Become a MacRumors Supporter for $50/year with no ads, ability to filter front page stories, and private forums.
Status
The first post of this thread is a WikiPost and can be edited by anyone with the appropiate permissions. Your edits will be public.

wlagarde

macrumors member
Dec 1, 2018
84
67
Dear All -

I may have a solution for the backlight intensity issue. I have been using my oscilloscope to probe around and explore the backlight board on my 2011 iMac 27 to understand how the backlight intensity is controlled. The answer is PWM. The PWM frequency is 13kHz, pulse height 3.25V, and the duty cycle of the 13kHz square wave pulses when varied from 0 to 100% adjusts the screen intensity from minimum to maximum. When a non Apple video card is used the lack of an appropriate EFI on the card results in a duty cycle delivered to the input of the backlight board to be 100%. Should be able to purchase a PWM controller that runs on 12VDC (get power fro 12V power supply rail on iMac PS) and produces a 3.25V height square wave pulse repeated at 13kHz and duty cycle varied by a potentiometer on the unit. I have traced the PWM input wires from the backlight board back to the logic board. Plan to cut this to isolate the logic board PWM output from the backlight board PWM input. Then will feed the purchased PWM controller output into the backlight board PWM input and bury the purchased controller inside the iMac. Would then set backlight intensity to about 50-60%, close up the iMac and use brightness slider app to provide the rest of the needed adjustability. Should work like a charm. Will report back with detailed how to guide with pictures if I am successful.

Bill
Dear all -

Reporting back and I have good news - I have successful backlight control! The method I describe above works like a charm and the PWM module I used cost $8 and is available on Amazon. I'll followup later this weekend with a detailed how to guide with pictures, etc.

PS: As I type this I'm using using my 2011 iMac 27 upgraded with a Dell/Alienware NVIDIA GTX 765M 2GB (vBIOS 80.06.61.00.01) with backlight control, i7 3.4Ghz CPU, 32MB ram with Mojave successfully installed and running flawlessly. The heat reduction achieved by having backlight control is very noticeable.

Bill
 
Last edited:

passatgt

macrumors 6502a
Jun 16, 2011
541
433
So, I have had the 2011 for a little while and I love it so far.

I now have that Dell Alienware card everyone recommends. What all parts of it need thermal paste? What all types of paste are needed and what do you all use for the white gummy stuff? Also, what mods if any happen to the heatsink?

For the time being, mine works and I am going to leave it as is until I get everything I need. I will say running a nice SSD and 16gb of ram makes it pretty awesome.

You can read thermal paste reviews online, but honestly theres minimal difference. Just buy a branded one and you are good to go. About the white gummy stuff, i used thermal pads instead, 1mm and 0.5mm thick: https://www.amazon.com/Arctic-Therm...d=1544264487&sr=8-3&keywords=thermal+pads+1mm (you can get this a lot cheaper on Aliexpress, if you have time). For the memory chips the 1mm thick worked fine, but i added the 0.5mm on the other, smaller chips too, so covered basically the whole thing with it.

For the back of the card if theres memory chips on it, you can use 0.8 or 1mm thick copper shims with thermal double sided tape to attach it: https://www.aliexpress.com/item/20-...552.html?spm=a2g0s.9042311.0.0.6cfe4c4dY9rAaa

But i did not install this yet and temps look fine so not sure if its required. But certainly won't cause any harm :)

About the heatsink, you need to grind a bit off at the top, where the new card's chips touch the heatsink. You can find pictures of this in the thread if you read back. Also, the old mounting bracket won't be compatible, so you either need to grind that in places so it sits flush on the new card, or just get a compatible bracket for your new card(the holes are at the same place, just the inner shape is different on the factory version)
 

FlorisVN

macrumors 6502a
Nov 8, 2013
979
380
So, I have had the 2011 for a little while and I love it so far.

I now have that Dell Alienware card everyone recommends. What all parts of it need thermal paste? What all types of paste are needed and what do you all use for the white gummy stuff? Also, what mods if any happen to the heatsink?

For the time being, mine works and I am going to leave it as is until I get everything I need. I will say running a nice SSD and 16gb of ram makes it pretty awesome.

As posted many times before.
But here again you need K5 Pro thermal pasta, I highly reccomend it !
It's way better then thermal pads, it is k5 pro comes closest to Apple's own thermal paste..
I have tested both, and K5 is a definite winner here !
It is also special made for iMac, and tested for iMac mxm video cards.

I use Artic MX4 for thermal paste, but you can of course also use K4 for this.


See following link as examples :
http://www.computer-systems.gr/en/content/k5-pro
https://www.amazon.com/CS-LABS-Thermal-replacement-K5-PRO/dp/B01H3D9ZE8

You can go up to 32GB of ram, and run dual SSD's if wanted...
Even triple when you remove the super drive...

[doublepost=1544267512][/doublepost]
Dear all -

Reporting back and I have good news - I have successful backlight control! The method I describe above works like a charm and the PWM module I used cost $8 and is available on Amazon. I'll followup later this weekend with a detailed how to guide with pictures, etc.

PS: As I type this I'm using using my 2011 iMac 27 upgraded with a Dell/Alienware NVIDIA GTX 765M 2GB (vBIOS 80.06.61.00.01) with backlight control, i7 3.4Ghz CPU, 32MB ram with Mojave successfully installed and running flawlessly. The heat reduction achieved by having backlight control is very noticeable.

Bill

Thats great news !
Can you tell us how you did it or make some pictures or something.. ?
Some more technical details.. ?
 
Last edited:

wlagarde

macrumors member
Dec 1, 2018
84
67
Backlight Control

Background:
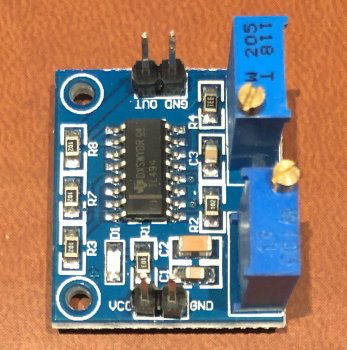
The 2011 iMac display backlight system uses pulse-width-modulation (PWM) to control backlight intensity. A PWM control signal is generated within the logic board-video card circuit and routed to the PWM input on the backlight board. The PWM frequency is 13KHz and the pulse height is 3.25V. The duty cycle is varied from 0 to 100% to adjust backlight intensity from minimum to maximum. When a non-Apple video card is installed that lacks a proper EFI, the logic board-video card circuit outputs a duty cycle of 100% resulting in maximum backlight intensity which reduces contrast and generates extra heat. The solution is to isolate the logic board-video card and backlight board circuits from one another (cut the wire that connects them) and feed a desired duty cycle PWM signal into the backlight board PWM input using a low-cost PWM module based upon the Texas Instruments TL494 IC.

You will need the following supplies:
1. TL494 PWM module (purchase from Amazon)
2. Wire (black for ground, red for 12V power, and 3rd color for PWM signal)
3. 1/4W Resistors – 1 x 1.8K and 1 x 6.8K

You will need the following tools:
1. Oscilloscope that has a bandwidth of 15KHz or greater and can measure frequency
2. Multimeter
3. Soldering iron and solder
4. 12V DC power supply

Step 1:
Solder the 1.8K resistor to the “OUT” pin, solder the 6.8K resistor to the “GND” pin adjacent to the “OUT” pin. Solder the other end of each resistor together. Note: This creates a voltage divider that reduces the output of the PWM module from 5V peak-peak to the backlight board required 3.25V peak to peak. The PWM output will be the connection between the two resistors and this will be fed to the PWM input on the backlight board.
PWM.jpeg

Step 2:
Connect the positive power supply lead to the “VCC” pin and the negative power supply lead to the to the “GND” pin adjacent to the “VCC” pin. Connect your oscilloscope to the PWM output and it’s adjacent “GND” pin. Adjust the two potentiometers on the PWM unit to achieve a frequency of 13KHz and duty cycle of 50%. Note: This will achieve a backlight intensity of 50%. If you want higher or lower backlight level adjust duty cycle accordingly.
Osc.jpeg

Step 3:
Remove backlight board and disconnect all connectors. Solder wires onto the board as pictured. Note:Red wire is 12V DC power, black wire is ground, and blue wire is PWM signal.
Backlight_1.jpeg
Backlight_2.jpeg

Step 4:
Identify which wire is carrying PWM signal from logic board to backlight board and cut this wire on the wiring harness: Look at the female connector on the backlight board and identify the pin on the connector that is soldered to the blue wire. Look at the male connector on the wiring harness that connects to the backlight board to the power supply and identify the corresponding pin. Locate this wire and pull it through the sleeve on the wiring harness to identify which wire needs to be cut. Once cut, use multimeter on ohms setting to confirm the correct wire is cut. Note: Where the backlight board wiring harness connects to the power supply you will see two wires that don’t connect to the power supply but travel onward in the harness to the logic board. One of these is the “PWM signal” wire and the other is the “Backlight ON” wire.
PWM Sig_1.jpeg
PWM Sig_2.jpeg

Step 5:
Install PWM module, route wires, and solder wires to PWM module as pictured. Note: The red wire goes to the “VCC” pin, the black wire to the “GND” pin, and the blue wire to the PWM output lead between the two resistors created in step 1.
Wiring_1.jpeg
Wiring_2.jpeg
Wiring_3.jpeg

Step 6:
Reinstall LCD screen but do not yet install the LCD screws. Power on and boot iMac into macOS and adjust brightness with Brightness Slider App to determine if the range of brightness adjustability is where you want it. You can adjust potentiometer labeled D to increase or decrease the duty cycle to adjust the maximum backlight level to your liking (the potentiometer labeled “F” adjusts the PWM frequency – be careful not to change it). Reinstall LCD screws and screen glass. Congratulations - you’re done!
 

Attachments

  • image.png
    image.png
    214.2 KB · Views: 587
Last edited:

passatgt

macrumors 6502a
Jun 16, 2011
541
433
Backlight Control

Step 1:
Solder the 1.8K resistor to the “OUT” pin, solder the 6.8K resistor to the “GND” pin adjacent to the “OUT” pin. Solder the other end of each resistor together. Note: This creates a voltage divider the reduces the output of the PWM module from 5V to the backlight board required 3.25V. The PWM output will be the connection between the two resistors and this will be fed to the PWM input on the backlight board.
View attachment 809421

We should find the part number for the male and female connector and create a short extender, so theres no need for soldering or cutting wires.

Edit: looks like its just a simple 6 Pin PCIe power cable?

0-2m-pcie-6-pin-female-to-male-extension-cable-p8813-6394_zoom.jpg
 
Last edited:
  • Like
Reactions: weckart

wlagarde

macrumors member
Dec 1, 2018
84
67
We should find the part number for the male and female connector and create a short extender, so theres no need for soldering or cutting wires.

That's a good idea. It's a 6-Pin power connector. A Y-connector would work even better...
[doublepost=1544291272][/doublepost]
We should find the part number for the male and female connector and create a short extender, so theres no need for soldering or cutting wires.

Edit: looks like its just a simple 6 Pin PCIe power cable?

0-2m-pcie-6-pin-female-to-male-extension-cable-p8813-6394_zoom.jpg
[doublepost=1544291321][/doublepost]Yup - that's it.

IMG_0803.jpeg
 

wlagarde

macrumors member
Dec 1, 2018
84
67
That's a good idea. It's a 6-Pin power connector. A Y-connector would work even better...
[doublepost=1544291272][/doublepost]
[doublepost=1544291321][/doublepost]Yup - that's it.

View attachment 809449
Here is another option (longer and black color matches better): https://www.amazon.com/gp/product/B01DV1Z4EQ/ref=ox_sc_act_title_1_1_2?smid=A1AMUYYA3CT6HJ&psc=1
[doublepost=1544297242][/doublepost]Also, I reviewed this entire thread and cataloged which vBIOS versions and cards have been reported to be successful:
Screen Shot 2019-01-20 at 9.57.56 PM.png
 
Last edited:

tschuuuls

macrumors newbie
Jul 7, 2017
15
0
Backlight Control
[...]
Did you reverse engineer the backlight by probing some things, or do you have a schematic?
I've read that some people had working backlight control in Windows, so i hope it's also "natively" (without modding the wiring) possible on osx.

Do you know where the backlight signal is created? Does it use DDC/CI (DisplayPort Control interface) or is it a seperate thing?
 

wlagarde

macrumors member
Dec 1, 2018
84
67
Did you reverse engineer the backlight by probing some things, or do you have a schematic?
I've read that some people had working backlight control in Windows, so i hope it's also "natively" (without modding the wiring) possible on osx.

Do you know where the backlight signal is created? Does it use DDC/CI (DisplayPort Control interface) or is it a seperate thing?

Reverse engineered at the level of the backlight board. This solution will work for both osx and windows as it bypasses software control of the backlight.
 
  • Like
Reactions: T'hain Esh Kelch

FlorisVN

macrumors 6502a
Nov 8, 2013
979
380
Here is another option (longer and black color matches better): https://www.amazon.com/gp/product/B01DV1Z4EQ/ref=ox_sc_act_title_1_1_2?smid=A1AMUYYA3CT6HJ&psc=1
[doublepost=1544297242][/doublepost]Also, I reviewed this entire thread and cataloged which vBIOS versions and cards have been reported to be successful:
View attachment 809471
1TDP and performance comparable to 6970M
1Dell 5YPW3 Nvidia GTX 765M 2GB GDDR5 Graphics MXM 3.0 Alienware M17x M18x available on eBay
2Listed for TDP reference

I'm not sure about the GTX770m aswell as the GTX980m.
GTX770m has been repported to not work properly, and seems to be throtheling heavily in performance.
This has been repported here as far as I can remember..

And didn't the GTX980m only worked with an external display, but not the internal iMac lcd ?
I could be wrong here of course, but i think this has been repported here..

As far as I am aware, the GTX765m and the GTX780m and the best working known cards..
 

wlagarde

macrumors member
Dec 1, 2018
84
67
I'm not sure about the GTX770m aswell as the GTX980m.
GTX770m has been repported to not work properly, and seems to be throtheling heavily in performance.
This has been repported here as far as I can remember..

And didn't the GTX980m only worked with an external display, but not the internal iMac lcd ?
I could be wrong here of course, but i think this has been repported here..

As far as I am aware, the GTX765m and the GTX780m and the best working known cards..

I think you are correct - probably best to delete the 770 and 980 from the list as they don't provide practical functionality. I also deleted the 675 as the vBIOS version is unknown.
 
Last edited:

FlorisVN

macrumors 6502a
Nov 8, 2013
979
380
I think you are correct - probably best to delete the 765 and 780 from the list as they don't provide practical functionality. I also deleted the 675 as the vBIOS version is unknown.

Well the GTX765m aswell as the GTX780m Dell/Alienware versions are known working !
So I would suggest you keep them on your repported succesfull list..

I would suggest you to consider removing the GTX770m aswell as the GTX980m...

But looking at the screenshot, it looks good to me now that list !
 

wlagarde

macrumors member
Dec 1, 2018
84
67
Well the GTX765m aswell as the GTX780m Dell/Alienware versions are known working !
So I would suggest you keep them on your repported succesfull list..

I would suggest you to consider removing the GTX770m aswell as the GTX980m...

But looking at the screenshot, it looks good to me now that list !

I updated the list accordingly...
 
  • Like
Reactions: FlorisVN

FlorisVN

macrumors 6502a
Nov 8, 2013
979
380
@highvoltage12v

How is your GTX770m project going.. ?
as far as I could remember you had some major performance throtteling going on.. ?
Did you installed it in your 21,5 inch 2011 iMac.. ?

I am just curious...

I thought 21,5 inch versions heatsink does not support MXM-B cards, only MXM-A cards.. ?
Since the heatsink is too small in that one.. ?

Or is it possible to upgrade the heatsink in the 21,5 inch version to a larger MXM-B version.. ?
I don't remember anymore...
 

bmillz

macrumors member
Jul 7, 2018
50
83
PA, USA
@highvoltage12v

How is your GTX770m project going.. ?
as far as I could remember you had some major performance throtteling going on.. ?
Did you installed it in your 21,5 inch 2011 iMac.. ?

I am just curious...

I thought 21,5 inch versions heatsink does not support MXM-B cards, only MXM-A cards.. ?
Since the heatsink is too small in that one.. ?

Or is it possible to upgrade the heatsink in the 21,5 inch version to a larger MXM-B version.. ?
I don't remember anymore...
I consulted with @highvoltage12v before I purchased my 770m. He told me that he suspected the throttling issue was only a concern with the 21.5 in. I’ve had mine in my Late 2009 27 in. for about a month now and I haven’t had any issues. However, I’m not very versed in how to test if for throttling. Any ideas? I only use MacOS as I don’t currently have a Boot Camp installation, so I can’t tell. I’ll check though if you could point me in the right direction.
 

FlorisVN

macrumors 6502a
Nov 8, 2013
979
380
I consulted with @highvoltage12v before I purchased my 770m. He told me that he suspected the throttling issue was only a concern with the 21.5 in. I’ve had mine in my Late 2009 27 in. for about a month now and I haven’t had any issues. However, I’m not very versed in how to test if for throttling. Any ideas? I only use MacOS as I don’t currently have a Boot Camp installation, so I can’t tell. I’ll check though if you could point me in the right direction.

Hi, Thanks for your info !
This is usefull for the community.
I suppose the 21,5inch does not have enough power left for the mxm slot.
maybay only 75 Watts ?
And the GTX770m and GTX780m use 100 Watt of power I think... ?

Anyway, you could run some benchmarks like heaven benchmark, and Cinebench GPU benchmark.
Post your results here !
For example my GTX765m gave about 59 fps in Cinebench GPU (OpenGL) benchmark, your GTX770m should get a higher score I suppose..
 

Attachments

  • Schermafbeelding 2018-12-01 om 17.18.50.png
    Schermafbeelding 2018-12-01 om 17.18.50.png
    292.1 KB · Views: 314
  • Like
Reactions: highvoltage12v

highvoltage12v

macrumors 6502a
Mar 27, 2014
926
931
I consulted with @highvoltage12v before I purchased my 770m. He told me that he suspected the throttling issue was only a concern with the 21.5 in. I’ve had mine in my Late 2009 27 in. for about a month now and I haven’t had any issues. However, I’m not very versed in how to test if for throttling. Any ideas? I only use MacOS as I don’t currently have a Boot Camp installation, so I can’t tell. I’ll check though if you could point me in the right direction.
The issue seems related to the fact that its in a 21.5" and the power supply or something related to power delivery is stopping the card from hitting 'boost'. I have shelved the iMac for now. I will dump the ROM from it if you want. But all I did was make the ram run at full speed to help with some animation lag.
 
  • Like
Reactions: FlorisVN

FlorisVN

macrumors 6502a
Nov 8, 2013
979
380
The issue seems related to the fact that its in a 21.5" and the power supply or something related to power delivery is stopping the card from hitting 'boost'. I have shelved the iMac for now. I will dump the ROM from it if you want. But all I did was make the ram run at full speed to help with some animation lag.

I think 75 Watts could be the limit of the 21,5inch iMac.
Then the GTX765m could be your best choice I think..
 

highvoltage12v

macrumors 6502a
Mar 27, 2014
926
931
I think 75 Watts could be the limit of the 21,5inch iMac.
Then the GTX765m could be your best choice I think..
Is it worth it to take the iMac back apart to buy/install a 765m? I have brightness control in Windows with the 770m, Do you know if the 765m will perform the same in Windows?
 

FlorisVN

macrumors 6502a
Nov 8, 2013
979
380
Is it worth it to take the iMac back apart to buy/install a 765m? I have brightness control in Windows with the 770m, Do you know if the 765m will perform the same in Windows?

Well, in my opinion if you want a working 21,5inch under MacOS, I think GTX765m is the best option..

GTX765m did not worked with brighness under Bootcamp, for me (tested on 27")
At least what i have tested with bootcamp, it did not give me a screen at all, just only on external monitor.

I don't know if this is the answer you are looking for.. ?

I never found a way to get internal iMac screen to work with GTX765m, at least not yet..
As far as I could remeber you made an Windows 10 EFi install and that worked good.. ?
 
Last edited:

highvoltage12v

macrumors 6502a
Mar 27, 2014
926
931
Well, in my opinion if you want a working 21,5inch under MacOS, I think GTX765m is the best option..

GTX765m did not worked with brighness under Bootcamp, for me (tested on 27")
At least what i have tested with bootcamp, it did not give me a screen at all, just only on external monitor.

I don't know if this is the answer you are looking for.. ?

I never found a way to get internal iMac screen to work with GTX765m, at least not yet..
As far as I could remeber you made an Windows 10 EFi install and that worked good.. ?
On my windows 10 install I went back to MBR because I couldn't get audio working.

So I cloned my drive from my 27" iMac (780m) over the 21.5 (770m) iMac and now it too can wake from sleep. I'm not sure what kext change I made that allows this to happen but it works. Could it be the deactivated Nvidia web drivers installed that are allowing this?
 
Last edited:

arkieboy72472

macrumors regular
May 4, 2017
128
29
A quick follow up to this, you need to slightly modify the 6970 Heatsink to clear a few capacitors but it’s fits fine, marked areas need filing flush with the rest of the Heatsink

So, if I do this, THIS is the mod that has to be done to make it all work?
 
Register on MacRumors! This sidebar will go away, and you'll see fewer ads.