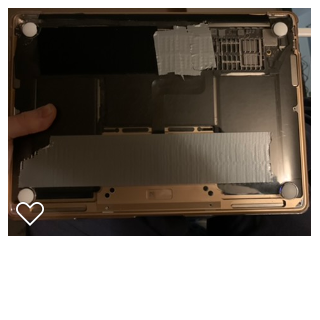
I’ve received it 3 days ago. Ordered about 2-5 weeks ago (can’t say the exact date, as it was ordered by my company’s IT). It’s a European model, not sure if it came from Holland or Germany.@DanSilov how long ago did you order your machine & delivery and where did it come from.
Got a tip for us?
Let us know
Become a MacRumors Supporter for $50/year with no ads, ability to filter front page stories, and private forums.
2020 Air Heatsink Modification Thread
- Thread starter ilikewhey
- Start date
- Sort by reaction score
You are using an out of date browser. It may not display this or other websites correctly.
You should upgrade or use an alternative browser.
You should upgrade or use an alternative browser.
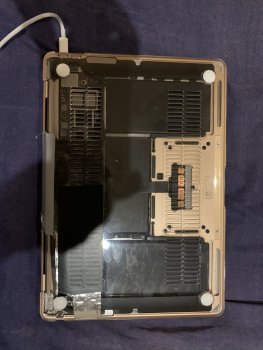
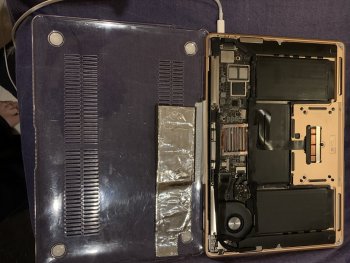
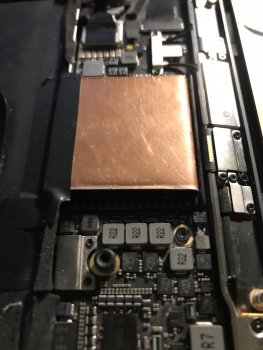
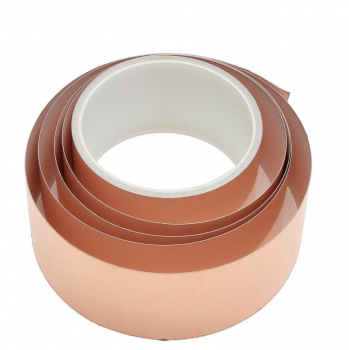
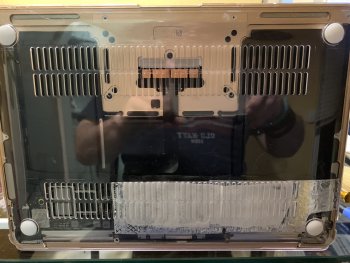
I now the phase of the super polished wedge, the radiator fins and the sealing of the wind tunnel, I am focused on making my own cover... Now I am diverting the heat from the cpu to the fan because with the heat that is here in Barcelona it burns my belly... I am waiting for a roll of adhesive copper tape.
But... there's another problem...
You see, the CPU radiates heat to the heat sink but... it's upside down! That means the other side of the plate must be very hot. After this invention, I see that the top part of the frame of the keyboard gets hotter!!! and it's logical, the heat always goes up...
But... there's another problem...
You see, the CPU radiates heat to the heat sink but... it's upside down! That means the other side of the plate must be very hot. After this invention, I see that the top part of the frame of the keyboard gets hotter!!! and it's logical, the heat always goes up...
Attachments
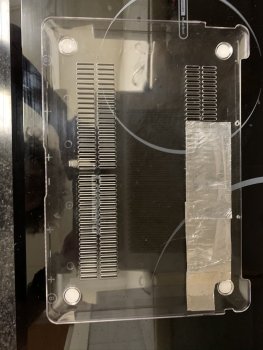
Personally, I would recommend using this strip to direct airflow under the plastic case. For example, to make a "border" between the fan and the other row of holes.I now the phase of the super polished wedge, the radiator fins and the sealing of the wind tunnel, I am focused on making my own cover... Now I am diverting the heat from the cpu to the fan because with the heat that is here in Barcelona it burns my belly... I am waiting for a roll of adhesive copper tape.
But... there's another problem...
You see, the CPU radiates heat to the heat sink but... it's upside down! That means the other side of the plate must be very hot. After this invention, I see that the top part of the frame of the keyboard gets hotter!!! and it's logical, the heat always goes up...
Thanks for your efforts and clear posting @DanSilovI've recently received new and shiny MBA 2020 i7/16GB/1TB to replace my much loved and trusted MBA 2015 i7. But I was very disappointed to find out the extent of the throttling issue — my single-core Geekbench scores varied between 1100s and 900s after multiple runs, which is a big difference, considering that my old MBA 2015 consistently pulled ~850 on the single core. Soon I found this thread and decided to try the copper shim mod.
Modification process
After I've removed the back cover and the heatsink, I've discovered the familiar blob of the black paste that everyone here has seen already.
View attachment 915469
From the looks of it the paste started to dry out already and cracked a bit. I don't think this will be a good heat conductor in the long run.
View attachment 915470
Removing the paste I've noticed what some have mentioned here — it is very thick.
View attachment 915471
Then I've applied some Arctic Silver on both dies in a thin layer (half a grain of rice). Initially I wanted to test just the thermal paste replacement, without the copper mod. But below you can see the result of placing the heatsink on top of the CPU that has been covered with Arctic Silver.
View attachment 915472
The gap is so big that it doesn't even touch the CPU! And here I am thinking that heatsink has to touch the CPU die.
So I've added copper shims to the mix. I've had some 15x15x0.3mm, and it turned out to be more than enough. As soon as I've placed the heatsink with the shims, it immediately stuck to the Arctic Silver.
Testing
I wanted to be thorough, so I made a lot of tests before and after the mod, under similar conditions. My macOS is fully fresh, I didn't migrate to it just yet, so there are no apps, nothing.
I've idled before every Cinebench run and before the first Geekbench run until temperatures reached low values. I've also tested with the maximum fan speed (8k) with TG Pro to see how that affects the results, because the system usually increases the fan speed quite slowly.
Here are a lot of screenshots for those of you who'd like to see some context. All results are summarized in a table below.
Before
Idle
View attachment 915478
Geekbench 1st run
View attachment 915473 View attachment 915474
After
Idle
View attachment 915481
Geekbench 1st run
View attachment 915479 View attachment 915480
Results
Single-Core
(before)Multi-Core
(before)Single-Core
(after)Multi-Core
(after)Geekbench
(1st run)1169 2621 1265 (+8%) 3397 (+30%) Geekbench
(2nd run)1006 2473 1174 (+17%) 3046 (+23%) Geekbench
(3rd run)1078 2606 1176 (+9%) 3022 (+16%) Geekbench
(max fan)1238 3212 1264 (+2%) 3765 (+17%) Cinebench - 903 - 1056 (+17%) Cinebench
(max fan)- 1029 - 1141 (+11%)
Single-core results are significant, but multi-core results are dramatic! What's more, during the tests I could clearly see that the CPU temperature doesn't jump to 100°C instantly with the copper shim added (I'll attach some extra screenshots in the post below).
Single-core performance is practically maxed with the copper shim, and the temperature doesn't reach full 100°C during the first half of the Geekbench test anymore.
I don't know, if this is an oversight on Apple's part or a simple way to save a few extra bucks during the assembly — putting some think paste and screwing the heatsink that doesn't touch the CPU is faster and safer, of course — but it just shows that that CPU in MBA 2020 can behave much better even without the complete redesign of the cooling system.
[automerge]1589581897[/automerge]
And here are a couple more screenshots showing the temperature charts during the Cinebench testing. It's obvious that with the copper shim installed the temperature doesn't rises so dramatically, which in the real life scenarios might keep the CPU cooler for much longer.
Before the shim mod
View attachment 915487
After the mod
View attachment 915486
Based on all the tryouts, i am wondering if there are actual two flaws. First the heatsink not in proper contact with the core, and second a restriction of airflow at the fan intake. It seems for me that Srkit changed the spacing between the fan and base cover by using the plastic one.
Yesterday, while adding the copper shim, I was wondering if it would be possible to somehow connect the heatsink to the backplate and dissipate some additional heat this way. Of course this might make the it very uncomfortable to hold the MBA on the lap under load, but I still wanted to try.
It's interesting, that the backplate has a special insulation pad right above the heatsink to actually protect you from the heat. I decided not to remove it, but instead place an additional thermal pad between the backplate and the heatsink. It's about 2mm thick.


Then I've made another Geekbench run after running idle for about 15 minutes (CPU temp reached 40°C). The multi-core score after that? 3841! This is a whopping +47% increase compared to the original setup!
Also, here's the comparison of the load/temp curves in the Intel Power Gadget right after that 1st Geekbench run.

One last thing I want to try is the Kryonaut thermal paste, which I've just ordered. Should be here in about a week, I will rerun all the tests then.
It's interesting, that the backplate has a special insulation pad right above the heatsink to actually protect you from the heat. I decided not to remove it, but instead place an additional thermal pad between the backplate and the heatsink. It's about 2mm thick.
Then I've made another Geekbench run after running idle for about 15 minutes (CPU temp reached 40°C). The multi-core score after that? 3841! This is a whopping +47% increase compared to the original setup!
Also, here's the comparison of the load/temp curves in the Intel Power Gadget right after that 1st Geekbench run.
One last thing I want to try is the Kryonaut thermal paste, which I've just ordered. Should be here in about a week, I will rerun all the tests then.
Yesterday, while adding the copper shim, I was wondering if it would be possible to somehow connect the heatsink to the backplate and dissipate some additional heat this way. Of course this might make the it very uncomfortable to hold the MBA on the lap under load, but I still wanted to try.
It's interesting, that the backplate has a special insulation pad right above the heatsink to actually protect you from the heat. I decided not to remove it, but instead place an additional thermal pad between the backplate and the heatsink. It's about 2mm thick.
View attachment 915609 View attachment 915610
Then I've made another Geekbench run after running idle for about 15 minutes (CPU temp reached 40°C). The multi-core score after that? 3841! This is a whopping +47% increase compared to the original setup!
Also, here's the comparison of the load/temp curves in the Intel Power Gadget right after that 1st Geekbench run.
View attachment 915616
One last thing I want to try is the Kryonaut thermal paste, which I've just ordered. Should be here in about a week, I will rerun all the tests then.
That's fascinating. Have you got an IR thermometer so you could test bottom case heat with your third scenario?
Unbelievable! I tried a copper tunnel and it worked because more air passed through than with the original cover. But I was burning my legs... that's why now with the transparent protection cover I try with copper tape to take that heat to the top of the fan. If you want you can try it!! take the cover and put aluminum stuck from the top of the cpu to the fan and instead of sticking it directly on the cover you put something that absorbs the heat like plastic, cardboard etc etc and on top the aluminum strip. I am testing the transparent cover and it is much better than working with the original... also it is very nice to see the inside and it is not thicker.Yesterday, while adding the copper shim, I was wondering if it would be possible to somehow connect the heatsink to the backplate and dissipate some additional heat this way. Of course this might make the it very uncomfortable to hold the MBA on the lap under load, but I still wanted to try.
It's interesting, that the backplate has a special insulation pad right above the heatsink to actually protect you from the heat. I decided not to remove it, but instead place an additional thermal pad between the backplate and the heatsink. It's about 2mm thick.
View attachment 915609 View attachment 915610
Then I've made another Geekbench run after running idle for about 15 minutes (CPU temp reached 40°C). The multi-core score after that? 3841! This is a whopping +47% increase compared to the original setup!
Also, here's the comparison of the load/temp curves in the Intel Power Gadget right after that 1st Geekbench run.
View attachment 915616
One last thing I want to try is the Kryonaut thermal paste, which I've just ordered. Should be here in about a week, I will rerun all the tests then.
Attachments
This is crazy, I'm really disappointed. How could Apple be so careless? If it's just a matter of thermal paste, it wouldn't have taken anything to deliver a better product.I've recently received new and shiny MBA 2020 i7/16GB/1TB to replace my much loved and trusted MBA 2015 i7. But I was very disappointed to find out the extent of the throttling issue — my single-core Geekbench scores varied between 1100s and 900s after multiple runs, which is a big difference, considering that my old MBA 2015 consistently pulled ~850 on the single core. Soon I found this thread and decided to try the copper shim mod.
Modification process
After I've removed the back cover and the heatsink, I've discovered the familiar blob of the black paste that everyone here has seen already.
View attachment 915469
From the looks of it the paste started to dry out already and cracked a bit. I don't think this will be a good heat conductor in the long run.
View attachment 915470
Removing the paste I've noticed what some have mentioned here — it is very thick.
View attachment 915471
Then I've applied some Arctic Silver on both dies in a thin layer (half a grain of rice). Initially I wanted to test just the thermal paste replacement, without the copper mod. But below you can see the result of placing the heatsink on top of the CPU that has been covered with Arctic Silver.
View attachment 915472
The gap is so big that it doesn't even touch the CPU! And here I am thinking that heatsink has to touch the CPU die.
So I've added copper shims to the mix. I've had some 15x15x0.3mm, and it turned out to be more than enough. As soon as I've placed the heatsink with the shims, it immediately stuck to the Arctic Silver.
Testing
I wanted to be thorough, so I made a lot of tests before and after the mod, under similar conditions. My macOS is fully fresh, I didn't migrate to it just yet, so there are no apps, nothing.
I've idled before every Cinebench run and before the first Geekbench run until temperatures reached low values. I've also tested with the maximum fan speed (8k) with TG Pro to see how that affects the results, because the system usually increases the fan speed quite slowly.
Here are a lot of screenshots for those of you who'd like to see some context. All results are summarized in a table below.
Before
Idle
View attachment 915478
Geekbench 1st run
View attachment 915473 View attachment 915474
After
Idle
View attachment 915481
Geekbench 1st run
View attachment 915479 View attachment 915480
Results
Single-Core
(before)Multi-Core
(before)Single-Core
(after)Multi-Core
(after)Geekbench
(1st run)1169 2621 1265 (+8%) 3397 (+30%) Geekbench
(2nd run)1006 2473 1174 (+17%) 3046 (+23%) Geekbench
(3rd run)1078 2606 1176 (+9%) 3022 (+16%) Geekbench
(max fan)1238 3212 1264 (+2%) 3765 (+17%) Cinebench - 903 - 1056 (+17%) Cinebench
(max fan)- 1029 - 1141 (+11%)
Single-core results are significant, but multi-core results are dramatic! What's more, during the tests I could clearly see that the CPU temperature doesn't jump to 100°C instantly with the copper shim added (I'll attach some extra screenshots in the post below).
Single-core performance is practically maxed with the copper shim, and the temperature doesn't reach full 100°C during the first half of the Geekbench test anymore.
I don't know, if this is an oversight on Apple's part or a simple way to save a few extra bucks during the assembly — putting some think paste and screwing the heatsink that doesn't touch the CPU is faster and safer, of course — but it just shows that that CPU in MBA 2020 can behave much better even without the complete redesign of the cooling system.
[automerge]1589581897[/automerge]
And here are a couple more screenshots showing the temperature charts during the Cinebench testing. It's obvious that with the copper shim installed the temperature doesn't rises so dramatically, which in the real life scenarios might keep the CPU cooler for much longer.
Before the shim mod
View attachment 915487
After the mod
View attachment 915486
I think I'll end doing the same as you on my i7.
did you mean, apple noticed this issue and adjusted the assembly? sorry did not get it.To begin with, that heatsink is copper, not aluminum ... and if it seems that they have noticed the error and there is less distance ...
I am interested in MBA 2020 and closely watching this thread (otherwise very happy with MBA 2017)
Yesterday, while adding the copper shim, I was wondering if it would be possible to somehow connect the heatsink to the backplate and dissipate some additional heat this way. Of course this might make the it very uncomfortable to hold the MBA on the lap under load, but I still wanted to try.
It's interesting, that the backplate has a special insulation pad right above the heatsink to actually protect you from the heat. I decided not to remove it, but instead place an additional thermal pad between the backplate and the heatsink. It's about 2mm thick.
View attachment 915609 View attachment 915610
Then I've made another Geekbench run after running idle for about 15 minutes (CPU temp reached 40°C). The multi-core score after that? 3841! This is a whopping +47% increase compared to the original setup!
Also, here's the comparison of the load/temp curves in the Intel Power Gadget right after that 1st Geekbench run.
View attachment 915616
One last thing I want to try is the Kryonaut thermal paste, which I've just ordered. Should be here in about a week, I will rerun all the tests then.
Maybe you could run the app Cinabench R20 before and after as well. Many YouTube reviews ran that on the MBA so you have a comparison now.
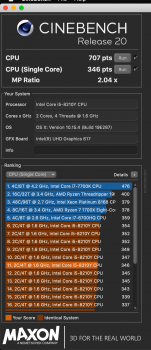
I've already found a way to get below 100° even on Cinebench! The fins of the heatsink I made contact with the metal adhesive of the lid and this ends up on top of the fan, as between the plastic of the lid and the adhesive I have put very thin foam the heat is not transmitted out of the lid. When I get the copper coil I will make it more aesthetic and even where I join copper with cpu fins I will put MX4 paste. The secret is to get the heat on top of the fan.
Attachments
You've got my fingers itching again 😝What kind of thermal pad did you use, and did you consider making it longer towards the fan?Yesterday, while adding the copper shim, I was wondering if it would be possible to somehow connect the heatsink to the backplate and dissipate some additional heat this way. Of course this might make the it very uncomfortable to hold the MBA on the lap under load, but I still wanted to try.
It's interesting, that the backplate has a special insulation pad right above the heatsink to actually protect you from the heat. I decided not to remove it, but instead place an additional thermal pad between the backplate and the heatsink. It's about 2mm thick.
View attachment 915609 View attachment 915610
Then I've made another Geekbench run after running idle for about 15 minutes (CPU temp reached 40°C). The multi-core score after that? 3841! This is a whopping +47% increase compared to the original setup!
Also, here's the comparison of the load/temp curves in the Intel Power Gadget right after that 1st Geekbench run.
View attachment 915616
One last thing I want to try is the Kryonaut thermal paste, which I've just ordered. Should be here in about a week, I will rerun all the tests then.
No, but I've check with my hands to see if it gets too hot during Cinebench tests. It was ok, but that's also because I didn't remove the insulation.That's fascinating. Have you got an IR thermometer so you could test bottom case heat with your third scenario?
[automerge]1589662055[/automerge]
You are much further down the road with experiments, I still need to keep my warranty, so trying only reversible mods for now. Plus, not sure about the plastic cover, original aluminium is thinner and it also should help dissipate some heat.I am testing the transparent cover and it is much better than working with the original... also it is very nice to see the inside and it is not thicker.
[automerge]1589662295[/automerge]
Thermal pad is regular, ordered on AliExpress quite some time ago. 2-3mm should be enough.You've got my fingers itching again 😝What kind of thermal pad did you use, and did you consider making it longer towards the fan?
As for making it longer, no, I think there's enough airflow as is. It can certainly be much better, but I can see that single-core performance is already close to the maximum, and multi-core performance is just a theoretical number, I won't be rendering too much stuff on MBA.
Last edited:
I'm thinking of getting this 14.5 W/mK thermal pad:Thermal pad is regular, ordered on AliExpress quite some time ago. 2-3mm should be enough.
As for making it longer, no, I think there's enough airflow as is. It can certainly be much better, but I can see that single-core performance is already close to the maximum, and multi-core performance is just a theoretical number, I won't be rendering too much stuff on MBA.

EC360® GOLD 14,5W/mK Wärmeleitpad (50 x 50 x 1,5 mm)
Die Wärmeleitpads der EC360 GOLD Serie bilden die Fortgeschrittenen-Variante im hoch-wärmeleitfähigen Segment, auf Augenhöhe mit Hochleistungs-Wärmeleitpasten. Mit einer herausragend hohen Wärmeleitfähigkeit von 14,5 W/mK, sind sie eine ausgezeichnete Wahl für eine Großzahl an Anwendungen. Anwe...
www.amazon.de
But I'm also wondering if we'd get better results by just folding tin foil or similar to a good thickness.
As an Amazon Associate, MacRumors earns a commission from qualifying purchases made through links in this post.
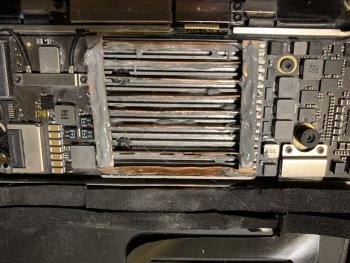
I've almost got it ready... all I have to do is put some adhesive copper and finish it off aesthetically, and then put in some screws. I have started from hibernation at 25º!
I have created overpressure at the air outlet as the turbine has a brutal flow at 8000rpm, now my navigation temperature at Chrome is 43º to 55º.
All the heat from the heatsink I've taken to the top of the turbine with the aluminum, with the copper it will be brutal!
I have created overpressure at the air outlet as the turbine has a brutal flow at 8000rpm, now my navigation temperature at Chrome is 43º to 55º.
All the heat from the heatsink I've taken to the top of the turbine with the aluminum, with the copper it will be brutal!
Attachments
I'm thinking of getting this 14.5 W/mK thermal pad:

EC360® GOLD 14,5W/mK Wärmeleitpad (50 x 50 x 1,5 mm)
Die Wärmeleitpads der EC360 GOLD Serie bilden die Fortgeschrittenen-Variante im hoch-wärmeleitfähigen Segment, auf Augenhöhe mit Hochleistungs-Wärmeleitpasten. Mit einer herausragend hohen Wärmeleitfähigkeit von 14,5 W/mK, sind sie eine ausgezeichnete Wahl für eine Großzahl an Anwendungen. Anwe...www.amazon.de
But I'm also wondering if we'd get better results by just folding tin foil or similar to a good thickness.
Why not get a 100x100 and cover more SA? Gently curious.
As an Amazon Associate, MacRumors earns a commission from qualifying purchases made through links in this post.
For me, the cost would go from €20 to €70, which I think is too high for an experimental mod. The heat sink is about 3.7 x 5.5 cm, so I'd only be losing 0.5 cm from the long side. This could be compensated by using the offcuts from the shorter side. I've also chosen a non-electrically conductive thermal pad that seems to have a high thermal conductivity which hopefully balances out the smaller surface area, but maybe someone knows of a better one.Why not get a 100x100 and cover more SA? Gently curious.
Last edited:
1080p 56º !!!
[automerge]1589670222[/automerge]
[automerge]1589670222[/automerge]
You are doing the opposite... between the radiator and the lid there must be space for the air to pass, bringing heat to the lid with thermal paste blocking the air flow is not the best option.For me, the cost would go from €20 to €70, which I think is too high for an experimental mod. The heat sink is about 3.7 x 5.5 cm, so I'd only be losing 0.5 cm from the long side. This could be compensated by using the offcuts from the shorter side. I've also chosen a thermal pad that seems to have a high thermal conductivity which hopefully balances out the smaller surface area, but maybe someone know's of a better one.
Attachments
An exceptional performance!! just cpu to move a video in 4k, with turbo bosst always running because the temperature is so low, here you have the graphics that even in a 4K video does not exceed 75 º and does not cut the power to the cpu. It's a 2019 MBA with an amazing performance! It could still lower the air pressure if the output was larger... it would lose pressure but gain flow.
Attachments
1080p 56º !!!
[automerge]1589670222[/automerge]
You are doing the opposite... between the radiator and the lid there must be space for the air to pass, bringing heat to the lid with thermal paste blocking the air flow is not the best option.
Hmmm good point. Don't wanna cover too much and efff up the airflow. We csan always get cute and create a strip from the heatsink towards the fan -> Ill try that. Getting the pads on Monday. My ETA keeps getting pushed back because of all the brilliant minds in this thread haha
Apple is using low watt processors in the Air. Stick that chip into the new Mac Pro’s sophisticated cooling system and it still won’t come close to a 13” MacBook Pro. It’s like comparing a 4-cylinder engine to a V-8.Long time reader, first time poster. Kudos to all the pioneers in this thread willing to push their new equipment and share the results!
As a MacBook Air 2010 owner, I've been reading this thread with a lot of interest. I was convinced the 2020 MacBook Air was finally going to be my next purchase. But I'm not sure.
Unfortunately, I think the MacBook Air's thermal design has been deliberately limited since the retina redesign (2018). Apple knows how to design thermally:
Reading around, not everyone has the same thermal issues like Max Tech. This appears to be down to poor thermal paste choice, poor thermal paste application, the large gap between CPU and heatsink. Likely, some customers have good thermal conductivity, and others not. Hopefully this doesn't turn into widespread CPU faults after years of high temperature usage.
- MacBook Airs had heat transfer or heat pipes from 2009 to 2017
- Some MacBook Pros even have dual fans in a 13" footprint
- Apple's engineering principles are that every part is deeply considered
I think there's many possible reasons why the Air's thermal design has faltered:
I really hope someone like OWC or iFixit could re-engineer a thermal heatpipe to retrofit to Airs, or perhaps sell an easy thermal kit with better CPU heatsink and paste to do away with shims. As it is, it is an embarrassment to the engineering prowess of Apple to have a thermal design like this easily surpassed with cheap paste and shims.
- Avoid 'Air' performance getting close to 'Pro' performance
- Build to a price, allowing manufacturers too much leeway
- Too much trust in Intel design envelopes
- Focus on iPhone/iPad ARM design and engineering (where the brightest minds at Apple go)
- Focus on ARM design for Mac (lack of dedicated GPUs and not using fastest on-market CPUs in any 13" MacBook chassis indicate laziness and end of lifecycle roadmap for current Air and Pro products)
MacBook Airs - History Lesson
Louis Rossmann's funny view on retina MacBook Air cooling:
- Original Design
- New Retina Design
Hi srkirt, my i7 heat sink has a different design that allows air to go through the "corrugated" heat sink, and the foam pad that is stuck on the bottom case seems to be there to stop air going over the heat sink; unless it's simply there to prevent the bottom case from getting too hot.You are doing the opposite... between the radiator and the lid there must be space for the air to pass, bringing heat to the lid with thermal paste blocking the air flow is not the best option.
@kinchee87, looking forward to the review, seems a few small steps make this great device even better!!I'm thinking of getting this 14.5 W/mK thermal pad:

EC360® GOLD 14,5W/mK Wärmeleitpad (50 x 50 x 1,5 mm)
Die Wärmeleitpads der EC360 GOLD Serie bilden die Fortgeschrittenen-Variante im hoch-wärmeleitfähigen Segment, auf Augenhöhe mit Hochleistungs-Wärmeleitpasten. Mit einer herausragend hohen Wärmeleitfähigkeit von 14,5 W/mK, sind sie eine ausgezeichnete Wahl für eine Großzahl an Anwendungen. Anwe...www.amazon.de
But I'm also wondering if we'd get better results by just folding tin foil or similar to a good thickness.
As an Amazon Associate, MacRumors earns a commission from qualifying purchases made through links in this post.
Register on MacRumors! This sidebar will go away, and you'll see fewer ads.


