Become a MacRumors Supporter for $50/year with no ads, ability to filter front page stories, and private forums.

RiaKoobcam

macrumors regular
Apr 17, 2020
225
289
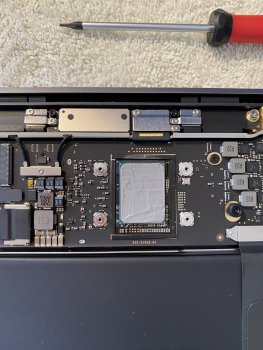
So, I did the mod today. I am not sure I applied paste correctly. I used Noctua NT-H2 for now. Anyone care to comment on how to apply paste correctly?
View attachment 922220
View attachment 922221
View attachment 922222
View attachment 922223

My only comment would be on your third photo - the 'pea-sized drop' method is recommended for heat sinks that have a very tight pressure tolerance. If you put a tiny drop on one of these CPU+heatsink combos, the pressure from the tight tolerance spreads it evenly.

With the gaps in the MBA's heatsink and the fact that the T3/4 screws on the heatsink don't ratchet it down super tight, spreading a very thin, even layer (using a credit card or something similar) tends to work better, but it probably won't make a huge difference.
 
  • Like
Reactions: octoviaa

Ghostrider72

macrumors member
May 24, 2020
50
11
I did the thermal pad only mod today. 1.5mm Arctic My size I cut was 45mm by 35mm from the 140 x 140 size. I could of saved a few bucks ordering a 50x50. It covered the majority of the heatsink. The heat sink is about 60x40 total.

Scores before Pad 1250+ 3400's to low 3,500, Not bad at all. i7 16GB 256SSD

Added 1.5mm Arctic Thermal pad 140x140mm way to much size but Amazon $14 Cut a piece 35mm x 45mm. 50x50 size would be perfect just measure 2x and cut once.

View attachment 921651
Upon applying your mod (1,5 thermal pad) did you have to remove the thermal isolation sponge that is located on the bottom plate of the laptop or did you just leave it there? And if this latter is the case, is still there a good thermal transfer from the thermal Arctic pad and the case? I understand this mod basically exploits the metal case as larger heatsink.
 

IngerMan

macrumors 68020
Feb 21, 2011
2,016
905
Michigan
Upon applying your mod (1,5 thermal pad) did you have to remove the thermal isolation sponge that is located on the bottom plate of the laptop or did you just leave it there? And if this latter is the case, is still there a good thermal transfer from the thermal Arctic pad and the case? I understand this mod basically exploits the metal case as larger heatsink.

No, Do not remove anything for this mod. I think part of the benefit of this mod is it forces the air through the corrugated heat sink vs overtop of it. I have not noticed any temperature difference on the bottom case, and my idle temps are the same as well with pad and without. At idle the fan is zero rpm so that makes sense. The big difference is when you push the laptop in multi core and the fans come on it’s more effective at cooling then with out the pad.


4) When applying the pad after cutting it to 35mmx45mm
a) Make sure there are no hanging chads.
b) Remove one side of the film and place it correctly on the heatsink, you can pick up and redo as needed.
c) Apply light amount of pressure with your finger tips like caressing a nipple, to seat the pad on the heatsink.
d) Remove the top side film
e) Done.
 
  • Like
Reactions: Ghostrider72

excelsior.ink

macrumors regular
Apr 15, 2020
134
78
My problem with the copper shim is that even if I get higher scores in Cinebench the idle temperature never goes down under 60. With just thermal paste applied it stay in the range of 50. I don't know what could be the explanation.
 

IngerMan

macrumors 68020
Feb 21, 2011
2,016
905
Michigan
My problem with the copper shim is that even if I get higher scores in Cinebench the idle temperature never goes down under 60. With just thermal paste applied it stay in the range of 50. I don't know what could be the explanation.

There are so many variables that could cause this, you really have to figure it out on your own.

shim should be free of burrs and flat. Clean the surfaces with isopropyl alcohol but make sure there is not excess fluid that can roll off the q-tip, so dab it on a lint free material like coffee filter. Shim should be fine polished on both sides, avoid oil from your fingers and use gloves. Use good thermal paste and spread it because the screws are to small to apply proper torque spreading a blob. Don’t use too much paste.

I’m sure there is more and there is plenty of risk. That’s why I did the pad only.

when you say idle at 60C. If you have all,I mean (Mail, Safari, etc) all programs closed except power gadget and you let it sleep for 20 minutes then wake it up (there will be an initial spike in temps) does it not show you are under 35C given your in a AC room below 23C?

If I idle with apps open Safari, Mail, power gadgets, I’m low 40,s but if I do above and close all I’m below 35c. In a 22C room.
 

vyruzreaper

macrumors regular
Jul 19, 2015
121
116
For those posting new results - can you post your config too? All the GB and CB scores need to have context around which processor, ram, and SSD configs.

Very exciting to see this community and thread keep growing. Great job :)
 

nill1234

macrumors 6502
Dec 22, 2012
311
215
Even if you didn't sand it perfectly and there are some grooves from sanding that's not a problem because those will be filled with the thermal paste, then use a credit card to put an almost even film on it like in the picture (keep in mind thats paste on my shim). If your scores are way higher with the shim mod then its working. What temperatures do you get during a Geekbench 5 test, are you hitting 100 degrees? @excelsior.ink
 

Attachments

  • A8C56F2B-F260-4965-858F-88AB31EAB963.jpeg
    A8C56F2B-F260-4965-858F-88AB31EAB963.jpeg
    495.1 KB · Views: 239
  • Like
Reactions: excelsior.ink

IngerMan

macrumors 68020
Feb 21, 2011
2,016
905
Michigan
For those posting new results - can you post your config too? All the GB and CB scores need to have context around which processor, ram, and SSD configs.

Very exciting to see this community and thread keep growing. Great job :)

How about putting it in your signature so its a one time type. See my signature

MBA CB with Pad.png MBA Compute Metal.png MBA GB W:Pad .png MBA Pad outline.png
 
Last edited:

excelsior.ink

macrumors regular
Apr 15, 2020
134
78
Thanks everyone for advice. @IngerMan and @nill1234
I've repasted using the card method and let it sit for a while. Now my idle temperature is about 40. It seems you
need to let the Mac sit for a while after changing the paste.

I now score ~1100 in Cinebench (stock I scored ~740). Temperature during test just briefly reaches 100 and fan is under 4000 rpm. This is a major improvement.

Most importantly, thanks to @Loog for sending me the shim. It worked and performance imrovement is 48%, which is massive.

Screenshot 2020-06-07 at 23.22.31.png


Idle:

Screenshot 2020-06-08 at 02.37.05.jpeg
 
Last edited:

excelsior.ink

macrumors regular
Apr 15, 2020
134
78
I wanted to test the theory that a thermal pad on top of the heatsink will improve air flow so I did this:

IMG_3502.jpeg

I put only a thin part (1.5 mm thick) of the thermal pad just to force air to flow through the (corrugated) heatsink. For me it didn't made any siginifcant difference. Geekbench multicore score varied between 3400-3600, which is the same as without it. So, I guess it's just a matter of heat transfer to the backplate. I don't want that mod, for me the shim is the way to go. More than I already did it maybe do some better lapping of the shim and heatsink and find the perfect method to apply thermal paste.
 
  • Like
Reactions: Bones13 and srkirt

srkirt

Suspended
Apr 12, 2020
257
179
Barcelona
[QUOTE = "excelsior.ink, publicación: 28540663, miembro: 1212893"]
Quería probar la teoría de que una almohadilla térmica en la parte superior del disipador térmico mejorará el flujo de aire, así que hice esto:

View attachment 922338
Puse solo una parte delgada (1,5 mm de grosor) de la almohadilla térmica solo para forzar que el aire fluya a través del disipador de calor (corrugado). Para mí no hizo ninguna diferencia significativa. La puntuación multinúcleo de Geekbench varió entre 3400-3600, que es lo mismo que sin ella. Entonces, supongo que es solo una cuestión de transferencia de calor a la placa posterior. No quiero ese mod, para mí la cuña es el camino a seguir. Más de lo que ya lo hice, tal vez haga un mejor lapeado de la cuña y el disipador térmico y encuentre el método perfecto para aplicar pasta térmica.
[/CITAR]
I wanted to test the theory that a thermal pad on top of the heatsink will improve air flow so I did this:

View attachment 922338
I put only a thin part (1.5 mm thick) of the thermal pad just to force air to flow through the (corrugated) heatsink. For me it didn't made any siginifcant difference. Geekbench multicore score varied between 3400-3600, which is the same as without it. So, I guess it's just a matter of heat transfer to the backplate. I don't want that mod, for me the shim is the way to go. More than I already did it maybe do some better lapping of the shim and heatsink and find the perfect method to apply thermal paste.
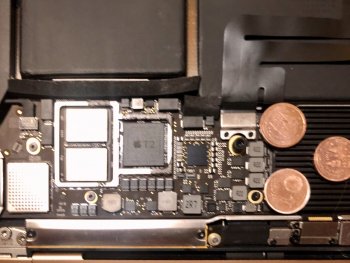
Try putting three € o coins in their copper place on top of the heatsink and before closing the cover ... and tell me ... Small huh ?? let the air pass !!!
[automerge]1591565630[/automerge]
[QUOTE = "excelsior.ink, publicación: 28540663, miembro: 1212893"]
Quería probar la teoría de que una almohadilla térmica en la parte superior del disipador térmico mejorará el flujo de aire, así que hice esto:

View attachment 922338
Puse solo una parte delgada (1,5 mm de grosor) de la almohadilla térmica solo para forzar que el aire fluya a través del disipador de calor (corrugado). Para mí no hizo ninguna diferencia significativa. La puntuación multinúcleo de Geekbench varió entre 3400-3600, que es lo mismo que sin ella. Entonces, supongo que es solo una cuestión de transferencia de calor a la placa posterior. No quiero ese mod, para mí la cuña es el camino a seguir. Más de lo que ya lo hice, tal vez haga un mejor lapeado de la cuña y el disipador térmico y encuentre el método perfecto para aplicar pasta térmica.
[/CITAR]

Try putting three € o coins in their copper place on top of the heatsink and before closing the cover ... and tell me ... Small huh ?? let the air pass !!!
 

Attachments

  • thumbnail_IMG_1194.jpg
    thumbnail_IMG_1194.jpg
    257.9 KB · Views: 169

Bones13

macrumors regular
Oct 7, 2008
144
62
So you are just throwing money at the problem @srkirt ?

Different heat sinks there though. Your coins are on the open i3 heat sink, vs the corrugated one on the i5.

Thank you @excelsior.inkfor posting the results of the experiment.
 

srkirt

Suspended
Apr 12, 2020
257
179
Barcelona
[QUOTE = "Bones13, publicación: 28540748, miembro: 234561"]
Entonces, ¿está arrojando dinero al problema [USER = 1212547] @srkirt [/ USER]?

Sin embargo, diferentes disipadores de calor allí. Sus monedas están en el disipador de calor i3 abierto, frente al corrugado en el i5.

Gracias @ excelsior.ink por publicar los resultados del experimento.
[/CITAR]
Well don't try it ...
 

octoviaa

macrumors regular
Oct 19, 2013
172
88
Thanks everyone for advice. @IngerMan and @nill1234
I've repasted using the card method and let it sit for a while. Now my idle temperature is about 40. It seems you
need to let the Mac sit for a while after changing the paste.

I now score ~1100 in Cinebench (stock I scored ~740). Temperature during test just briefly reaches 100 and fan is under 4000 rpm. This is a major improvement.

Most importantly, thanks to @Loog for sending me the shim. It worked and performance imrovement is 48%, which is massive.

View attachment 922331

Idle:

View attachment 922380
The score is about the same as my method and mine don't require opening up the apple heat-sink.
For anyone who want easier mod can try mine. It is much easier to revert too as it doesn't require opening up the apple heatsink.
 
  • Like
Reactions: excelsior.ink

octoviaa

macrumors regular
Oct 19, 2013
172
88
MacBook Air 2020 i5/16GB/256GB heatpipe mod

We need your help to keep this non-profit!

To help battling against commercial usage and keep this as a non-profit community input, if you adapt this mod, please DO NOT SHARE ANY MESAUREMENTS regarding any componenets. This will keep out pure opportunists because they will have to buy themselves a MacBook before doing commercialization.

Background and acknowledgement
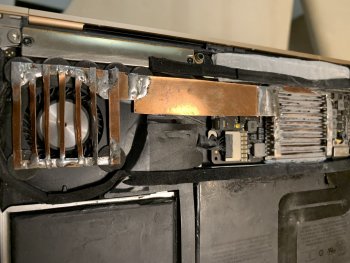
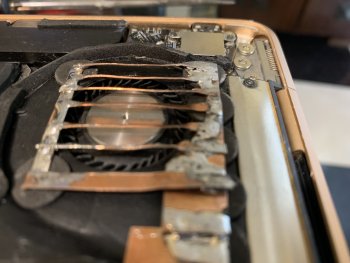
Hi guys. Here is a new Air user from Japan. Thanks to all brilliant challengers from this thread (including srkirt, kinchee87, vyruzreaper, RiaKoobcam, Robotronic and DanSilov). I tried the shim mod which is great. The performance is better and more quiet, but the heat dissipation still worries me. I tried the heat pad mod but the bottom is too warm for me and the mod seems to stress the insulating material at the bottom case too much. So, I tried to transfer the heat from the heatsink to the spinning fan without touching the bottom case.

Process
I read this thread for guys who used metal pipe to transfer the heat to somewhere near the fan. I think the improvement is limited because the heat conduction from the metal pipe is not efficient and most air to the fan does not need to pass through the metal pipe. My plan is to make a metal punching mesh to force the spinning fan to cool it.
Here is the overall idea before installation.
View attachment 921971
I used the remaining 0.3mm copper plate (same as shim mod) to make the copper pipe. And I bought an aluminum punching mesh 0.5mm (I think) because I cannot find a copper mesh on Amazon Japan here.

View attachment 921973 View attachment 921974
I used heat insulating double-side adhesive to seal the fan border and brown heat insulating tape to seal the copper plate not to overheat other components. Between the heatsink and copper pipe I used a heated (0.5mm, 6mW only) to hold the pipe in place. On top I used the brown heat insulating tape again to ensure no contact and heating up of bottom case.

Results
I found that the startup CPU temperature with shim mod alone still reaches 100 degree. But with heated mod it was 70 degree. This one is 80 degree but the temperature drops very quickly with fan spinning. I used TG Pro to setup a custom profile (4500 rpm always and maximum 7000 rpm over 90 degree).

I ran Geekbench Multicore CPU test and found that the score is very good
3169 (shim mod)
3595 (shim + heatpipe mod)
View attachment 921976

The heat profile also proves that heat is transferred properly. The frequency (light blue) during early low utilization part of the test caught up the requested one (pink) than shim pad alone. And heavy load part is better also (though heatpad mod is better because the heatpipe and fan speed capacity). You can find the comparison quoted from DanSilov thread below.
View attachment 921978


Conclusion
I am very happy to have this little reversible fix to help my Air performing better. I don't want the touch bar, and this mod helps me to have a comfortable use of my Air for years (at least I think). Thank you all.
Did you tried without the heat-pipe, just use the thermal-pad, wonder how much is the impact of the heat-pipe.
I suspect the heat-pipe won't have much impact, but curious to know if you're willing to experiment a little bit.
 

octoviaa

macrumors regular
Oct 19, 2013
172
88
How easy would it be to reverse the thermal paste on top of the heat sink if you need to send your Air for repairs?


For me the bottom case screws are Pentalobe 5 (P5) and the heat sink screws are Torx 4 (T4).
Quite easy, just use alcohol or thermal paste cleaner. I use 75% alcohol and tissue to wipe out as I have to re-do like 4 times before getting the satisfactory result.
 

Loog

macrumors regular
Apr 14, 2020
164
167
So you are just throwing money at the problem @srkirt ?

Different heat sinks there though. Your coins are on the open i3 heat sink, vs the corrugated one on the i5.

Thank you @excelsior.inkfor posting the results of the experiment.
@Bones13, @srkirt has a MBA 2019 so not quite apples for apples here, like my mods have been on MBA 2018. The Shim and wind tunnel seem to equally translate but not so for the heatpad. I got <10 points extra on cinebench with this but over 100 for the shim and with both in play a warmer unit +5deg estimate.

If you want easily reversible mod the pad is the way to go but with additional heat if you are using the device on your lap and work it (or use video conferencing). The Shim provides 10-15% improvement and retained the cooler baseplate. Both mods have their advantages/disadvantages.

I like the idea of the @kazune_karin idea, very intuitive and possibly with the shim is the best overall, not for me though as I'm comfortable with the mods undertaken so far and my next step is up or out if I need more sustained power. For me, battery life and portability is king hence the step back to the 2018... and oh, yes I'm one of those weird people who prefer the butterfly keyboard (until it fails).
 

excelsior.ink

macrumors regular
Apr 15, 2020
134
78
The score is about the same as my method and mine don't require opening up the apple heat-sink.
For anyone who want easier mod can try mine. It is much easier to revert too as it doesn't require opening up the apple heatsink.
True. But I cut a thin part from a thermal pad and attached it to the heatsink and I didn't liked it as the backplate was becoming hot. I guess I got used to a very cool laptop.
For me it all was about fixing that recessed heatsink. I still don't have an oppinion if that recession, which can be easily filled with a copper shim was done by Apple on purpose. I am pretty sure they know exactly what the machine does.
 
  • Like
Reactions: octoviaa

RiaKoobcam

macrumors regular
Apr 17, 2020
225
289
I'm probably going to mod my 2019 tomorrow/at some stage this week. Even though the thermal performance is great, I'd be curious to see if the mod adds anything on the sustained performance front. Even though that's something I very rarely need, it's been about a decade since I've cracked a case and had some fun modding a CPU.

The main point of doing this is to (hopefully) increase the longevity of the chip, as I'm not comfortable with the Thick Black Goo™ that Apple's used as the thermal conductor since the 2018 refresh. I'm not convinced about the thermal pad mod because I use my computer almost exclusively off-desk, and the bottom case is currently a really acceptable 35c in day-to-day use.

I'm doing the shim because it's something I've done with other laptops and am comfortable with, and looking through the results, seems to bring about the biggest positive changes. If not, worst case scenario, the shim mod does nothing really and I just replace the Thick Black Goo™ with MX-4.

As far as materials go, I've been guided by @kinchee87 and his awesome blog posts: I bought these shims in 0.3mm thickness (which seem to have temporarily sold out). As they're 20x20mm, I used Kinchee's method of cutting down the middle to get the correct dimensions, so it's a shim-and-a-half.

For smoothing and uniformity, the method that I came up with as a student and re-used for this prep was using a knife/hatchet whetstone like this one I had around the house. It helps me guarantee flatness of the copper in ways I was never able to achieve with sandpaper. I'd definitely recommend a whetstone - even just so you can cut tomatoes better and keep a keener blade on your axe 😂

vcCoMTd.jpg


Although the MBA that I'm modding is a 2019, I'm hoping to film it and upload so people can get comfortable poking around the heatsink itself, and realising that it's not a scary thing. Hopefully people understand my accent
 

excelsior.ink

macrumors regular
Apr 15, 2020
134
78
I used some slightly abrasive cleaning paste/cream, the kind you use in the kitchen/bathroom to polish whatever you want to, in combination with some paper towels. The honing stone is a good idea for the shim, but you'll also want to polish the Apple heatsink. It looks like this (after you clean it):
IMG_3484.jpeg


And then you have the problem of how to and how much paste to apply. This is my last application:

IMG_3499.jpeg


and this is how it eventually came up on the CPU:

IMG_3501.jpeg


I am by no means expert but even with my method I got massive improvement in performance and lower temperatures.
If anyone can improve the process it would be great. I will likely try in the near future to repeat and improve the process.
 
Last edited:

Loog

macrumors regular
Apr 14, 2020
164
167
Screenshot 2020-06-08 at 09.05.37.png
I'm probably going to mod my 2019 tomorrow/at some stage this week. Even though the thermal performance is great, I'd be curious to see if the mod adds anything on the sustained performance front. Even though that's something I very rarely need, it's been about a decade since I've cracked a case and had some fun modding a CPU.

The main point of doing this is to (hopefully) increase the longevity of the chip, as I'm not comfortable with the Thick Black Goo™ that Apple's used as the thermal conductor since the 2018 refresh. I'm not convinced about the thermal pad mod because I use my computer almost exclusively off-desk, and the bottom case is currently a really acceptable 35c in day-to-day use.

I'm doing the shim because it's something I've done with other laptops and am comfortable with, and looking through the results, seems to bring about the biggest positive changes. If not, worst case scenario, the shim mod does nothing really and I just replace the Thick Black Goo™ with MX-4.

As far as materials go, I've been guided by @kinchee87 and his awesome blog posts: I bought these shims in 0.3mm thickness (which seem to have temporarily sold out). As they're 20x20mm, I used Kinchee's method of cutting down the middle to get the correct dimensions, so it's a shim-and-a-half.

For smoothing and uniformity, the method that I came up with as a student and re-used for this prep was using a knife/hatchet whetstone like this one I had around the house. It helps me guarantee flatness of the copper in ways I was never able to achieve with sandpaper. I'd definitely recommend a whetstone - even just so you can cut tomatoes better and keep a keener blade on your axe 😂

vcCoMTd.jpg


Although the MBA that I'm modding is a 2019, I'm hoping to film it and upload so people can get comfortable poking around the heatsink itself, and realising that it's not a scary thing. Hopefully people understand my accent
@RiaKoobcam ... Look forward to this, my mod was with 0.5mm using the same thermal paste. I'd be interesting to see the cinebench scores on this once completed to see if there is anything different between shim thickness.

Impromptu test, full office suit open and working, safari, mail... and timemachine running. Lets add the intel power gadget to max and see what happens to my MBA 2018...

Attached left start, middle running for 10 mins, right cool down for 1 min.

08:54 set Intel power gadget to full while still working as normal, see the slow build up of temp and also notice that CPU maintains full frequency through out, 09:04, this has been running for 10 mins fan at 2685 and CPU 98.75 time to close the test down. Let the device cool down 1 min later 64 deg and fan at 2691.

I've captured the Intel gadget only on the first screen shot, added this to the second with desktop data and fan metric for the second capture, and finally all this data together during 1 min cool down.

So pretty much silent the whole time, fan did go to 4300 at one point but dropped down. Yeah you could say that the mod gives the older 2018/19 devices some extra legs and headroom and allows this to operate at 100% load without going crazy or throttling down to a dribble.
 
Last edited:

kazune_karin

macrumors member
May 9, 2020
38
50
Did you tried without the heat-pipe, just use the thermal-pad, wonder how much is the impact of the heat-pipe.
I suspect the heat-pipe won't have much impact, but curious to know if you're willing to experiment a little bit.

Hi. Yeah, I tried shim + heatpad mod first before turning to shim + heatpipe mod.

My Geekbench Multicore CPU results were:
3169 (shim mod)
3443 (shim + heatpad mod)
3595 (shim + heatpipe mod)
So definitely to me, adding heatpad or heatpipe both improve my Air i5 performance.

The heatpad mod and heatpipe mod were actually not so different.
However, the heatpad mod transferred the heat to the bottom case and I am afraid the insulating tape of the bottom case will deteriorate very quickly.
And I have to clarify, the heatpipe mod makes sure the heatsink have no contact with the case (with a thin 0.5mm heatpad and on top insulating tape), the hot air goes out more from the fan outlet. The bottom case is cool during heavy load and there is still considerable performance increase.

I am curious if any i7 Air owner can see if the score can catch close to i5 10th-gen Pro?
[automerge]1591623808[/automerge]
1º Test...

Wow, it looks like just built-in cooling system. Cool.
I would suggest insulating the copper plate in the mid-way so as not to heat up the other components on the way.
Looking forward to your results.
 

IngerMan

macrumors 68020
Feb 21, 2011
2,016
905
Michigan
I am curious if any i7 Air owner can see if the score can catch close to i5 10th-gen Pro?

MBA i7 16GB 256SSD
Stock i7 16GB GB Single Core 1300 Multi Core 3450
Thermal Pad Mod SC 1300 MC 4000

From the MBP Pro data threads they retrieved from GB below

single core / multicore
i5 = 1142 / 4254 (309 results)
i7 = 1213 / 4447 (95 results)

But some bad tests that some users do bring the scores down.


I seen a post in this thread that a i7 user did paste shim and pad and achieved over 4100 MC.

So yes the i7 is on par for SC performance and a little under using both mods meeting the MC performance on GB 5 results. Of course this is not real world and would require a real world test to see if it upholds. The Air is not meant to be Pro but it is a huge upgrade in performance from past.
 
Last edited:

srkirt

Suspended
Apr 12, 2020
257
179
Barcelona
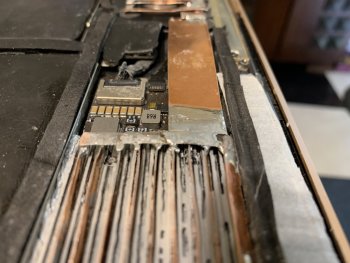
Covering the copper has been a bad idea ... I lower the temperature less ... it is clear that the long piece already dissipates heat before reaching the fan. I'm fed up!! staining me with thermal paste !!! all stained gray ...
IMG_0146.jpg
 
Last edited:
Register on MacRumors! This sidebar will go away, and you'll see fewer ads.