Become a MacRumors Supporter for $50/year with no ads, ability to filter front page stories, and private forums.

Bushsong

macrumors newbie
Dec 12, 2020
5
1
Hello, thanks alot for your help. I could solve it with this Site... too 100%

Here i have some tipps and minor issues i had with the solution. Its actually the same like on this sits, but maybe this can help you. I tried to explain every step i took. I hope it helps and awares some stupid issues for you.

1. Start in Recovery Mode (Boot your system and hold down CMD + R)

2. Choose your Language

3. Start the Terminal Menubar > Developer Tools > Terminal

4. csrutil disable
csrutil disable
5. authenticated root disable
csrutil authenticated-root disable
6. Restart Recovery Mode (Apple Icon > Restart and hold down CMD + R)

7. Start the Terminal again

8. Mount the Harddrive

-- Note --
Everywhere where you find "Harddrive\Name" you should replace it with the name of your Harddrive or it won't work. The Name of your Harddrive, can be found in the "Diskutility Tool". If your Harddrive Name has a space inbetween, replace the space with an --> \ <-- Backslash.

8.1 Info​
Read this please, even if this is just an example, but i did here some misstakes, i better tell you if you dont have any ideas of terminal usage like i had. After you read it you can go on with 8.2.
Here i had the biggest problems, my Hard Drive is called "Apple SSD SM0512F" and is splitted into 2 Partitions "Daten" and "WorkBench", so what i had to Mount was the Apple SSD SM0512F and Daten, for me it didnt worked with only mounting the Harddrive.
So istarted typing
mount -uw /V
now i pressed Tab so it completed it to
mount -uw /Volumes/
so i typed on and pressed Tab again (tab Autocompletes the first possibility with the letters u entered befor) if you dont want to press Tab type it by Hand", but you can refuse some misstakes with it. Humans always do mistakes.
mount -uw /Volumes/A
here came my next problem... it completed it to
mount -uw /Volumes/Apple\SSD\SM0512F/
I needed to remove the last "/" or it gives an Error for unknown File System
mount -uw /Volumes/Apple\SSD\SM0512F
Correct :D
mount -uw /Volumes/Apple\SSD\SM0512F
Incorrect :mad:
mount -uw /Volumes/Apple\SSD\SM0512F/
-- Note --
Your Harddrive can have a different Name i find out the right name under Diskutility tool.
Use the name you had Choosen earlier...
if its called "MacOS"
"mount -uw /Volumes/MacOS"
if its called MacSSD
"mount -uw /Volumes/MacSSD"
Just as an example to understand it
After that i mounted my Partition Daten (better do it it could cause problems if you dont do it) when you got partitions. Maybe its just for me, because my partitions are existing for a very long time: since SnowLeopard) and again take care for the last Slash --> / <--)

8.2 Mount the Harddrive​
mount -uw /Volumes/Harddrive\Name
-- Note --
For me it was
mount -uw /Volumes/Apple\SSD\SM0512F
8.3 Mount the Partition
mount -uw /Volumes/Harddrive\Name/Partition\Name
-- Note --
For me it was
mount -uw /Volumes/Apple\SSD\SM0512F/Daten

9. Rename or Remove the "AppleThunderboltNHI.kext"
mv /Volumes/System/Library/Extensions/AppleThunderboltNHI.kext /Volumes/System/Library/Extensions/AppleThunderboltNHI.kext.BAK
10. Check it
Move to the Extensions​
cd /Volumes/Harddrive\Name/System/Library/Extensions/
List all Files
ls
If you find the "AppleThunderboltNHI.kext.BAK" you did everything right, but be careful it realy has to be called "AppleThunderboltNHI.kext.BAK"
11. REBUILD the extensions cache
New in BigSur
kmutil install -u --force --volume-root /Volumes/Harddrive\Name
-- Note --
For me it was
kmutil install -u --force --volume-root /Volumes/Apple\SSD\SM0512F
12. create another system snapshot
bless --folder /Volumes/Harddrive\Name/System/Library/CoreServices --bootefi --create-snapshot
-- Note --
For me it was
bless --folder /Volumes/Apple\SSD\SM0512F/System/Library/CoreServices --bootefi --create-snapshot
13. csrutil enable
14. csrutil authenticated-root enable
15. Restart in Normal Mode


Info
For me it caused a Problem. I came into a Crash routine with blackscreen, but alot of people had this problem.
The Error massage after the Restart followed with a blackscreen and said "press a Key to restart!".
If you have the same issue do following
1. Restart in recovery mode
2. Start the "diskutility tool"
3. Click on your Harddrive and choose "First Aid" and "run it"
5. Click on your Snapshot and choose "First Aid" and "run it"
6. Exit the "diskutility tool"
7. Run "Terminal" again
8. csrutil disable
9. Restart in recovery mode
10. Restart in Normal mode
16. Enjoy and have Fun without any stupid crashes

Info
The security mode of BigSur is deactivated, but you still have the security mode of Catalina active. So this is the only small minus at this solution.
This is, in my humble opinion, the best laid out solution to address this problem. I was able to get all the way through the solution, but worked my way down through individual directories to ensure I was in the right one. I then ran the ls command in the directory to make sure I could see the particular .kext file and it was certainly there.

However when I tried to rename it, I kept getting a message that it couldn't be renamed as it was a read-only system file. And yes, I had disabled csrutil and csrutil authenticated-root and rebooted to Recovery Mode before continuing with the process.

I notice above a few people have had similar issues. Has anyone found a way of modifying the permissions on such files in Big Sur 11.1?
 

on_to_victory

macrumors newbie
Nov 19, 2020
4
0
If I am reading your steps correctly, you should reboot to recovery mode and then disable csrutil and csrutil authenticated-root while in recovery mode. That is what worked for me.

Unfortunately, even after moving the AppleThunderbolt files, my computer still goes black and shuts off after a few minutes' use.
 

MacKeloo

macrumors newbie
Jan 10, 2021
1
0
Hello everybody,

I have tried, as several other people here, to rename / move a kext file. I used this guide: https://grafxflow.co.uk/blog/mac-os-x/delete-ioplatformpluginfamilykext-macos-big-sur
When it comes to moving the file, I keep getting the message, that it's a read-only file system, just like @Bushsong mentioned before me.
I'm on Big Sur, with the latest Update, disabled both System Integration Protection and authenticated-root from Recovery Mode.

Any chance to get the kext file moved in Big Sur?
Or does anybody know what else I could try or do here?
 

monsow8

macrumors newbie
Jan 13, 2021
1
0
Hey guys,

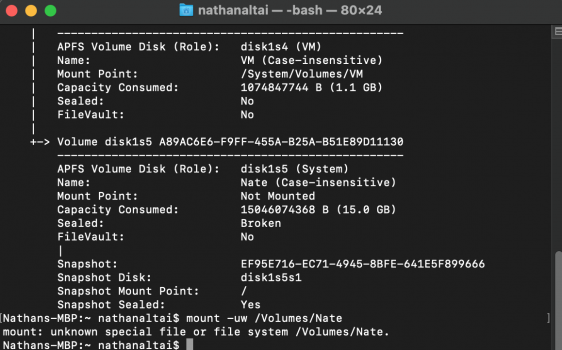
I keep getting an error that says:

mount: unknown special file or file system /Volumes/...

You can see on the attached image that I'm using the correct name for the drive.

I would really appreciate any feedback as my computer is unusable right now :(


Edit: I managed to have a workaround to the above, but I'm getting the same problem as @MacKeloo and @Bushsong regarding the read-only file system. I think this may be because we have Big Sur 11.01? Either way, would much appreciate any suggestions!
 

Attachments

  • Screenshot 2021-01-13 at 17.02.05.png
    Screenshot 2021-01-13 at 17.02.05.png
    134.1 KB · Views: 199
Last edited:

waqas1992

macrumors newbie
Jan 31, 2021
1
0
Check this solution


It will work.
 

bbrell

macrumors newbie
Feb 3, 2021
1
0
Hello everybody,

I have tried, as several other people here, to rename / move a kext file. I used this guide: https://grafxflow.co.uk/blog/mac-os-x/delete-ioplatformpluginfamilykext-macos-big-sur
When it comes to moving the file, I keep getting the message, that it's a read-only file system, just like @Bushsong mentioned before me.
I'm on Big Sur, with the latest Update, disabled both System Integration Protection and authenticated-root from Recovery Mode.

Any chance to get the kext file moved in Big Sur?
Or does anybody know what else I could try or do here?
I had this problem as well. You have to disable csrutil and csrutil authenticated-root in recovery mode, then reboot into recovery mode again and do the following steps. Initially I didn't do the second reboot and got the same message as you.

It's now working, but I have to live without csrutil and authenticated-root. If they're enabled I get the infinite reboot loop. Mid-2014 15" MPB Retina.
 

nebedaay

macrumors newbie
Feb 16, 2021
1
0
I've tried the steps listed above, but I can't get past "csrutil authenticated-root disable." I'm told that this isn't possible unless I disable FileVault (which I'm required to have enabled by my workplace). I've begun disabling it, but it's currently telling me it's going to take me 18 days to decrypt my hard drive. Who knows how many times my MBP will reboot during that process. Does anyone know a way around this? I suspect the only solution would be to back up my hard drive and revert to Catalina, but that would be a last resort because I'd have to involve my workplace admins remotely and I'm not sure how that would work. So if anyone knows a way to modify system files with filevault on, that would be greatly appreciated.
 

martin.k

macrumors newbie
Mar 8, 2021
3
2
Damn...!! Hard luck..even after doing it all.. thunderbolt drivers are still being loaded... and shut down is still happening ????


Ok Guys So Here’s the FIX with BIG SUR


I did few modifications with whatever was available on internet to solve this problem


Step 6 & 7 are few modifications which I did.


Here it goes


Reboot in recovery mode (CMD+R)


  1. Utilities -> Terminal
  2. csrutil disable
  3. csrutil authenticated-root disable
  4. mount - uw /Volumes/Macos (Enter WHATEVER YOUR MACOS DRIVE NAME IS, my macOS drive name is Macos)
  5. cd /Volumes/Macos (Enter WHATEVER YOUR MACOS DRIVE NAME IS, my macOS drive name is Macos)/System/Library/Extensions
  6. rm -rf AppleThunderboltNHI.kext
  7. rm -rf /System/Library/Caches/*
  8. Kmutil install -u --force --volume-root /Volumes/Macos (Enter WHATEVER YOUR MACOS DRIVE NAME IS, my macOS drive name is Macos)/System/Library/Extensions
  9. bless -folder /Volumes/Macos(Enter WHATEVER YOUR MACOS DRIVE NAME IS, my macOS drive name is Macos)/System/Library/CoreServices —bootefi --create-snapshot

FORGET THE PROBLEM :-D


You’ll need to perform these steps every time you update Big sur with their security updates n all.


No need to enable SIP


Have a good life :)
Unfortunately it does not solve the problem with unexpected reboot :-/
Damn...!! Hard luck..even after doing it all.. thunderbolt drivers are still being loaded... and shut down is still happening ????


Ok Guys So Here’s the FIX with BIG SUR


I did few modifications with whatever was available on internet to solve this problem


Step 6 & 7 are few modifications which I did.


Here it goes


Reboot in recovery mode (CMD+R)


  1. Utilities -> Terminal
  2. csrutil disable
  3. csrutil authenticated-root disable
  4. mount - uw /Volumes/Macos (Enter WHATEVER YOUR MACOS DRIVE NAME IS, my macOS drive name is Macos)
  5. cd /Volumes/Macos (Enter WHATEVER YOUR MACOS DRIVE NAME IS, my macOS drive name is Macos)/System/Library/Extensions
  6. rm -rf AppleThunderboltNHI.kext
  7. rm -rf /System/Library/Caches/*
  8. Kmutil install -u --force --volume-root /Volumes/Macos (Enter WHATEVER YOUR MACOS DRIVE NAME IS, my macOS drive name is Macos)/System/Library/Extensions
  9. bless -folder /Volumes/Macos(Enter WHATEVER YOUR MACOS DRIVE NAME IS, my macOS drive name is Macos)/System/Library/CoreServices —bootefi --create-snapshot

FORGET THE PROBLEM :-D


You’ll need to perform these steps every time you update Big sur with their security updates n all.


No need to enable SIP


Have a good life :)
Unfortunately it does not solve the problem with unexpected reboot. Thanks for any advice
I also moved all AppleThunderbolt* files to .BAK and removed NHI file.
Damn...!! Hard luck..even after doing it all.. thunderbolt drivers are still being loaded... and shut down is still happening ????


Ok Guys So Here’s the FIX with BIG SUR


I did few modifications with whatever was available on internet to solve this problem


Step 6 & 7 are few modifications which I did.


Here it goes


Reboot in recovery mode (CMD+R)


  1. Utilities -> Terminal
  2. csrutil disable
  3. csrutil authenticated-root disable
  4. mount - uw /Volumes/Macos (Enter WHATEVER YOUR MACOS DRIVE NAME IS, my macOS drive name is Macos)
  5. cd /Volumes/Macos (Enter WHATEVER YOUR MACOS DRIVE NAME IS, my macOS drive name is Macos)/System/Library/Extensions
  6. rm -rf AppleThunderboltNHI.kext
  7. rm -rf /System/Library/Caches/*
  8. Kmutil install -u --force --volume-root /Volumes/Macos (Enter WHATEVER YOUR MACOS DRIVE NAME IS, my macOS drive name is Macos)/System/Library/Extensions
  9. bless -folder /Volumes/Macos(Enter WHATEVER YOUR MACOS DRIVE NAME IS, my macOS drive name is Macos)/System/Library/CoreServices —bootefi --create-snapshot

FORGET THE PROBLEM :-D


You’ll need to perform these steps every time you update Big sur with their security updates n all.


No need to enable SIP


Have a good life :)
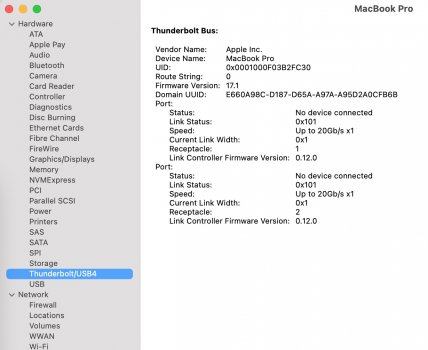
Unfortunately this steps does not solve my problem. I deleted all AppleThunderbolt files and my Mac still have unexpected shutdowns. I can also push up the shutdown with disconnected adapter and just run Chrome.

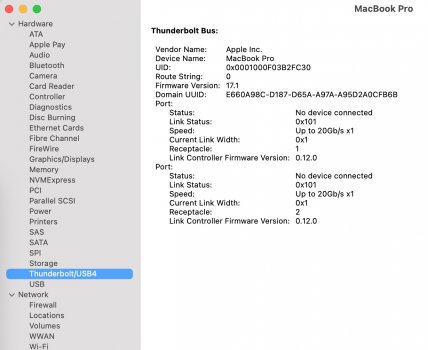
See thunderbolt bus seems to be stil active :-/

Do you have any idea what could be next steps to solve it?

MacBook Pro (Retina, 15-inch, Late 2013)
Big Sur 11.2.2

Thankt you.
 

Attachments

  • AppleThuderbolt.jpg
    AppleThuderbolt.jpg
    224.3 KB · Views: 259
  • Thunderbolt.jpg
    Thunderbolt.jpg
    173.4 KB · Views: 267
  • Thunderbolt.jpg
    Thunderbolt.jpg
    173.4 KB · Views: 266

chetna

macrumors newbie
Aug 8, 2021
3
0
I tried this and now my main system is also not loading - it is constantly displaying kernel panic and after running first aid I could see some issue with the snapshot, says it is corrupted - PLS HELP!!!!!!!!!!!!!!!!! I HAVE TO DO MY OFFFICE WORK!!
 

chetna

macrumors newbie
Aug 8, 2021
3
0
I tried this and now my main system is also not loading - it is constantly displaying kernel panic and after running first aid I could see some issue with the snapshot, says it is corrupted - PLS HELP!!!!!!!!!!!!!!!!! I HAVE TO DO MY OFFFICE WORK!!
Unfortunately it does not solve the problem with unexpected reboot :-/

Unfortunately it does not solve the problem with unexpected reboot. Thanks for any advice
I also moved all AppleThunderbolt* files to .BAK and removed NHI file.

Unfortunately this steps does not solve my problem. I deleted all AppleThunderbolt files and my Mac still have unexpected shutdowns. I can also push up the shutdown with disconnected adapter and just run Chrome.

See thunderbolt bus seems to be stil active :-/

Do you have any idea what could be next steps to solve it?

MacBook Pro (Retina, 15-inch, Late 2013)
Big Sur 11.2.2

Thankt you.
 

chetna

macrumors newbie
Aug 8, 2021
3
0
I tried this and now my main system is also not loading - it is constantly displaying kernel panic and after running first aid I could see some issue with the snapshot, says it is corrupted - PLS HELP!!!!!!!!!!!!!!!!! I HAVE TO DO MY OFFFICE WORK!!
make sure you are in the following directory

cd /Volumes/MacIntosh\ HD/System/Libraries/Extensions

mv AppleThunderboltNHI.kext AppleThunderboltNHI_kext.bak

I think Chrome just makes the crash symptoms appear quicker. I've noticed that as well. Just anecdotal evidence though.
 

martin.k

macrumors newbie
Mar 8, 2021
3
2
I tried this and now my main system is also not loading - it is constantly displaying kernel panic and after running first aid I could see some issue with the snapshot, says it is corrupted - PLS HELP!!!!!!!!!!!!!!!!! I HAVE TO DO MY OFFFICE WORK!!
This works for my MacBook Pro (Retina, 15-inch, Late 2013) Big Sur 11.2.2

Reboot in recovery mode (CMD+R)
Utilities -> Terminal

Bash:
$ csrutil disable
$ csrutil authenticated-root disable

Mount disc in read-write mode. Do not add "/: at the end.
Bash:
$ mount -uw /Volumes/Macintosh\ HD

Remove Thunderbolt files
Bash:
$ cd /Volumes/Macintosh\ HD/System/Library/Extensions
$ rm -rf AppleThunderboltNHI.kext

Clear cache
Bash:
$ rm -rf /System/Library/Caches/*

REBUILD the extensions cache !
Bash:
$ cd /Volumes/Macintosh\ HD/System/Library/Extensions
$ kmutil install -u --force --volume-root /Volumes/Macintosh\ HD

DON'T FORGET to create another system snapshot to take these modifications under account at next reboot

Bash:
$bless --folder /Volumes/Macintosh\ HD/System/Library/CoreServices --bootefi --create-snapshot

Restart to normal mode
Bash:
reboot


k0017

macrumors newbie
Sep 28, 2021
6
0
Hürth
The newest and easiest way to solve the problem is to use open core legacy patcher.
It is a bootloader, that recognizes your Macbook and automatically disables the thunderbolt-controller (GUI-Version) or does it by option (TUI-Version).

No need to disable the thunderbolt-controller with every MacOS update and without complicated terminal-commands and keystrokes..

And its possible to make a bootable USB-Stick for the faulty Mac by another Mac. Then boot the faulty Mac with the USB-Stick by pressing and holding the option key und choose the loader. When started, just install the open core legacy patcher onto the internal SSD.

https://dortania.github.io/OpenCore-Legacy-Patcher/

Download:

https://github.com/dortania/OpenCore-Legacy-Patcher/releases/tag/0.2.5
 

flyhotstuff

macrumors newbie
Oct 13, 2021
1
0
The newest and easiest way to solve the problem is to use open core legacy patcher.
It is a bootloader, that recognizes your Macbook and automatically disables the thunderbolt-controller (GUI-Version) or does it by option (TUI-Version).

No need to disable the thunderbolt-controller with every MacOS update and without complicated terminal-commands and keystrokes..

And its possible to make a bootable USB-Stick for the faulty Mac by another Mac. Then boot the faulty Mac with the USB-Stick by pressing and holding the option key und choose the loader. When started, just install the open core legacy patcher onto the internal SSD.

https://dortania.github.io/OpenCore-Legacy-Patcher/

Download:

https://github.com/dortania/OpenCore-Legacy-Patcher/releases/tag/0.2.5
how does one go about doing this? open core did not automatically unload anything
 

k0017

macrumors newbie
Sep 28, 2021
6
0
Hürth
If you have open core version 0.2.5 gui version installed, and you have a MacBook Pro 11,1 or 11,2 or 11,3, thunderbolt Kexts will not be loaded at startup automatically. Or use the tui version, chose disable thunderbolt manually.

If you do it on another machine for the faulty one, change the machine type to the target machine type macbookpro 11,1 or 2 or 3
 

Dangitsda

macrumors newbie
Oct 14, 2021
5
0
Running on MacBook Pro Retina 15" Late 2013; MacOS 11.6 Big Sur

Followed the instructions but failed to perform the last step bless. Here is what I did

For me
Started in Recovery Mode
- csrutil disable
- csrutil authenticated-root disable

Reboot Started in recovery mode again

- mount -uw /Volumes/Macintosh\ HD
- cd /Volumes/Macintosh\ HD/System/Library/Extensions

- Removed AppleThunderboltNHI.kext AppleThunderboltNHI_kext.bak
rm -rf AppleThunderboltNHI.kext
rm -rf /System/Library/Caches/*

- Renamed
mv AppleThunderboltDPAdapters.kext AppleThunderboltDPAdapters.kext.bak
mv AppleThunderboltEDMService.kext AppleThunderboltEDMService.kext.bak
mv AppleThunderboltIP.kext AppleThunderboltIP.kext.bak
mv AppleThunderboltNHI.kext AppleThunderboltNHI.kext.bak
mv AppleThunderboltPCIAdapters.kext AppleThunderboltPCIAdapters.kext.bak
mv AppleThunderboltUTDM.kext AppleThunderboltUTDM.kext.bak

- kmutil install -u --force --volume-root /Volumes/your MacOS files location

Then onto the last Step

- bless --folder /Volumes/Macintosh\ HD/System/Library/CoreServices --bootefi --create-snapshot

Also Tried

- bless -folder /Volumes/Macintosh\ HD/System/Library/CoreServices —bootefi --create-snapshot

Gave me the same error.

Was unable to perform the last step. Picture shown below of the error.

Would appreciate any feedback or advice!


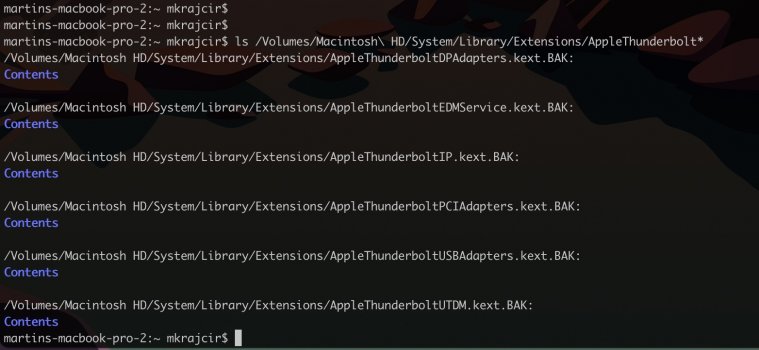
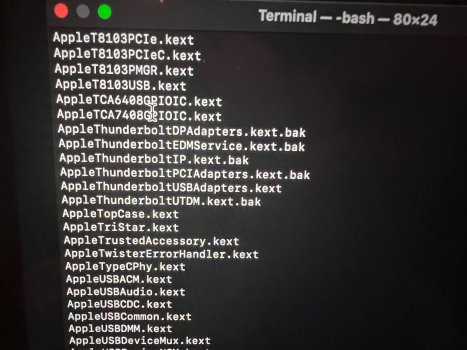
1st Picture shows NHI file was removed and all other Thunderbolt.kext files were renamed to .kext.bak
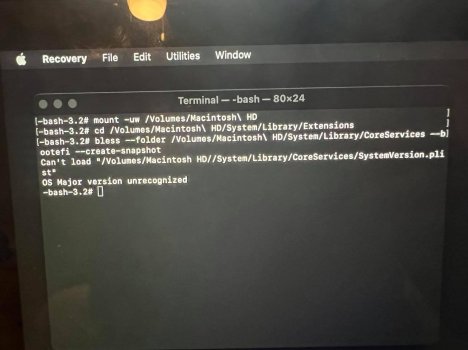
2nd Picture shows the bless --folder command
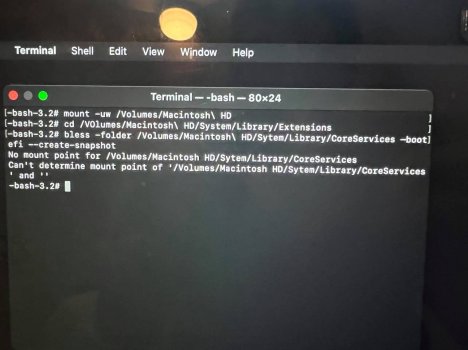
3rd Picture shows bless -folder

2nd Picture Error
Cant load "/Volumes/Macintosh HD//System/Library/CoreServices/SystemVersion.plist"
OS Major version unrecognized

3rd picture Error
" Cant determine mount point of 'Volumes/Macintosh HD/System/Library/CoreServices ' and ' '

Am I doing something wrong?

Thank you!
 

Attachments

  • 1234.jpg
    1234.jpg
    381.4 KB · Views: 146
  • 148.jpg
    148.jpg
    76.5 KB · Views: 142
  • 147.jpg
    147.jpg
    79.6 KB · Views: 153

k0017

macrumors newbie
Sep 28, 2021
6
0
Hürth
Maybe try opencore legacy patcher tui version 0.2.5, configure option disable thunderbolt and build with another machine for type MacBook Pro 11.2, Boot and install it on the faulty one with the bootable usb Stick and that‘s it. Next Updates and even newer macOS Monterey will be running with it on the old machine without sudden shutdowns
 
Last edited:

MikeGraveston

macrumors newbie
Oct 15, 2021
1
0
Maybe try opencore legacy patcher tui version 0.2.5, configure option disable thunderbolt and build with another machine for type MacBook Pro 11.2, Boot and install it on the faulty one with the bootable usb Stick and that‘s it. Next Updates and even newer macOS Monterey will be running with it on the old machine without sudden shutdowns
This isn’t working for me I’m afraid. I can keep my Mac on long enough to do this but still shuts down randomly after even when rebooting.

any advice? Or a step-by-step in case I’ve missed it. Tried both TUI manual and GUI
 

k0017

macrumors newbie
Sep 28, 2021
6
0
Hürth
1.) Are you able to prepare a bootable usb stick with open core legacy patcher 0.2.5 tui version for MacBook 11.2 on another, not faulty MacBook?
2.) Boot the faulty MacBook with the usb stick by pressing and holding the option key to boot with opencore legacy patcher
3.) again choose the option disable thunderbolt in the patcher, build and installing onto the internal ssd of the faulty MacBook.
4.) remove usb stick from the faulty MacBook
5.) reboot with option key and choose opencore legacy patcher
6.) set Startup disk to the open core legacy patcher

done
 
Last edited:

Dangitsda

macrumors newbie
Oct 14, 2021
5
0
1.) Are you able to prepare a bootable usb stick with open core legacy patcher 0.2.5 tui version for MacBook 11.2 on another, not faulty MacBook?
2.) Boot the faulty MacBook with the usb stick by pressing and holding the option key to boot with opencore legacy patcher
3.) again choose the option disable thunderbolt in the patcher, build and installing onto the internal ssd of the faulty MacBook.
4.) remove usb stick from the faulty MacBook
5.) reboot with option key and choose opencore legacy patcher
6.) set Startup disk to the open core legacy patcher

done
I will definetly give that a shot this coming monday. Is there a way I could reach you personally if I have issues with this ?
 

k0017

macrumors newbie
Sep 28, 2021
6
0
Hürth
You probably won’t need my help, it is quite easy. Try it, it will work, I am pretty sure. There is 0.3.0 out. This version will work as well. But use the tui version!!
 

Dangitsda

macrumors newbie
Oct 14, 2021
5
0
You probably won’t need my help, it is quite easy. Try it, it will work, I am pretty sure. There is 0.3.0 out. This version will work as well. But use the tui version!!
I can confirm this solution works. I will layout step by step what I did for others to do as well. It took me less than 15 minutes to do.

First go to this link https://github.com/dortania/Opencore-Legacy-Patcher/releases
Scroll down under the latest version. For me it was version 0.3.0

Download OpenCore-Patcher-TUI.app.zip on a NON-faulty Mac. ( DOWNLOAD THE TUI VERSION )

A.) Once downloaded select option 1 to build Open core Legacy
B.) Select option 2 to install on an internal/external drive.
Note: " You want to install this on a bootable USB stick ( also make sure its formatted to a FAT32 ) you can go through disk utility to do so and select MS-DOS " I don't remember the exact USB memory requirements I used a 32gb flash drive.
C.) Once you have Open core legacy installed on your USB stick, its time to move that USB stick to your FAULTY MacBook.

Note: If you do not have another Mac laying around you can try to install Open Core onto a USB stick with your faulty Mac, but you'd have to do it fast before it randomly shuts down. I used my mac mini from 2010 running on Mojave

Now we will follow k0017 instructions with some added information:

1.) Boot the faulty MacBook with the USB stick you created in the above steps by pressing and holding the option key until you see another drive, mine said EFI and it will boot with open core legacy patcher.
Note: " For me when I booted with open core legacy it wasn't able to detect my keyboard or trackpad, I had to use an external mouse and a Bluetooth keyboard to continue, your situation may differ. BUT DONT WORRY once you complete all these steps your keyboard and trackpad will be useable once again! "

2.) Now that you have booted into open core legacy, download it again onto your faulty MacBook through the above link again. Since its being downloaded from GitHub you will have to go through settings -> security and privacy to allow this application to be opened.
2A.) Once open core legacy is downloaded, open it and choose Adjust patcher settings -> then Miscellaneous Setting and select the option disable thunderbolt in the patcher.

3.) Return to the main menu of Open core legacy, Choose option 1). Build Open core Legacy and then option 2). install onto the internal SSD or HDD whatever you have of the faulty MacBook.

4.) Remove USB stick from the faulty MacBook.

5.) Reboot while pressing and holding option key and choose open core legacy patcher ( Mine said EFI ) after you click enter, you will see your internal SSD/HDD and select that again

Note: After doing the above steps my trackpad and keyboard was detected again and I was able to login to my account and do everything normally with no random shutdowns or issues for the past 24 hours.

6.) You can also Set Startup disk to the open core legacy patcher if you shutdown your computer often, but I didn't do this

Hope this helps everyone!

Another thanks to K0017!!! Thank you!!!!
 
Last edited:

k0017

macrumors newbie
Sep 28, 2021
6
0
Hürth
@Dangitsda
1.) It seems that you didn´t change your modell in the options of OC before installing it to the usb stick. That´s propobably the problem with the keyboard and Trackpad. The OC took the Hardware-drivers of the non faulty Macbook to the faulty one with other Keyboard or Trackpad Hardware when loading via USB Stick, which then didn´t work.

So Keyboard and Trackpad probably would work with usb stick, when changing the modell type, i am pretty sure.
2.) You really should install the oc on the internal SSD to be sure to survive next updates. When doing so, you don´t have to think about that anymore. It will just do it right without the usb-stick.
 

Dangitsda

macrumors newbie
Oct 14, 2021
5
0
@Dangitsda
1.) It seems that you didn´t change your modell in the options of OC before installing it to the usb stick. That´s propobably the problem with the keyboard and Trackpad. The OC took the Hardware-drivers of the non faulty Macbook to the faulty one with other Keyboard or Trackpad Hardware when loading via USB Stick, which then didn´t work.

So Keyboard and Trackpad probably would work with usb stick, when changing the modell type, i am pretty sure.
2.) You really should install the oc on the internal SSD to be sure to survive next updates. When doing so, you don´t have to think about that anymore. It will just do it right without the usb-stick.
You' re absolutely right.

If youre using a desktop to download Open Core and moving it to your faulty Laptop be sure to choose option 4.) Change Model in the Open Core patcher.

I just changed the model to my model. I have a Macbook Pro Late 2013 so my model is MacBookPro10,2. Type that exactly how it is.

If youre a fool like me and have a god like k0017 to help you this is what I did.

1.) Opened OpenCore on my MacBook Pro that WAS faulty
2.) Chose option 4 to change my model
3.) Chose option 1 to build OpenCore
4.) Chose option 2 to install OpenCore on my internal SSD

Did this as recommended by k0017 incase of future updates or problems occur I wont have to worry about getting another mouse or keyboard and my laptops trackpad and keyboard will work.

List of all models: https://dortania.github.io/OpenCore-Legacy-Patcher/MODELS.html

I also wont be updating it anymore since my laptop is not compatible with Monterey, I will just leave it at this!

Thank you k0017!!
 
Last edited:
Register on MacRumors! This sidebar will go away, and you'll see fewer ads.