Through the settings of the better display I was able to set up only the travel mode, changing the values to 2 and 1 respectively. For volume control via the keyboard I use the eqmac program. Write here if you manage to start volume control in some other way.Many thanks to @PaulD-UK and all the others for explaining the 5K monitor conversion process! I've mostly succeeded in converting an A1419 iMac to a nice 5K monitor, using an SA-1 board and audio crossovers from StoneTaskin. It's connected to an M2 Macbook Air using USB-C. Video quality was great out of the box. The board gets pretty hot, and even crackled at one point (ouch), but it seems to work. I'm still planning to connect the iMac on/off button, and the power cable connector.
My main remaining issue is that I can use the Mac keyboard volume buttons to mute and unmute audio, and to show the pretty on-screen display showing higher or lower volume, but *not* to actually increase or decrease the volume coming out of the iMac/5K display. Changing volume settings within the Music app does change volume. I've played with the DCC settings through both MonitorControl and BetterDisplay, aiming to force software volume control, but nothing seems to work. I would be grateful for any further tips.
Got a tip for us?
Let us know
Become a MacRumors Supporter for $50/year with no ads, ability to filter front page stories, and private forums.
DIY 5k Monitor - success :-)
- Thread starter fiatlux
- WikiPost WikiPost
- Start date
- Sort by reaction score
You are using an out of date browser. It may not display this or other websites correctly.
You should upgrade or use an alternative browser.
You should upgrade or use an alternative browser.
- Status
- The first post of this thread is a WikiPost and can be edited by anyone with the appropiate permissions. Your edits will be public.
@PaulD-UK
From what I understand, Juicy Crumb has a board that is perfect for a 2011 iMac. It's set up to easily integrate with everything, like the power and audio.Is anyone else making boards like this for my 2017 iMac?
Also, I watched that video of that German guy building a 5k using an SA-1 board. I see them as pretty cheap. Also successful was @RDCh .
Maybe I could do this too....
@ItsAShaunParty "Juicy Crumb has a board that is perfect for a 2011 iMac. It's set up to easily integrate with everything, like the power and audio... Is anyone else making boards like this for my 2017 iMac?"
No. I don't think it will happen, because the costs of replicating Apple's TB/USB ports on a new DIY conversion PCB would be probably be too expensive, and reusing the PCIe webcam and microphones needs a whole new computer to interface with...
"Maybe I could do this too...."
We all started out thinking this.....
@Xarl-li Thank you so much for your 3D designs!
I printed the SA1 adapter board posted here (https://www.thingiverse.com/thing:6840882) via Craftcloud. It fits my SA1 board like a glove, but it did not align with the mounts on the inside of my A1419 iMac. Specifically, the two mounting holes on the side of the "Yikashdaida" lettering (top and bottom left as the board would align in the Mac) don't line up with the two plugs (what's the right word?) in the iMac case. I was eventually able to mount my SA1 with a couple of these (https://www.thingiverse.com/thing:6897927), although it didn't quite fit either.
The original AA1 board you posted here (https://www.thingiverse.com/thing:6775247) obviously won't fit the SA1 because the AA1 is both narrower and shorter, but it does look like those two holes on the top and bottom left of the board (along the edge with the lettering) would match the plugs in the iMac case. You can see the different position of the mounting holes on the photo (IMG_6074.jpeg): the hole at the bottom right of the top board (for the AA-1) is roughly 1cm to the left of the equivalent hole in the bottom board (for the SA1). Same for the raised cylindrical shape at the top right.
Am I seeing this right? Have others had the same issue with the SA1 3D design? If I'm right, @Xarl-li would you be prepared to modify the design, or provide an stl file with editable parts so I can have a go (compleet noob, but hey you have to start somewhere ;-))
Thanks again!
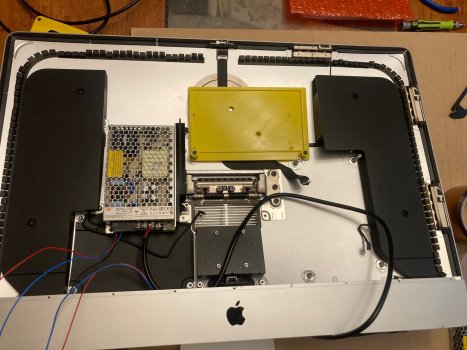
I've designed an adapter board for the SA1 (similar to the one from @Xarl-li) that's mounted in a similar location as the one that @Ozpyn designed (see pic below). I'm designing several more pieces and was hopping to upload all of them in one shot, but I can start by uploading the SA1 adapter board.
Printables - iMac 5K conversion using SA1 board
Attachments
Last edited:
HAha are you saying that everyone who used an SA-1 board is lying? What're the problems?@ItsAShaunParty "Juicy Crumb has a board that is perfect for a 2011 iMac. It's set up to easily integrate with everything, like the power and audio... Is anyone else making boards like this for my 2017 iMac?"
No. I don't think it will happen, because the costs of replicating Apple's TB/USB ports on a new DIY conversion PCB would be probably be too expensive, and reusing the PCIe webcam and microphones needs a whole new computer to interface with...
"Maybe I could do this too...."
We all started out thinking this.....
@ItsAShaunParty "HAha are you saying that everyone who used an SA-1 board is lying? What're the problems?"
Juicy Crumb's website says this about their proposed Dock Pro product:
"Simply connect a USB-C capable computer of your choice and get access to the iMacs original Webcam, Speakers, Hard Drive and more! Integrated software control.
While currently only compatible with the iMac G4 and 2011 iMac, we plan on expanding to other models in the future. 5K iMacs anyone?"
All that means integrating the whole of a JRY--SA1 or R1811 into their own PCB, and adding the additional features.
All that functionality has been done already by people in this thread, but the additional costs and computer design capability to create an iMac shaped board, with integrated JRY/R1811 circuitry, and adding a 'computer with PCIe capability' to connect to the iMac's PCIe webcam, are far ahead of anything Juicy Crumb has shown they can do, up to now.
Of course someone could come up with a full kit of parts to do a DIY 5K conversion, but the I/O USB-C/DP/HDMI input options make it difficult because everyone has different ideas about the interface cabling needs etc etc.
For their current Docklite 2011 boardJuicy Crumb says:
"USB ports can be accessed via the RAM access hatch and allow you to easily connect accessories such as keyboards, mice or USB sticks to your computer."
Which is very complicated for those wanting to plug a USB-C video or data input cable into the existing TB or USB-A ports on the 2017- iMac cases...
Even the attempts at designing 3D printed mounting boards aren't versatile enough for everyone to want the same parts...
Last edited:
Oh, haha, my mistake! I think there was a bit of a misunderstanding! I wasn't clear. When I said, "Maybe I can do this too..." I was just referring to using an SA1 board instead of an R1811. It'd save a lot of money, and many people seem to have success. What do I get more with R1811?@ItsAShaunParty "HAha are you saying that everyone who used an SA-1 board is lying? What're the problems?"
Juicy Crumb's website says this about their proposed Dock Pro product:
"Simply connect a USB-C capable computer of your choice and get access to the iMacs original Webcam, Speakers, Hard Drive and more! Integrated software control.
While currently only compatible with the iMac G4 and 2011 iMac, we plan on expanding to other models in the future. 5K iMacs anyone?"
All that means integrating the whole of a JRY--SA1 or R1811 into their own PCB, and adding the additional features.
All that functionality has been done already by people in this thread, but the additional costs and computer design capability to create an iMac shaped board, with integrated JRY/R1811 cicuitry, and adding a 'computer with PCIe capability' to connect to the iMac's PCIe webcam, are far ahead of anything Juicy Crumb has shown they can do, up to now.
Of course someone could come up with a full kit of parts to do a DIY 5K conversion, but the I/O USB-C/DP/HDMI input options make it difficult because everyone has different ideas about the interface cabling needs etc etc.
For their current Docklite 2011 boardJuicy Crumb says:
"USB ports can be accessed via the RAM access hatch and allow you to easily connect accessories such as keyboards, mice or USB sticks to your computer."
Which is very complicated for those wanting to plug a USB-C video or data input cable into the existing TB or USB-A ports on the 2017- iMac cases...
Even the attempts at designing 3D printed mounting boards aren't versatile enough for everyone to want the same parts...
Go back and read a little more of the thread - this has been asked and answered several times alreadyI was just referring to using an SA1 board instead of an R1811. It'd save a lot of money, and many people seem to have success. What do I get more with R1811?
Thank you, very cool – waiting for deliveryI've designed an adapter board for the SA1 (similar to the one from @Xarl-li) that's mounted in a similar location as the one that @Ozpyn designed (see pic below). I'm designing several more pieces and was hopping to upload all of them in one shot, but I can start by uploading the SA1 adapter board.
Printables - iMac 5K conversion using SA1 board
Hello,
Could someone give me some advice on the power supply brick? I’ve read through this entire forum and took plenty of notes. It seems there are a lot of different opinions and I am a novice with electrical stuff (but I am comfortable soldering).
Already ordered the FA1 board and I will NOT have cable PD, a fan, usb, speakers, or a camera. I would like to eventually hook up the original power switch to the board. I’m fine with the power supply being outside, but would prefer it inside if it isn’t too much trouble.
My broken LG 4k monitor has an external power supply that is 24V 7A, 140W (see photo). Could I use this? Or is there another you would recommend? I live in Italy and electricity costs a lot here. Getting a PS that is cool and energy efficient is important to me. I plan to setup similar to 6-Colors in post #2284 with the logo punched out for cooling and no fan.
What are your thoughts? Should I go internal and if so, which PS like a Mean Well 100W 24V 4.2A?
Or can my old external PS work? Or another external like a Leicke 24V, 5A, 120W?
Thank you for any help provided
As an Amazon Associate, MacRumors earns a commission from qualifying purchases made through links in this post.
@razmanugget
That's a 19 volt power supply, and should work fine with a JRY--FA1 board, but you will have to change the connector to the FA1 board with a 5.5x2.5mm barrel plug.
It's coming up to 8 years old, but should continue to work fine, although if it is outside the case it would be easy to replace.
That's a 19 volt power supply, and should work fine with a JRY--FA1 board, but you will have to change the connector to the FA1 board with a 5.5x2.5mm barrel plug.
It's coming up to 8 years old, but should continue to work fine, although if it is outside the case it would be easy to replace.
You are the man, PaulD-UK. Thank you!@razmanugget
That's a 19 volt power supply, and should work fine with a JRY--FA1 board, but you will have to change the connector to the FA1 board with a 5.5x2.5mm barrel plug.
It's coming up to 8 years old, but should continue to work fine, although if it is outside the case it would be easy to replace.
Hello, can I use the JRY-W9CUHD-AA1 (the cheap one with only 8-bit) for an imac 5k 27 2017? because at stonetaskin only the model numbers A1219 A2115 are listed for this board. As far as I know, the 2017 has the model number A1419, which is included with the more expensive JRY-W9RQUHD-SA1 and FA1 boards. However, the price difference is very big and I only really need 5k/60hz via USB C with charging function. The cheaper one should also offer that...?
@lasse1234
Yes, that must be a typo on their website.
The JRY-AA1 should be fine using USB-C for 5K/60 + PD.
It will probably run a bit hotter with PD, so mount it where it gets some air flow on both sides.
What you lose with the AA1 is keyboard control of brightness, which the more expensive ones have,
using apps like Better Display or Monitor Control which allow this.
Tell StoneTaskin which screen panel you will be using so you get the right cables.
Last edited:
Thank you!
@lasse1234
Yes, that must be a typo on their website.
The JRY-AA1 should be fine using USB-C for 5K/60 + PD.
It will probably run a bit hotter with PD, so mount it where it gets some air flow on both sides.
What you lose with the AA1 is keyboard control of brightness, which the more expensive ones have.
There are apps which allow this.
Tell StoneTaskin which screen panel you will be using so you get the right cables.
I printed one of these and it fits, but there isn't enough clearance below it to plug a DisplayPort cable in. How were you able to fit one?I've designed an adapter board for the SA1 (similar to the one from @Xarl-li) that's mounted in a similar location as the one that @Ozpyn designed (see pic below). I'm designing several more pieces and was hopping to upload all of them in one shot, but I can start by uploading the SA1 adapter board.
Printables - iMac 5K conversion using SA1 board
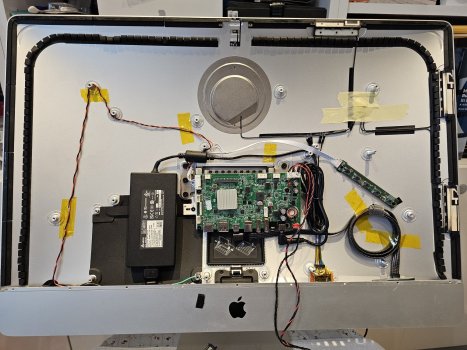
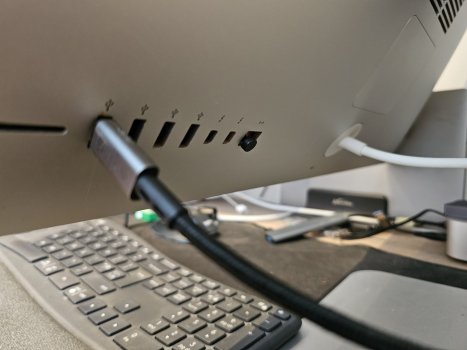
I finally managed to get my 2015 5K iMonitor looking clean (at least from the outside!). I connected the joystick through the Ethernet port and got the USB-C connection to fit through the iMac's USB-A port. I bought a decent Delta 24V 5W PSU and put it inside - it's so much better than the POS PSU I got from Amazon which warmed up even when nothing was connected to it. Next on the list is making power available on the other three USB-A ports - for my LED over-monitor lamp, an analog VU meter thingy, and a small fan pointing at me for use in summer - it gets horribly hot and humid here in Barcelona.
Attachments
Can the r1811 board be used with the M3 Ultra by just a single Thunderbolt 5 cable to get full 5K?
Yes. Thunderbolt 3/4/5 isn’t necessary as a USB-C 8K alt-mode DP 1.4 is all that is needed for 5K/60 Full 4.4.4 10 bits.
But using a TB 3+ cable is an easy way to ensure that the cable is good for 8K video.
On a Studio Ultra any USB-C port should work, but on a Max then only the rear ports carry a video signal.
If you get a R1811 with HDMI 2.1 then the Mac’s HDMI port can be used. But colour space is better using the TB ports.
You get an excellent monitor. 😃
In most ways as good as a Studio Display, but at below a third of the price…
With multiple ports for PCs or gaming consoles.
thanks for the reply - I've got 2 x old iMac 2014 and bought a dual arm monitors for my desk - gonna get the R1811 from stone taskin and gut the iMacs - will let you know how it goesYes. Thunderbolt 3/4/5 isn’t necessary as a USB-C 8K alt-mode DP 1.4 is all that is needed for 5K/60 Full 4.4.4 10 bits.
But using a TB 3+ cable is an easy way to ensure that the cable is good for 8K video.
On a Studio Ultra any USB-C port should work, but on a Max then only the rear ports carry a video signal.
If you get a R1811 with HDMI 2.1 then the Mac’s HDMI port can be used. But colour space is better using the TB ports.
You get an excellent monitor. 😃
In most ways as good as a Studio Display, but at below a third of the price…
With multiple ports for PCs or gaming consoles.
Incidentally, my JRY-AA1 arrived yesterday. On my system, brightness can be changed with the keyboard! In MonitorControl, under Displays, it says “Control method: Hardware (DDC)”, and brightness changes are reflected in the board’s own OSD. This is a tremendous relief, as I failed to research the board sufficiently before ordering one. I'm using this all the time.What you lose with the AA1 is keyboard control of brightness, which the more expensive ones have, using apps like Better Display or Monitor Control which allow this.
Maybe related: the board shipped with a backlight connector unlike any I’ve seen on this Forum, or in the supplier’s AliExpress store.
@dnptr That's good news about the DDC control. It means they must have developed an updated firmware for the AA1 board.
Which seller did you buy yours from?
Boards with older firmware are probably still being sold... 🙁
That backlight connector looks very good, as it's got a proper socket for the screen b/l cable plug, rather than inserting prongs from the back of a JST SH socket into the cable.
Which seller did you buy yours from?
Boards with older firmware are probably still being sold... 🙁
That backlight connector looks very good, as it's got a proper socket for the screen b/l cable plug, rather than inserting prongs from the back of a JST SH socket into the cable.
@valexv You're completely right, clearance is extremely tight; don't know what I was thinking when I designed it.I printed one of these and it fits, but there isn't enough clearance below it to plug a DisplayPort cable in. How were you able to fit one?
I've uploaded a low profile version of the board that I think will provide better access to the ports (see pic below):
iMac 5K conversion using SA1 board
This project has been entertaining (forced me learn about 3d modeling) but I think I'm ready to close it out - most likely will not try to reuse the speakers (at least for now) since the SA1 board amplifier is supposed to not be very good. Will upload the remaining models once I'm done.
Register on MacRumors! This sidebar will go away, and you'll see fewer ads.