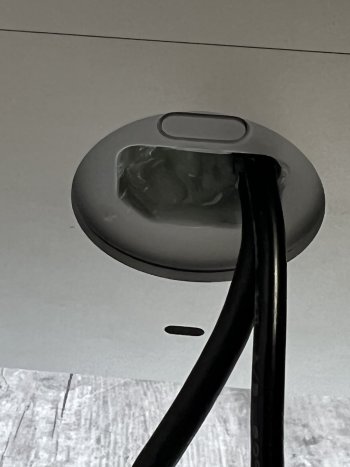
Is there anywhere to order this camera/mic module other than Alibaba? Could you post a link? ThanksI thought I'd share my setup. Some key features of my 2015 iMac 5K conversion:
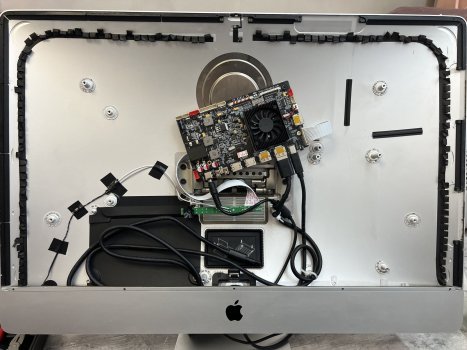
It took a few weeks to finish the project. I've spent a lot of time on designing 3D printed parts and by the end of it I was really bored and cut a few corners here and there. The parts are not perfect and I'm not releasing anything just yet. Ideally I'd reprint rear piece because it looks really bad but I don't really care at this point. I'll make another display conversion for my brother soon and I'll probably optimize the parts.
- Connected stock speakers to the internal amplifier on R1811.
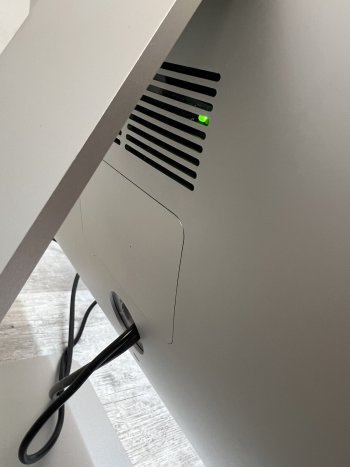
- Wired stock fan through to a PWM controller with a thermistor attached to the PSU which is the hottest component in the case. This is a blower style fan that sucks fresh air and blows it through 3D printed duct. This makes the display not silent but it doesn't really bother me because it's still very quiet. The fan ramps up when a MacBook is charged through USB-C.
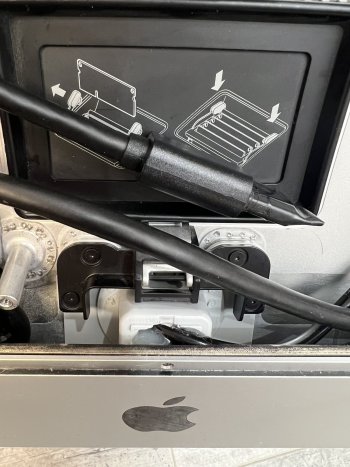
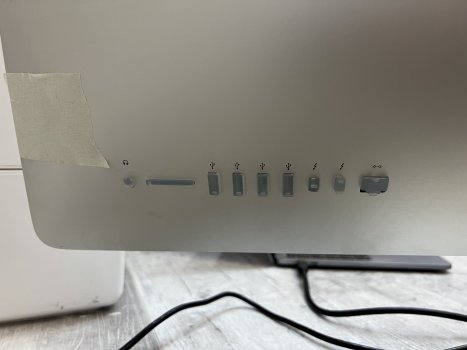
- RAM door cover replaced by a 3D printed piece which exposes 2x HDMI and 1x USB-C. I used extension cables to route I/O to the rear. It also houses buttons and IR receiver.
- R1811 fan replaced by a Noctua 40x10. I highly recommend it because the stock fan is quite loud. I had to use low noise adapter to eliminate high pitch noise.
- Generic USB webcam installed. I also rewired internal microphone to the location used by stock microphones. The microphone picks up fan noise but most voice apps have noise suppression feature which eliminates the problem completely.
- Most of the things are mounted using 3D printed parts.
View attachment 2170519
View attachment 2170520
View attachment 2170521
View attachment 2170522
View attachment 2170523
Got a tip for us?
Let us know
Become a MacRumors Supporter for $50/year with no ads, ability to filter front page stories, and private forums.
DIY 5k Monitor - success :-)
- Thread starter fiatlux
- WikiPost WikiPost
- Start date
- Sort by reaction score
You are using an out of date browser. It may not display this or other websites correctly.
You should upgrade or use an alternative browser.
You should upgrade or use an alternative browser.
- Status
- The first post of this thread is a WikiPost and can be edited by anyone with the appropiate permissions. Your edits will be public.
I've ordered it from AliExpress (link). You have to message the seller and ask them for a board that comes WITH a microphone because they not always install it. This module is very interesting. I haven't try to reverse engineer it yet but I'm pretty sure there should be a GPIO that is active when you use the webcam, this should allow us to mimic LED behavior from stock iMac camera 
Thanks so for the quick response and info. I've ordered it. I'm a very low level noob, so any further links or pics would be VERY much appreciated. Like an specific wiring diagrams.I've ordered it from AliExpress (link). You have to message the seller and ask them for a board that comes WITH a microphone because they not always install it. This module is very interesting. I haven't try to reverse engineer it yet but I'm pretty sure there should be a GPIO that is active when you use the webcam, this should allow us to mimic LED behavior from stock iMac camera
Also, I'd love your 3D plans and I don't care if they look perfect because they look better than anything I've seen.
I know I posted some pics before but I’ve since uploaded a video if anyone is interested in seeing my 5K display in action. Planning a part 2 video to show the enclosure I’m going to make for it.
That camera looks interesting. What kind of frame rate are you getting? The specs listed in that link show only 15fps.I've ordered it from AliExpress (link). You have to message the seller and ask them for a board that comes WITH a microphone because they not always install it. This module is very interesting. I haven't try to reverse engineer it yet but I'm pretty sure there should be a GPIO that is active when you use the webcam, this should allow us to mimic LED behavior from stock iMac camera
From the specs, it looks like the FPS for this webcam depends on the resolution you choose, so if it is set to 1080p, it is 30FPS.That camera looks interesting. What kind of frame rate are you getting? The specs listed in that link show only 15fps.
There is an excellent 2017 5k iMac available locally to me selling for $300. I have been wanting to turn a 5k iMac into an external display for a while now. Does this seem like a good deal for the iMac? Is this panel less prone to pink edges and ghosting? I would have to check for these issues as well as dust in the corners. Should I hold out for a different model year? What is the preferred controller board for this panel? Any opinions would be appreciated.
Edit: It sold before I could take a look at it...
Edit: It sold before I could take a look at it...
Last edited:
It did not! I was able to get it revived with some help from one of my tech guys. We found the short, and replaced the chip.Did it kill your board, or just temporarily cause it to not function?
If your board was dead, it would be interesting to have someone remove the heatsink and take a photo of the chip markings.
There's actually a diagram of the board somewhere, and I posted the manual in an earlier post that gives more specs.
That's been my experience too, and it makes sense because a 2017 iMac can still run Ventura, the most current version of macOS. So in the big picture, it doesn't have the perception of being outdated like a 2014-2015 iMac would, hence they command higher prices on the used market.Edit: It sold before I could take a look at it...
But to your question - is/was $300 a good deal? - I'd say so! You're at $300, plus $170-290 for the adapter board (depending on the model), plus $20 for the opening tool and the replacement adhesive strips... so ~$490-610 total plus a bit of DIY time, to get a respectable stand-in for the Apple Studio Display - a $1500 product that at best has only seen sale prices of $1300.
There's just nothing else on the market that's comparable or can touch it for the price. Well, maybe a used 5K LG UltraFine, but it's a lot to gamble with their reliability issues. $300 iMacs will get you *TWO* 5K displays plus money in your pocket for less than the cost of a single Apple Studio Display.
I'm glad your board was not beyond repair! Can you (or your tech guy) provide more details about what chip specifically was replaced and how you fixed it? I'm having a similar issue with my own R1811 and would greatly appreciate any information you can provide.It did not! I was able to get it revived with some help from one of my tech guys. We found the short, and replaced the chip.
There's actually a diagram of the board somewhere, and I posted the manual in an earlier post that gives more specs.
Has anyone else noticed when the computer wakes up, your browser windows are like 3/4 the height that they used to be? Happens to me all the time. I think some resolution changes occur during sleep and wake up?
Which conversion board are you using?Has anyone else noticed...
Thanks for the advice on choosing a board to the participants in this topic.
Purchased:
1) Controller R1811, new (aliexpress)
2) Case iMac 27 2012 (A1418), bought used
3) Matrix LM270QQ1(SD)(D1) for iMac Pro A1862 5k, new spare part
Everything is assembled in the case, it works)
Of the features I want to note.
1) The controller board is fixed in standard holes.
2) The wires to the case (power supply and USB C) are brought through the disassembled standard IMAC power connector and filled with hot melt adhesive.
3) I removed the spare PD2 wire in the imac case so that it would be possible, if necessary, to connect the monitor to Windows in the future, if necessary. You can get it by opening the cover of the RAM (I saved the opening mechanism).
4) I soldered the regular power button to the board with buttons
5) I stuck silicone plugs into the connectors on the back of the IMAC (I bought it on Ali)
Attachments
My build is now more or less complete.
Haha, I started out thinking minimally, but that's not how things have turned out -
6.66 Kg is the number of the beast, well its weight...
1. R1811, bought from Chinese seller on eBay UK.
This is mounted so that access to the cable ports are retained through the ram hatch.
2. Case: New 2019 iMac 27 case, surplus stock from Cork, Ireland - via eBay.
This is fitted with a plate VESA mount, bolted through the case slot.
3. iMac Pro LM270QQ1(SD)(D1) screen, new from local auction of surplus stock.
I moved the heat protection pads to match the hot spots of my build.
4. The smallest PSU I could find is a Cincon CFM130M240 24V 5.4A medical grade power supply,
with a 400,000 hour MTBF rating - eBay UK
5 iMac 21 fan (new) fitted back-to-front to cool the PSU, kept inaudible by a variable speed 4 wire PWM controller, with temp probe to PSU.
6. Aluminium ducting to exhaust the fan through the existing exit port.
7. iMac Pro main speakers, used, from eBay.
The existing iMac power-on button has had to be removed and the hole blanked-off.
8. 2012 iMac secondary speakers (metal-dome tweeter model), cut down to fit.
Backed with sections of the aluminium shell from a damaged iMac 27 to retain the acoustic properties of speakers.
9. Four ‘first-order’ crossover units at 4kHz, to protect the tweeters from low frequencies - each with 10uF capacitors and 0.15mH inductors.
10. Another fan controller (2 wire) feeding the R1811’s fan, and a temp probe clipped to the R1811’s, heatsink. This makes this fan inaudible.
11. Both fans are run from a variable voltage board which can be adjusted through the case ram hatch.
Its initially set at 10V to lower fan noise - if the temp probes register increased heat and ramp the fan speeds up.
12. The two PWM controllers and the Buck voltage converter are slidable - so all 3 units can be adjusted through the ram hatch.
13. The control strip is mounted internally, with the buttons facing to the rear, in the original TB/USB ports. External buttons taken from an old TV are fitted into a new cover-plate cut from the damaged iMac case that I took the speaker backing plates from.
14. A small circle of IR translucent plastic ( taken from the TV) is cut into the cover plate to allow the remote control to be used - very effectively. Clear plastic for the LED to be visible.
15. The speakers can be powered either externally, or by the R1811, feeding cables out of the ram hatch to external sockets - one pair for each speaker pair.
So I can tweak the audio in perpetuity!
The R1811's audio speaker amp is very good for everyday purposes - much better than I expected.
The correct pinout is L+ L- R- R+, top to bottom.
EDIT: The internal amplifier definitely has better max volume with a single internal speaker at 4 ohms on each channel.
With 8 ohms/channel loading its not really loud enough for quietly recorded audio.
Initial comments:
Everything worked straightforwardly - after weeks of design/redesign build/rebuild angst!!!
Screen quite bright enough with no extra backlight board.
EDIT: Power consumption at max screen brightness is 52 watts (including internal sound and my fans - which remain at very low speed). Power consumtion at normal screen brightness is 26 watts. This is with no power draw on any of the R1811's internal connectors or power from USB (A or C).
No heat, The PSU is heat-sinked to the external case and is showing about a 3 degree rise in temp compared to the cool parts of the case.
So, no fan noise. Whatsoever. Both fans running at about 30% of their 10v speed.
The iMac Pro speakers are designed to be run from a T2 DSP, very loud mids/bass, lower high frequencies,
so they need to be paired with the ordinary iMac speakers, which, because they are cut down, are very bright.
Work in progress, but I’m very happy so far!.
Its been a lot of work.
A lot - especially as the first month was installing an electric sit/stand desk with the VESA arms…
Cost: just below half the price of an Apple Studio display. Lots of fiddly tools and kit needed.
But the screen is (of course) gorgeous, seemingly 10 bit, running through a Cable Matters DP 8k cable fed by a Mac mini M1.


Last edited:
Hi all,
I just wanted to share my successful build using the T18 board.
- 5k60 works via single cable, USB-C to USB-C or USB-C to Displayport from M1 Macbook Air, (HDMI not tested yet)
- "billions of color" so I figure it supports 10bit
- brightness and contrast keyboard controls working with MonitorControl
- I am not charging the mac from the T18, but in a brief test it showed as charging even with the 'weak' 20V 65W power supply I used.
I added some other details. If I find the time I will write a full build log:
- Converted to VESA
- DSLR mount + wiring
- Mic in the front-facing apple
- Reusing original USB cutouts for, well, USB ports
- USB switch
Since I just finished, I have no long-term test of the T18 yet, but for now it seems great.
Even the dimensions of the board are somewhat lucky, I could directly use two of the original HDD-stands for mounting.
The only minor annoyance was that the labels of 'up/down' on the control panel were swapped, so that I had to rewire them after drilling the holes.
What did you use for the usb ports (last picture)? I would love to see your write up.- Reusing original USB cutouts for, well, USB ports
That's fantastic. Thanks for sharing, as the T18 looks great on paper, but the "momentum" of positive results with the R1811 tends to drown out (or even discourage) any discussion or consideration of the newer alternatives. Especially nice is that it appears to be comparable in features to the R1811, but without requring a fan to get there.I just wanted to share my successful build using the T18 board.
How do you find the maximum backlight brightness? Is it sufficient without any accessory driver boards?
So... After reading this entire thread and being really blown away by all the different ways of achieving the same objectives, I've finally finished mine and it looks awesome (at least it does to me).
Anyway, as I was reading, I started ordering parts since it takes so long to receive items from China. As a result, I have two items which I never used and I'm offering them up for sale. The huge advantage that I can offer free US shipping within two days of purchase. Sorry, US only please.
Here's what I have:
-never removed from box
-looked at, but never used.
If this post is breaking any rules, please let me know.
Anyway, as I was reading, I started ordering parts since it takes so long to receive items from China. As a result, I have two items which I never used and I'm offering them up for sale. The huge advantage that I can offer free US shipping within two days of purchase. Sorry, US only please.
Here's what I have:
1. StoneTaskin High quality Audio speaker for R9513 R9516 R9A18 R1811 Panel 5K Driver Board Speaker 8 ohm 10W 100% Tested
-paid ~$18. Will sell for $15, including shipping via PayPal-never removed from box
2. Led Backlight Driver DZ-LP0818 Improving Brightness for LM270QQ1/LM270QQ2...
-paid ~$28. Will sell for $20-looked at, but never used.
If this post is breaking any rules, please let me know.
Any chance that the display menu will tell you if this is in RGB or YUV?- "billions of color" so I figure it supports 10bit
I remember that some of the other board/port/machine combinations were giving people YUV by default... there's a photo attached to this post that shows the difference:
I didn't even know that that was a product. Are they sized to fit within the iMac enclosure?Here's what I have:
1. StoneTaskin High quality Audio speaker for R9513 R9516 R9A18 R1811 Panel 5K Driver Board Speaker 8 ohm 10W 100% Tested
Here's the link: https://www.aliexpress.us/item/3256...2ynvloW&gatewayAdapt=glo2usa&_randl_shipto=USI didn't even know that that was a product. Are they sized to fit within the iMac enclosure?
They're small: 4"x2". I've seen them in more than one "success upload".
It's a cheapo usb hub from amazon.What did you use for the usb ports (last picture)? I would love to see your write up.
The ports are spaced a bit too far, about 3mm too much from the outer edge to edge.
Bending the pcb just a bit solved that in my case, hence the cable tie.
Plugs are not perfectly straight, and the outer two ports require some force, but the inner two ports work smoothly.
I glued the unused ports shut using heat-glue gun (thunderbolt, ethernet, etc). Taping some glossy tape on the back gives an even finish once it cools off, I used the protective plastic film that comes with 3M double-sided glue pads.
The stands are m4 (better get m3 if you can) and glued in place using 2-component adhesive.
As an Amazon Associate, MacRumors earns a commission from qualifying purchases made through links in this post.
Hi all,
I just wanted to share my successful build using the T18 board.
- 5k60 works via single cable, USB-C to USB-C or USB-C to Displayport from M1 Macbook Air, (HDMI not tested yet)
- "billions of color" so I figure it supports 10bit
- brightness and contrast keyboard controls working with MonitorControl
- I am not charging the mac from the T18, but in a brief test it showed as charging even with the 'weak' 20V 65W power supply I used.
I added some other details. If I find the time I will write a full build log:
- Converted to VESA
- DSLR mount + wiring
- Mic in the front-facing apple
- Reusing original USB cutouts for, well, USB ports
- USB switch
Since I just finished, I have no long-term test of the T18 yet, but for now it seems great.
Even the dimensions of the board are somewhat lucky, I could directly use two of the original HDD-stands for mounting.
The only minor annoyance was that the labels of 'up/down' on the control panel were swapped, so that I had to rewire them after drilling the holes.
has the t18 an amp? Is it possible to connect speakers like with R1811?
Any chance that the display menu will tell you if this is in RGB or YUV?
I remember that some of the other board/port/machine combinations were giving people YUV by default... there's a photo attached to this post that shows the difference:
Unfortunately, no luck on getting any more detailed output form the OSD.
I dumped the output off the AllRez tool (attached) but could not identify whether im getting 4:4:4.
What exactly should it say?
So far, I did not go through the commands to force RGB mode because the test image you referenced looked crisp.
Brightness seems good to me.
It feels brighter than or on-par with the MacBook Air display. I'm 24/7 in dark mode and would go as far as saying that the occasional white-background website hurts a bit. This was not the case the 4K Dell I had before.
Sadly, since I picked the iMac up with a broken mainboard I cannot compare before/after.
One thing I am not super happy with is the color profile.
In previous posts there were some recommendations but for me none of the software profiles that show up (combined with various options in the OSD) renders anything close to the macbook.
Any suggestions on how to calibrate (manually) without buying a spyder?

Attachments
According to the seller's specs it does have an amp.has the t18 an amp? Is it possible to connect speakers like with R1811?
There are also unused connectors on the PCB, but for me speakers were no priority so I have not botherd to figure out how to connect them (nor a DZ-LP0818 to increase brightness, since I have 2015 panel and the brightness seems sufficient).
Note that the board came with no instructions on how to connect or wire things up, whatsoever.
I guessed the 'correct' orientation for the LCD power from the (sellers) jpeg below.

Register on MacRumors! This sidebar will go away, and you'll see fewer ads.


