Got a tip for us?
Let us know
Become a MacRumors Supporter for $50/year with no ads, ability to filter front page stories, and private forums.
DIY 5k Monitor - success :-)
- Thread starter fiatlux
- WikiPost WikiPost
- Start date
- Sort by reaction score
You are using an out of date browser. It may not display this or other websites correctly.
You should upgrade or use an alternative browser.
You should upgrade or use an alternative browser.
- Status
- The first post of this thread is a WikiPost and can be edited by anyone with the appropiate permissions. Your edits will be public.
I haven't looked for a way to determine what ColorElement is being used by the current display mode. Also, there's no way (with the known APIs) to map the current display mode to a TimingElement except for the current mode. #302 In your AllRez output,Unfortunately, no luck on getting any more detailed output form the OSD.
I dumped the output off the AllRez tool (attached) but could not identify whether im getting 4:4:4.
What exactly should it say?
DPTimingModeId is 83. Here's the info for TimingElement with ID:83.
Code:
                        { ID:83 ElementType:0 5120x2880@3932160(3932160)Hz 11534336(11501568)kHz H(5280: 48 32 80 ±:1 *:0) V(2925: 3 5 37 ±:0 *:0) AspectRatio:15 IsInterlaced:0 IsOverscanned:0 IsPreferred:1 IsPromoted:0 IsSplit:0 IsVirtual:0 PreciseAspectRatio:116508 ScanInformation:2 StandardType:1 TimingStandard: TimingType:3 ValidPixelEncodings:6989 CEAShortID: Score:16985
                          ColorModes = (
                                { ID:1 ElementType:1 Depth:8 PixelEncoding:0 DynamicRange:0 Colorimetry:10 EOTF:0 IsVirtual:1 SupportsDSC:1 StandardType:1 Chromaticity: R:, G:, B:, W:, WhiteGamma: Score: },
                                { ID:3 ElementType:1 Depth:8 PixelEncoding:3 DynamicRange:1 Colorimetry:1 EOTF:0 IsVirtual:1 SupportsDSC:1 StandardType:2 Chromaticity: R:, G:, B:, W:, WhiteGamma: Score: },
                                { ID:6 ElementType:1 Depth:12 PixelEncoding:2 DynamicRange:1 Colorimetry:7 EOTF:2 IsVirtual:1 SupportsDSC:1 StandardType:2 Chromaticity: R:, G:, B:, W:, WhiteGamma: Score: },
                                { ID:7 ElementType:1 Depth:12 PixelEncoding:6 DynamicRange:1 Colorimetry:7 EOTF:2 IsVirtual:1 SupportsDSC:1 StandardType:2 Chromaticity: R:, G:, B:, W:, WhiteGamma: Score: },
                                { ID:86 ElementType:1 Depth:8 PixelEncoding:0 DynamicRange:0 Colorimetry:16 EOTF:0 IsVirtual:0 SupportsDSC:1 StandardType:2 Chromaticity: R:42112,22016 G:20544,40640 B:9920,3456 W:20544,21568 WhiteGamma:144179 Score:240999 },
                                { ID:88 ElementType:1 Depth:10 PixelEncoding:0 DynamicRange:0 Colorimetry:16 EOTF:0 IsVirtual:0 SupportsDSC:1 StandardType:2 Chromaticity: R:42112,22016 G:20544,40640 B:9920,3456 W:20544,21568 WhiteGamma:144179 Score:440999 }
                        )
                          DSCRequiredColorElementIDs = (
                            88
                        )
                        }
It also says that TimingElement 83 requires ColorElement 88 for DSC.
I guess the one with the highest Score is the preferred ColorElement.
I don't know what the PixelEncoding, DynamicRange, Colorimetry values are. They are not the same as the values used on Intel Macs. If we knew what they were then we could see if any of the modes are not RGB or 444. Actually, the IOKit.Framework has hidden APIs to convert the values to strings.
Code:
•••••••••••••IOAVVideoAspectRatioString
 1: 27:64
 2: 135:256
 3: 9:16
 4: 9:15
 5: 10:16
 6: 9:14
 7: 3:4
 8: 4:5
 9: 1:1
10: 5:4
11: 4:3
12: 14:9
13: 16:10
14: 15:9
15: 16:9
16: 256:135
17: 64:27
•••••••••••••IOAVVideoScanInformationString
 0: None
 1: Overscan
 2: Underscan
 3: Selectable
•••••••••••••IOAVStandardTypeString
 0: None
 1: VESA
 2: CEA
•••••••••••••IOAVVideoTimingStandardString
 0: None
 1: DMT
 2: GTF
 3: CVT
 4: CEA
•••••••••••••IOAVVideoTimingTypeString
 0: Established
 1: Standard
 2: Calculated
 3: Detailed
 4: CEAShortID
•••••••••••••IOAVVideoPixelEncodingString
 0: RGB 4:4:4
 1: YCbCr 4:2:0
 2: YCbCr 4:2:2
 3: YCbCr 4:4:4
 4: DolbyVision (native)
 5: DolbyVision (HDMI tunneling)
 6: YCbCr 4:2:2 (DP tunneling)
 7: YCbCr 4:2:2 (HDMI tunneling)
 8: DolbyVision LL YCbCr 4:2:2
 9: DolbyVision LL YCbCr 4:2:2 (DP tunneling)
10: DolbyVision LL YCbCr 4:2:2 (HDMI tunneling)
11: DolbyVision LL YCbCr 4:4:4
12: DolbyVision LL RGB 4:4:4
13: GRGB Tunneled as YCbCr422 (Even line blue)
14: GRGB Tunneled as YCbCr422 (Even line red)
•••••••••••••IOAVElementTypeString
 0: Video Timing
 1: Video Color
 2: Audio
 3: Audio Channel Layout
 4: Vendor Specific Data Block
•••••••••••••IOAVVideoColorDynamicRangeString
 0: Full
 1: Limited
 2: Unknown
•••••••••••••IOAVVideoColorimetryString
 0: SMPTE 170M/BT.601
 1: BT.709
 2: xvYCC601
 3: xvYCC709
 4: sYCC601
 5: AdobeYCC601
 6: BT.2020 (YcCbcCrc)
 7: BT.2020 (YCbCr)
 8: DolbyVision VSVDB
 9: BT.2020 (RGB)
10: sRGB
11: scRGB
12: scRGBfixed
13: AdobeRGB
14: DCI-P3 (D65)
15: DCI-P3 (Theater)
16: Default RGB
•••••••••••••IOAVVideoColorEOTFString
 0: Traditional gamma (SDR)
 1: Traditional gamma (HDR)
 2: SMPTE ST 2084 (PQ)
 3: BT.2100 HLG
•••••••••••••IOAVStandardTypeString
 0: None
 1: VESA
2: CEAAnyway, PixelEncoding 0,2,3,6 are: RGB 4:4:4, YCbCr 4:2:2, YCbCr 4:4:4, YCbCr 4:2:2 (DP tunneling)
Interesting that there's no 4:2:0 mode.
Colorimetry 1,7,10,16 are: BT.709, BT.2020 (YCbCr), sRGB, Default RGB
Most likely you are running full Default RGB.
At least on the 2014 I opened, the standoffs seem to have used different welding methods depending on the location. I don't know that they would pop off without damage... but you could certainly grind one off if necessary?Is it possible to remove the standoffs like in the Powermac G5 ? Or most probably the iMac will bend when pulling?
Ah, I thought this was a USB hub question.
If its the iMac case stand-offs, then yes, they come off easily.
I used a sharp wood chisel, and got them off in a couple of taps with a mallet.
There are spot welds on earlier cases, but my 2019 case had much neater in-line welds.
I had to refit the speaker mounts in a different position, and used epoxy resin, after roughening up the aluminium.surface.
I dumped the output off the AllRez tool (attached) but could not identify whether im getting 4:4:4.
What exactly should it say?
So far, I did not go through the commands to force RGB mode because the test image you referenced looked crisp.
Colorimetry 1,7,10,16 are: BT.709, BT.2020 (YCbCr), sRGB, Default RGB
Most likely you are running full Default RGB.
Thanks to both of you for this.
So with a positive visual result on the test pattern, and what looks like a good result from AllRez (?), this sounds like an overall good result for the T18 as a single-cable display? Am I correct @pSpitzner that your only real concern now is color calibration?
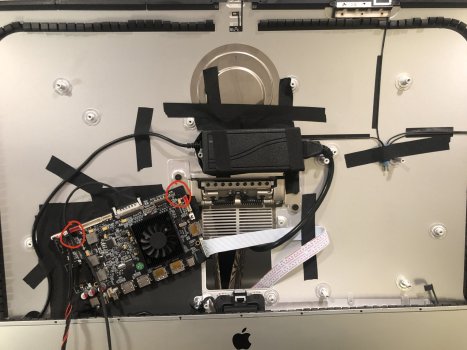
Got the r1811 into a 2015 imac 5k this weekend. Just wanted to share a photo of a good mounting location - can use existing holes (the upper right you need to enlarge the hole in the board by a fraction of a millimeter) and imac screws for these locations. Insulated the screen and back of the imac with some high temp automotive fabric tape.
It would be nice to have more than 2 Display Port inputs.
It would be nice to have more than 2 Display Port inputs.
Attachments
Thanks to both of you for this.
So with a positive visual result on the test pattern, and what looks like a good result from AllRez (?), this sounds like an overall good result for the T18 as a single-cable display? Am I correct @pSpitzner that your only real concern now is color calibration?
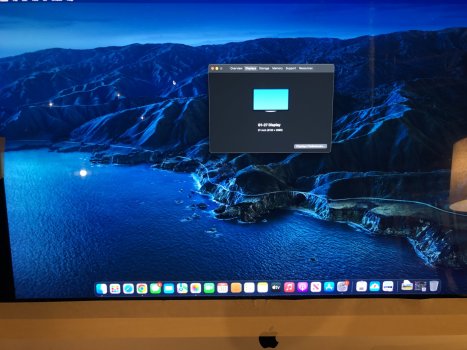
After two weeks of testing, and given that I cannot compare to other boards myself, I think the T18 is a decent solution. Some more notes:
- I tried HDMI with an 14" MBP M1 Pro just to realize that this would not give 5k60. M2 Pro needed
- Daisy-chaining through Lenovo-Docks (40AN, 40AC) brings along its own kind of troubles, but that's not the T18s fault.
- I had occasional dropouts. When my automated plant light turns on (same wall-outlet), it might trigger a reset and the board restarts. But this also happens with other screens — I should probably avoid these minisurges 😅.
- A bit more worriesome was one random shutdown after a few hours of use. Only a full power-cycle helped, disconnecting the power supply from the wall-outlet. I briefly checked the temps of the board and psu, both were warm to touch but not worse than a macbook under load. I think this might be due to the powerbrick. I will keep monitoring and might replace it for a spare magsafe, but since it only happened once its a low prio.
Want to share with you guy my “clean and simple” build:
- R1811 and Led backlight from ebay
- iMac 2014 mint condition: bought for $400 CAD (~ usd $300).
- One DP 1.4 to usb C cable
- AC adapter 24v 6A.
- push button
- Cable Wires and pin headers
- some pcs of plastic to make “frame”
Functional:
- 5k 60hz 10bit via on ly DP cable (i use MBP M1 Pro). I’m not sure if i have 8bit or 10bit.
- original speaker.
- original power button.
- 4 buttons through original usb ports
- can plug new cables without remove screen again (hard but still possible).
So far I happy with my build, this was the first time i use a soldering in my life loll. Maybe will re run all the cables and again to make it even better.
Thank you all of the previous comments, without you guys i wont have speakers and power button 🥲
Attachments
Phuncbb: nice set up. Can I ask how you attached the r1811 to the back of the imac? Also which sound amp board did you use?
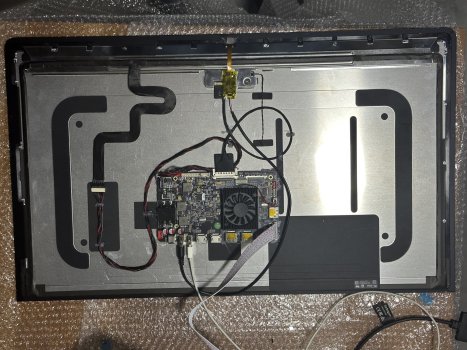
the board mounted with 2 screws. I cut a piece of plastic as a "mount" and mount it 2 the body (2 red screws), then drill a hole to screw the board (yellow).
At the bottom left corner (green) I have another screw (last photo) between the board and the body.
For speakers, I only connect wires to a 4 pin header and plug it into the board, no amp.


At the bottom left corner (green) I have another screw (last photo) between the board and the body.
For speakers, I only connect wires to a 4 pin header and plug it into the board, no amp.

Hi all, thanks for this great thread and shared content!
I would like to have your advice regarding the best board to buy (R1811 or R9A18).
I currently have two Late 2015 5k iMacs.
I am planning to convert one of the two iMacs to a monitor and use it for some time with my current late 2015 iMac (which will require to send the signal with 2 DP 1.2).
Later down the line, I am planning to convert the second iMac as well and use both of them as monitors with a M2 mac mini. At that time, I should ideally use a single DP 1.4 connection for each monitor.
Ideally I would like to use the same board model for both iMacs.
I tend to favor the R9A18 for the following reasons:
1/ it seems to handle both connectivity to get 5k at 60hz (dual DP1.2 and single DP1.4)
2/ It has also no fan, which is good in terms of noise. And temperature doesn't seem to be an issue.
3/ I am also planning to connect the iMac internal speakers to it, which I think should work (the board amp seems to deliver sufficient power for an every day use)
4/ It seems also that the brightness level we get with the R9A18 and 2015 panels is very close to the 500 nits we have with the iMac graphic cards.
Can you please give me your view and let me know if I missed any point that would make the R1811 (or any other board) a better choice?
Thanks a lot!
Last edited:
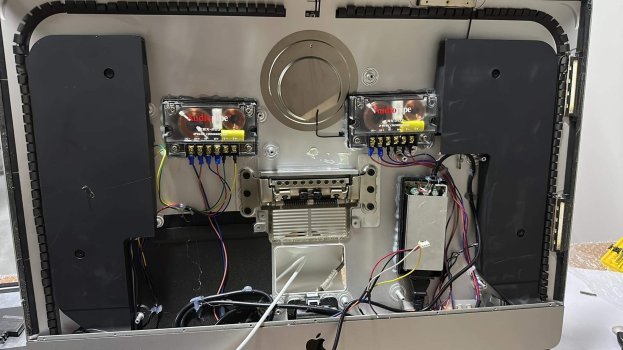
My turn to share. First of all, thanks to all the great info in this thread.

My set up:
2017 iMac - £595 (sold disks, PSU, Motherboard for £400)
R1811 - £230
Mean Well LRS-150-24 156W 24V 6.5A Single Output Enclosed Power Supply - £23
USB4 Extension cable - £15
DollaTek 2Pcs 130W 2-Way Speaker System Audio Crossover - £14
PATIKIL Adhesive Standoff, 30 Pack Reverse Mount Insulation Bracket - £5
Micro JST PH 2.0mm 4-Pin Plug Connector (for the audio) - £5
Gebildet 2pcs 19mm 12V/24V/125V/250V/5A Latching Push Button - £6
Total Build Cost: £500 with a few extra bits not list above.
Some notes from my build:
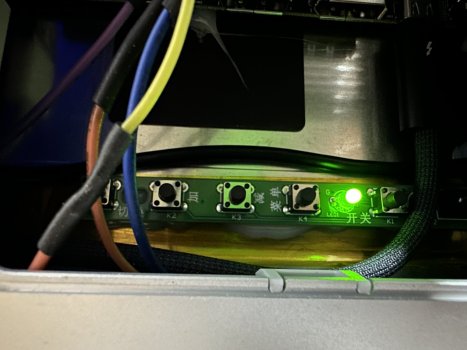
Reusing the power socket and power switch were a must.
I wanted to reuse the speakers. But be aware, it doesn't matter if you wire them in series, parallel or leave out one of the drivers - they will sound terrible. I bought the cheapest crossovers I could find - a massive overkill but they do improve the sound. They were a pain to wire up given none of the speaker connectors are labelled! Apple must be doing some EQ magic to get them sounding so good (relatively) by default!
For the PSU I wanted a higher quality one. The above Mean Well PSU is probably overkill but it wasn't too expensive and fit perfectly where the 3.5" disk was and has no fan. However... it makes quite a lot of whine/squeal noise when there is no load (i.e. when the screen is off). In the end I had to put the latching push button in the back of the case to completely kill the power to it. With hindsight I wish I used the included PSU.
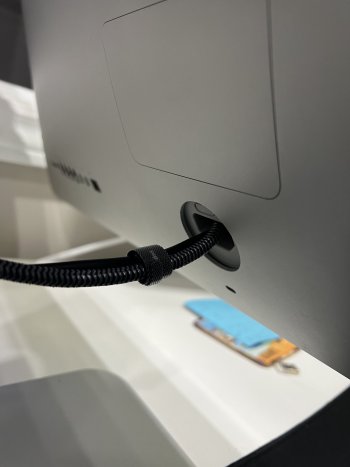
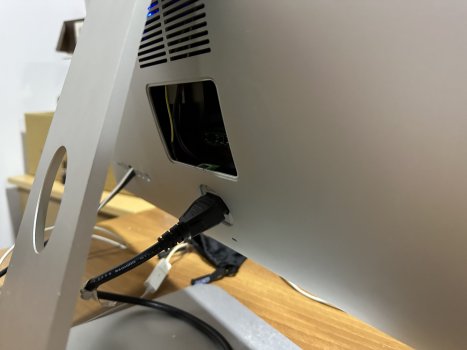
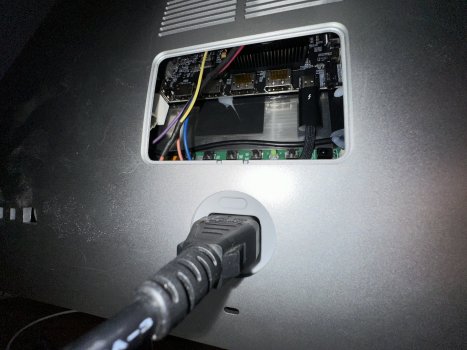
I didn't want to plug the cable in directly so I added the 20cm USB4/TB extension cable. I drilled a hole in the RAM cover and used a grommet. Not a bad solution.

The fan noise of the R1811 is... loud. I experimented with some 1 watt resistors and found that 360 ohm reduced the fan noise to a bearable level but was still audible. I guess only time will tell as to whether this has a long term detrimental effect.
An interesting point worth mentioning is that when I attached the screen to my 2017 21.5" iMac it didn't recognise it as a 5k screen even though the Apple page says it should. It wasn't a biggie as I was getting rid of that and replacing it with an M2 Mac Mini.
The remote control still works with the buttons in the case - you just have to reach around the back and point the remote at the air vent.
I think that's it. I'm happy with the build - glad I did it assuming it lasts a good 3-4 years. Only time will tell. If you have any questions, please ask.
Edit after using it for a week: Still very happy with it. Negatives though are that you can't set the screen brightness nor the volume using software or the keyboard, you can only do it via the remote which is rather annoying.
My set up:
2017 iMac - £595 (sold disks, PSU, Motherboard for £400)
R1811 - £230
Mean Well LRS-150-24 156W 24V 6.5A Single Output Enclosed Power Supply - £23
USB4 Extension cable - £15
DollaTek 2Pcs 130W 2-Way Speaker System Audio Crossover - £14
PATIKIL Adhesive Standoff, 30 Pack Reverse Mount Insulation Bracket - £5
Micro JST PH 2.0mm 4-Pin Plug Connector (for the audio) - £5
Gebildet 2pcs 19mm 12V/24V/125V/250V/5A Latching Push Button - £6
Total Build Cost: £500 with a few extra bits not list above.
Some notes from my build:
Reusing the power socket and power switch were a must.
I wanted to reuse the speakers. But be aware, it doesn't matter if you wire them in series, parallel or leave out one of the drivers - they will sound terrible. I bought the cheapest crossovers I could find - a massive overkill but they do improve the sound. They were a pain to wire up given none of the speaker connectors are labelled! Apple must be doing some EQ magic to get them sounding so good (relatively) by default!
For the PSU I wanted a higher quality one. The above Mean Well PSU is probably overkill but it wasn't too expensive and fit perfectly where the 3.5" disk was and has no fan. However... it makes quite a lot of whine/squeal noise when there is no load (i.e. when the screen is off). In the end I had to put the latching push button in the back of the case to completely kill the power to it. With hindsight I wish I used the included PSU.
I didn't want to plug the cable in directly so I added the 20cm USB4/TB extension cable. I drilled a hole in the RAM cover and used a grommet. Not a bad solution.
The fan noise of the R1811 is... loud. I experimented with some 1 watt resistors and found that 360 ohm reduced the fan noise to a bearable level but was still audible. I guess only time will tell as to whether this has a long term detrimental effect.
An interesting point worth mentioning is that when I attached the screen to my 2017 21.5" iMac it didn't recognise it as a 5k screen even though the Apple page says it should. It wasn't a biggie as I was getting rid of that and replacing it with an M2 Mac Mini.
The remote control still works with the buttons in the case - you just have to reach around the back and point the remote at the air vent.
I think that's it. I'm happy with the build - glad I did it assuming it lasts a good 3-4 years. Only time will tell. If you have any questions, please ask.
Edit after using it for a week: Still very happy with it. Negatives though are that you can't set the screen brightness nor the volume using software or the keyboard, you can only do it via the remote which is rather annoying.
Last edited:
As an Amazon Associate, MacRumors earns a commission from qualifying purchases made through links in this post.
Theoretically it would be possible to profile the sound output, and add an equalizer to correct for this?I wanted to reuse the speakers. But be aware, it doesn't matter if you wire them in series, parallel or leave out one of the drivers - they will sound terrible. I bought the cheapest crossovers I could find - a massive overkill but they do improve the sound. They were a pain to wire up given none of the speaker connectors are labelled! Apple must be doing some EQ magic to get them sounding so good (relatively) by default!
It could be done with a separate box, but would probably nullify any cost savings for having converted your own display. I wonder if it could be done globally (for the system audio output, not just specific programs) via software on the mac? 🤔
So I've been mulling this decision for quite a while, but decided to go with the T18 for my 2014 5K iMac conversion.
In its favor, I liked the fact that it was not only fanless, but had a heatsink twice as large as anything else, giving it the best chances of keeping reasonable temps with convection. It uses the RTD2718Q-CG chipset, which is the same as the proven R9A18, but improves on the R9A18 by including USB-C with PD, and supporting a 24V power supply (instead of 12V only for the R9A18), letting it operate with much lower currents in the power supply & connectors.
The positive tests by @pSpitzner were much appreciated, and the T18 being ~$70 cheaper than the gold-standard R1811 doesn't hurt either.
Did you keep the original speakers and add the audio pipe ones, or are the original speakers just there for structural support?My build
I've decided to use the original speakers. The quality is not the best, but I'm ok with it - I will not be listening to music and for movies or games the quality is acceptable.Did you keep the original speakers and add the audio pipe ones, or are the original speakers just there for structural support?
You guys are awesome. Also lucky to have access to suitable cases to repurpose.
My setup: LM270QQ2 + Haijing T18 (the one with USB). Mounting details below.
I intended to get both the panel and the driver board from the same seller on AliExpress but they said QQ2 was out of stock. At that time, I assumed QQ2 was matte (vs QQ1 glossy) so I had to get the panel from a different vendor. Turns out QQ2 is glossy too. I am left with a consolation that it has better brightness and color capabilities and lower power consumption than QQ1.
Then, the driver board arrived with the wrong backlight cable. For some reason, they have you choose which panel you are going to use, and supply the appropriate cable. Something went wrong and I got a QQ1 cable. I had to chat with seller’s support and wait about a month for the correct cable to be delivered. All that time, I was afraid that when I finally connect everything the panel will turn out defective and I won’t be able to exchange it. Fortunately, everything worked at the first attempt.
I bought a random defective 27″ monitor to use as a case donor. It turns out, among 27″ panels, the LM270QQ2 is on the large side (and QQ1 even bigger). It did not fit.
So, my current solution is: a piece of plywood, a food container, a VESA arm, and a small bucket of bolts, washers, and nuts.
The result is quite nice. 5K @ 60Hz 4:4:4 over DP worked right out of the box with my Ubuntu 22.04. I didn’t even try the other inputs.
The T18 firmware seems to have made a mess of button mapping. On the PCB, buttons are labeled “Menu Down Up Enter Power”, but the actual functions are “Power Back + − Enter”. (The +/− buttons moves menu selection down/up respectively, but, when used to adjust brightness etc, they increment/decrement the value, which is shown as the bar going up/down.)

As can be seen, my woodworking skills leave much to be desired. And I think I overdrilled one of the mounting holes while trying to just countersink it.

Still, quite satisfied with the result and the decision to build this. All in all, I think it cost me about 666 USD, which is much cheaper than a ready-made monitor of this resolution can be bought.
My setup: LM270QQ2 + Haijing T18 (the one with USB). Mounting details below.
I intended to get both the panel and the driver board from the same seller on AliExpress but they said QQ2 was out of stock. At that time, I assumed QQ2 was matte (vs QQ1 glossy) so I had to get the panel from a different vendor. Turns out QQ2 is glossy too. I am left with a consolation that it has better brightness and color capabilities and lower power consumption than QQ1.
Then, the driver board arrived with the wrong backlight cable. For some reason, they have you choose which panel you are going to use, and supply the appropriate cable. Something went wrong and I got a QQ1 cable. I had to chat with seller’s support and wait about a month for the correct cable to be delivered. All that time, I was afraid that when I finally connect everything the panel will turn out defective and I won’t be able to exchange it. Fortunately, everything worked at the first attempt.
I bought a random defective 27″ monitor to use as a case donor. It turns out, among 27″ panels, the LM270QQ2 is on the large side (and QQ1 even bigger). It did not fit.
So, my current solution is: a piece of plywood, a food container, a VESA arm, and a small bucket of bolts, washers, and nuts.
The result is quite nice. 5K @ 60Hz 4:4:4 over DP worked right out of the box with my Ubuntu 22.04. I didn’t even try the other inputs.
The T18 firmware seems to have made a mess of button mapping. On the PCB, buttons are labeled “Menu Down Up Enter Power”, but the actual functions are “Power Back + − Enter”. (The +/− buttons moves menu selection down/up respectively, but, when used to adjust brightness etc, they increment/decrement the value, which is shown as the bar going up/down.)
As can be seen, my woodworking skills leave much to be desired. And I think I overdrilled one of the mounting holes while trying to just countersink it.
Still, quite satisfied with the result and the decision to build this. All in all, I think it cost me about 666 USD, which is much cheaper than a ready-made monitor of this resolution can be bought.
Last edited:
My setup: LM270QQ2 + Haijing T18 (the one with USB). Mounting details below.
Thanks for posting! Glad to see another T18 success story!
That's kind of what the crossovers are doing, but obviously no actual EQing. I did try using software to boost the treble, but the tweeters are funnelled to the bottom of the screen - without them connected it sounds like you have some speakers at the back.Theoretically it would be possible to profile the sound output, and add an equalizer to correct for this?
It could be done with a separate box, but would probably nullify any cost savings for having converted your own display. I wonder if it could be done globally (for the system audio output, not just specific programs) via software on the mac? 🤔
The hardware developers have done a great job with this but I am a little surprised that the solution isn't designed to be more plug-and-play. I wonder how many screens other than a 27" iMac these boards are used for? I would happily pay more for:
1. Reuse of the original PSU with compatible connector (although I guess this would make USB-PD impossible given the PSU output is only 12v).
2. Reuse of the iMac power button with compatible connector.
3. Speaker connectors that are compatible and have some EQ-ing/crossovers.
4. Mounting points that fit the case
5. Reuse of the original fan.
6. Adding/reusing a webcam
And so on... Surely given where we are now, a drop-in replacement board wouldn't be beyond possibility. If Apple was actually serious about e-waste, really they should offer this themselves! A drop-in replacement M2 logic board would be sweet!
This thread screams out for my DIY VESA attempt.
Unfortunately, the Intel iMac I bought in 2017 came without the VESA mount. I thought that this was built in but in fact, Apple removed this feature, and if you didn't specify when buying you just got the generic model. Unfortunately, specific VESA mounts were not available here in the Philippines I decided to go the HARD WAY by cutting off the stand and drilling holes in the remaining part.
Unfortunately, the Intel iMac I bought in 2017 came without the VESA mount. I thought that this was built in but in fact, Apple removed this feature, and if you didn't specify when buying you just got the generic model. Unfortunately, specific VESA mounts were not available here in the Philippines I decided to go the HARD WAY by cutting off the stand and drilling holes in the remaining part.
So I have been lurking around in this thread for months now and finally pulled the trigger for a second hand 2015 iMac. However I still don't know which board to go for. I don't need USB-PD (I don't trust any other power source then apples own charger even my 100EUR Anker dongle) but I absolutely want the RGB layout. IDK if 8 bit 10 bit thingy is important especially since the panel is not really 10 bit but uses FRC to emulate? it. I am planning to buy a second hand CalDigit (or OWC) thunderbolt hub, use the whatever displayport input there is, create a custom PCB for using the rear cutout ports and connect them all to the thunderbolt hub inside than use that hub as a one port solution. I have a M1 MBA so only one port for everything (other is for charging). Which board should I go for? I am currently thinking Haijing T18 for it's passive cooling and cheapness but I couldn't find any long term reviews about it. What do you guys think?
Edit: Extra Questions => Do you think 10 bit is actually worth it? Should I really be aware of the PD charging of these boards or would they be on par with the quality in the LG Ultrafine or Studio Display?
Edit 2: Apparantly Haijing T19 model supports HDMI 2.1, can I use that to achieve 5K RGB 8bit? If that's the case that would really simplify things as I don't have to buy a thunderbolt hub (well, an expensive variant anyways) Some cheapish good quality hubs support HDMI 2.1 afaik.
Last edited:
If cheap is a priority, and you don't want or need USB-C charging, then the R9A18 is probably the way to go?cheapness
They are about $60 less expensive than the equivalent T18 bundle, and have plenty of long-term reviews here.
Just read the rest of this thread, and know what you are ordering, so that you get one with the correct firmware for your usage.
Yeah, I thought about doing a thunderbolt hub + R9A18 inside at first as well. but now Haijing T19 is kinda pushing me over the edge since it has HDMI 2.1 which is a real nice to have imo for the longevity of it. Not sure though.If cheap is a priority, and you don't want or need USB-C charging, then the R9A18 is probably the way to go?
They are about $60 less expensive than the equivalent T18 bundle, and have plenty of long-term reviews here.
Just read the rest of this thread, and know what you are ordering, so that you get one with the correct firmware for your usage.
Register on MacRumors! This sidebar will go away, and you'll see fewer ads.


