It may be more economical to disconnect the fans from the board, and use regulator module?@PaulD-UK
I have now tried it again on the DC Jack connection. Strangely enough, there is the same problem as with the fan connector. The fan rotates continuously. Also the iMac fan...so all fans that hang in chain. Even if I only connect the small fan.
I currently regret ordering directly from Stonetaskin (although that was the forum recommendation). He says I should send it back and then get a new one. I have to pay for the return shipment to China myself. And I didn't get a really firm statement, because I extended and soldered the fan cable.
Got a tip for us?
Let us know
Become a MacRumors Supporter for $50/year with no ads, ability to filter front page stories, and private forums.
DIY 5k Monitor - success :-)
- Thread starter fiatlux
- WikiPost WikiPost
- Start date
- Sort by reaction score
You are using an out of date browser. It may not display this or other websites correctly.
You should upgrade or use an alternative browser.
You should upgrade or use an alternative browser.
- Status
- The first post of this thread is a WikiPost and can be edited by anyone with the appropiate permissions. Your edits will be public.
Yes, maybe. But I'm afraid that something else from the board is defective. If I keep and use the board now and then something does not work in the future, then I can completely forget about an exchange.It may be more economical to disconnect the fans from the board, and use regulator module?
As I said on the screen reserve port the fan works. I would have to buy the right pic connectors. Hmm...would you really just connect the fan there and that's it?
Yes it looks like it.What happens when you use the R1811 connected to its screen and a Mac?
Does everything work as expected?
Does the screen go into standby mode if you put the Mac to sleep or turn it off?
So as soon as the Mac is turned on, the image immediately comes on the iMac screen.
As soon as the Mac goes into standby, the iMac screen goes out and the fans off. 2 seconds later "No Signal" appears in the display and the fans turn on again for 2 seconds (is that normal?) And then off again.
If I turn off the board with the remote control, the screen goes out immediately.
But I'm surprised that the reserve screen goes, DJ Jack and the fan connection are defective. I still think it's just a small thing but I'm slowly giving up hope.
The DC Jack 10 pin socket is always on when the 24v is connected, that is how it should be.
The Reserve screen voltage 5 pin connector is tied to the Backlight power output, so will come on when the screen backlight voltage is powering the screen panel, and go off in standby mode.
If there was no power to that the monitor wouldn't work, but it is working for you , so that is good.
Everything that needs to work seems to be working.
Hopefully. 😐
Hi, loving this forum thread and got inspired to do the same to an old iMac. Final got two for cheap, one was to good as a casual browsing machine to convert, (500Tb ssd and 32 Gb ram) so got used the second one. (150€ a piece! crazy cheap)
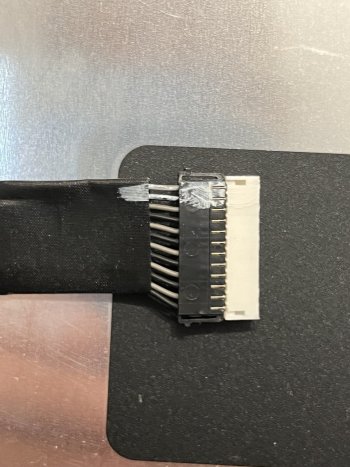
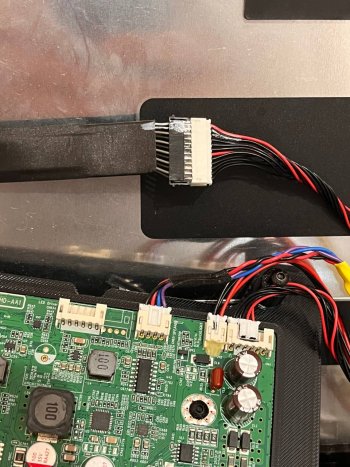
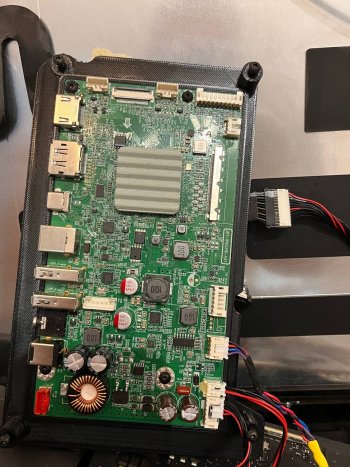
Finally got the driver board, went for the jry-w9cuhd-aa1. dismantling the iMac was very easy with the ifixit kit. But then ran into an issue connecting one of the two main connectors. The flat ribboncable, I guess data, fit perfectly. But for the other, i guess backlight cable, I can’t seem to connect it. Searched through all photos but can’t seem to find a description on howto connect.
What am I doing wrong? Is the board the wrong type? Am I missing a part?
some pictures.
fixed it.. was to cautious.. it appears to be a tight fit.. seems to work now.Hi, loving this forum thread and got inspired to do the same to an old iMac. Final got two for cheap, one was to good as a casual browsing machine to convert, (500Tb ssd and 32 Gb ram) so got used the second one. (150€ a piece! crazy cheap)
Finally got the driver board, went for the jry-w9cuhd-aa1. dismantling the iMac was very easy with the ifixit kit. But then ran into an issue connecting one of the two main connectors. The flat ribboncable, I guess data, fit perfectly. But for the other, i guess backlight cable, I can’t seem to connect it. Searched through all photos but can’t seem to find a description on howto connect.
What am I doing wrong? Is the board the wrong type? Am I missing a part?
some pictures.
@tomver77
I think its better to use some adhesive tape to keep the backlight plug together once you've got it connected.
Those long prongs are 'live' when the board is powered, and it might kill the board if they get shorted....
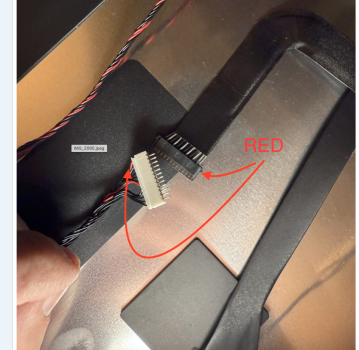
Your last pic shows the backlight plug the wrong way round - the red wire on the outside connects to the outer grey wire on the screen panel cable.
I think its better to use some adhesive tape to keep the backlight plug together once you've got it connected.
Those long prongs are 'live' when the board is powered, and it might kill the board if they get shorted....
Your last pic shows the backlight plug the wrong way round - the red wire on the outside connects to the outer grey wire on the screen panel cable.
Last edited:
Hi, loving this forum thread and got inspired to do the same to an old iMac. Final got two for cheap, one was to good as a casual browsing machine to convert, (500Tb ssd and 32 Gb ram) so got used the second one. (150€ a piece! crazy cheap)
Finally got the driver board, went for the jry-w9cuhd-aa1. dismantling the iMac was very easy with the ifixit kit. But then ran into an issue connecting one of the two main connectors. The flat ribboncable, I guess data, fit perfectly. But for the other, i guess backlight cable, I can’t seem to connect it. Searched through all photos but can’t seem to find a description on howto connect.
What am I doing wrong? Is the board the wrong type? Am I missing a part?
some pictures.
View attachment 2427321
View attachment 2427319
View attachment 2427318View attachment 2427316
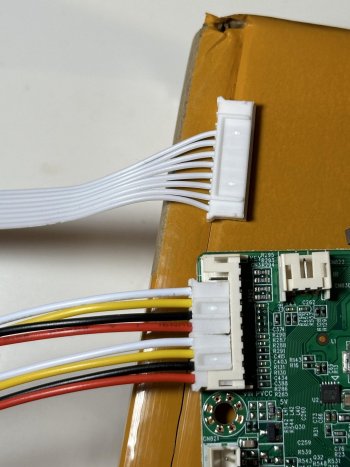
What you have there is a male and female connector, Push it hard it fits very well and Make sure the gray matches the red. Afterwards to work you can disconnect/separate the white terminal.
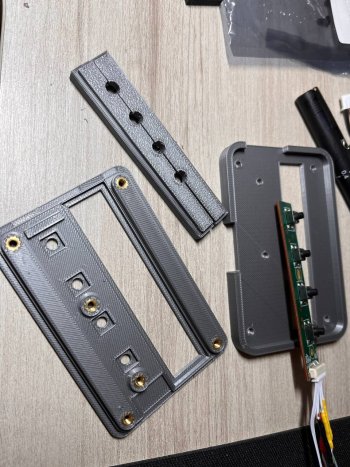
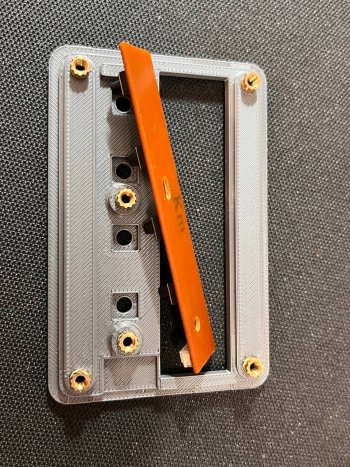
If you need support for the plate, you can print it, I shared the STL, it fits perfectly in the imac chassis without cutting anything. You have to print a small elevator separator, and the base, included two Stl too.
Attachments
Last edited:
thanks! will do that for the next iteration, like the connection of the speakers, adding power brick or power supply to the inside.@tomver77
I think its better to use some adhesive tape to keep the backlight plug together once you've got it connected.
Those long prongs are 'live' when the board is powered, and it might kill the board if they get shorted....
Your last pic shows the backlight plug the wrong way round - the red wire on the outside connects to the outer grey wire on the screen panel cable.
nice. i'll find them , that would make a great addition.What you have there is a male and female connector, Push it hard it fits very well and Make sure the gray matches the red. Afterwards to work you can disconnect/separate the white terminal.
If you need support for the plate, you can print it, I shared the STL, it fits perfectly in the imac chassis without cutting anything. You have to print a small elevator separator, and the base, included two Stl too.
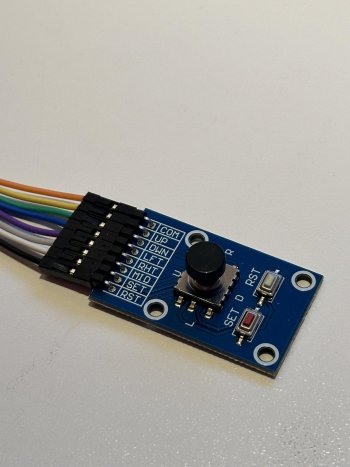
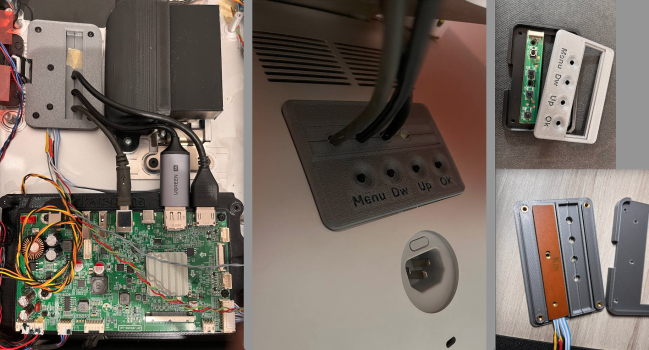
Does someone know how to connect a 5D rocker instead of the original controller of the jry-w9cuhd-aa1 board? I connected 8 cables via 2x 4 pin jst connectors to the board but can´t figure out how to connect it. And I don´t need the power button connected as I´m using the imac power button as so. The Layout doesn´t make sense to me, as the menu isn´t routed to anything but the menu button on the original controller works. Thanks in advance
Attachments
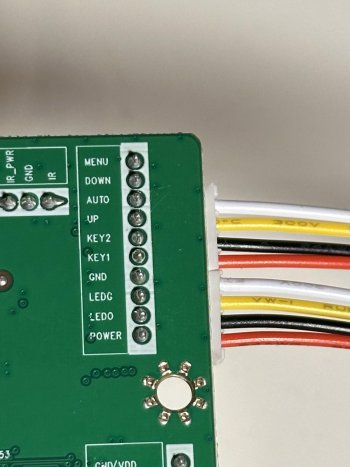
I haven't got a JRY--AA1 board, but the pictures of the remote Control Strip that is supplied is labelled (top to bottom):
10. unused
9. unused
8. Menu
7. Enter
6. Down
5. Up
4. Ground (Common)
3. Green
2. Red
1. Power.
So your iMac Power Switch goes to pins 1 and 4,
and your 5 way switch is connected:
Com to 4.
Up to 5.
Down to 6.
Left to 7.
Right to 8.
Mid unused
Set unused
Reset unused.
Your Red/Green LED if you wish to have one (you need one with a common cathode) goes:
Green anode to 3.
Common cathode to 4.
Red anode to 2.
@Patrick874 great news to read about a successful firmware flashing project. I received a bin file via email today. Boards from StoneTaskin are somewhere travelling between Shenzen, German customs, and Limbo (Which can be the same thing, Limbo and German customs)it works.....
These little Chinese freaks from StoneTaskin did a great job. So. Thanks to the new firmware, my late 2017 iMac with dual DP at a resolution of 5K also works.
Thanks guys and Thanks StoneTaskin
How did you flash the board and with which tooling? I did not receive information or tools from the supplier so far.
Anybody else having had success with flashing R1811 v4 with provided firmware?
Last edited:
Tested it today and worked fine.I haven't got a JRY--AA1 board, but the pictures of the remote Control Strip that is supplied is labelled (top to bottom):
10. unused
9. unused
8. Menu
7. Enter
6. Down
5. Up
4. Ground (Common)
3. Green
2. Red
1. Power.
So your iMac Power Switch goes to pins 1 and 4,
and your 5 way switch is connected:
Com to 4.
Up to 5.
Down to 6.
Left to 7.
Right to 8.
Mid unused
Set unused
Reset unused.
Your Red/Green LED if you wish to have one (you need one with a common cathode) goes:
Green anode to 3.
Common cathode to 4.
Red anode to 2.
Appreciate the help
Hi, I've been told that the JRY CPU at 5k goes up to 70⁰, have you noticed that?
I'm thinking of removing the stone heatsink and adding a heatsink with a fan, like the ones used in VGAs 15 years ago the old Pentium 286...386. Any ideas?
I'm thinking of removing the stone heatsink and adding a heatsink with a fan, like the ones used in VGAs 15 years ago the old Pentium 286...386. Any ideas?
Last edited:
70ºC is probably 5-10ºC too high.
The LG Ultrafine 5K monitor uses a very similar main chip heatsink, but it also has an extra aluminium heatsink about 10 times the size of the original one, which is underneath, and it's cooled by a fan.
There's some ducting not shown in the pic which directs the fan exhaust onto the heatsink.


If you don't have a fan to extract warm air out of the iMac case then even more heat will build up.
The large amount of aluminium in an iMac case will help to some extent, but the screen panel is also a source of heat, and without an exhaust fan the interior of the case will definitely be warmer.
Other builders of monitors using the JRY--AA1 have used the original iMac fan (at reduced speed) to blow air across their video driver board, and out of the original exhaust grille.
I used the smaller fan out of an A1418 21" iMac for my R1811 conversion, with ducting to blow the air out of the case.
The LG Ultrafine 5K monitor uses a very similar main chip heatsink, but it also has an extra aluminium heatsink about 10 times the size of the original one, which is underneath, and it's cooled by a fan.
There's some ducting not shown in the pic which directs the fan exhaust onto the heatsink.
If you don't have a fan to extract warm air out of the iMac case then even more heat will build up.
The large amount of aluminium in an iMac case will help to some extent, but the screen panel is also a source of heat, and without an exhaust fan the interior of the case will definitely be warmer.
Other builders of monitors using the JRY--AA1 have used the original iMac fan (at reduced speed) to blow air across their video driver board, and out of the original exhaust grille.
I used the smaller fan out of an A1418 21" iMac for my R1811 conversion, with ducting to blow the air out of the case.
Last edited:
Thanks Paul, I am going to use the original fan channeling the hot air to the outside due to its original design, I will regulate it with the plate that you recommended here, I am already trying it with a stepdown to go from 24 to 12v.
I note that the board has 3 fan outputs, but only 1 is controlled by the NTC, outputs 2 and 3 have manual adjustment.
I recycle what I can, but the old fans laptop i have are at 5v, i will look for a very narrow 12v pwm fan, and try to channel the flow over the cpu, although the speed will be fixed...I would prefer self-regulation, but it means installing another module.
I hadn't thought about channeling the air, maybe it's a good idea, and I didn't take off that original heatsink.
I'm testing that it works before installing it.
Hey y'all! Been dying to try this project, and finally found a good deal on a 2017 5K ($120 US). Want to convert it to a monitor for an M1 Mini and 2021 MBP. It's a shame to butcher such a beautiful machine (took reinstalling Monterrey but the iMac runs perfectly) but I finally got around to taking the glass off today and got the necessary part number for the screen.
Just wondering if there's a recommended monitor controller board compared to others. I'd prefer easier over complex (I don't solder, nor 3D print, so the super cool full feature conversions are a bit beyond me). Appreciate any advice!
Just wondering if there's a recommended monitor controller board compared to others. I'd prefer easier over complex (I don't solder, nor 3D print, so the super cool full feature conversions are a bit beyond me). Appreciate any advice!
Hello everyone,
I was able to test my board and the monitor for some time now and I have to say that it works well. The fan turns on and off cleanly and the display also works well.
But I have to say that I still find the fan of the R1811 quite loud. I have used 150Ohm but still I hear it clearly and find it disturbing. But the RAM flap is still open...
Do I have any other way to get more quiet there?
@usert888 does it work for you with the big fan? Is there anything to consider? I would like the whole thing silently.
Otherwise, I find the speakers OK, but no more. As soon as I change the sound to my MacBook Pro 2021, the sound sounds much better. Now, of course, I wonder if I may have infected something wrong or if it is normal that the iMac speakers from 2017 do not sound as good as those of the MacBook 2021? The bass is much better on the MacBook Pro.
Otherwise, I am satisfied. It is also quite well calibrated. I adjust the brightness and sound in macOS with BetterDisplay. Controlling the sound via the keyboard is not so linear (loudness over macOS).
Otherwise, I am glad to haven't installed the additional board for the extra brightness. The display is already way too bright and I have downgraded it significantly as a photographer.
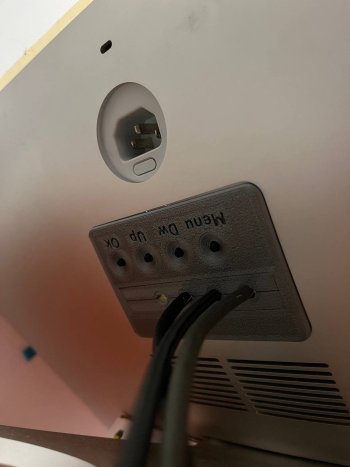
Currently, the iMac is still temporarily glued. I'll test it for a while and at some point it will be glued shut (when I've solved the fan problem). I still have to think about how to mount the keyboard inside. Had considered just pushing it in sideways (without mounting). I then want to control the monitor menu via the remote control through the ventilation slot. I don't use it that often or never...
Or I print a small holder with the 3D printer and mount the keyboard directly at the RAM opening so that I can get it in a pinch. But....the remote control works and why should I get to the buttons?
And now we come to the most important point. At the beginning I was quite quickly ready to get a matte screen. That reflected bothered me more than I guess. I only knew it from my small Macbook, so it was OK. But on the big screen...so lala. From a photographer's point of view.
In the meantime, I got used to it a bit and it fits. Fantastic display. But I think the next screen is something matte like the studio display nano texture or so.
Otherwise, I'm still considering whether I don't unscrew the stand and screw on VESA. The stand doesn't really bother me and the height also fits well. But I also like it when the monitor floats and you have a little more space underneath.
If you have more tips for the points, I would be happy to thank you. The most important thing for me is to solve the fan problem and also to mount the keypad somewhere.
///EDIT: As soon as I unplug the laptop and plug it back into the iMac, the sound stays with the laptop and does not automatically switch to the large iMac. Can I somehow set this in MonitorControl or BetterDisplay?
I was able to test my board and the monitor for some time now and I have to say that it works well. The fan turns on and off cleanly and the display also works well.
But I have to say that I still find the fan of the R1811 quite loud. I have used 150Ohm but still I hear it clearly and find it disturbing. But the RAM flap is still open...
Do I have any other way to get more quiet there?
@usert888 does it work for you with the big fan? Is there anything to consider? I would like the whole thing silently.
Otherwise, I find the speakers OK, but no more. As soon as I change the sound to my MacBook Pro 2021, the sound sounds much better. Now, of course, I wonder if I may have infected something wrong or if it is normal that the iMac speakers from 2017 do not sound as good as those of the MacBook 2021? The bass is much better on the MacBook Pro.
Otherwise, I am satisfied. It is also quite well calibrated. I adjust the brightness and sound in macOS with BetterDisplay. Controlling the sound via the keyboard is not so linear (loudness over macOS).
Otherwise, I am glad to haven't installed the additional board for the extra brightness. The display is already way too bright and I have downgraded it significantly as a photographer.
Currently, the iMac is still temporarily glued. I'll test it for a while and at some point it will be glued shut (when I've solved the fan problem). I still have to think about how to mount the keyboard inside. Had considered just pushing it in sideways (without mounting). I then want to control the monitor menu via the remote control through the ventilation slot. I don't use it that often or never...
Or I print a small holder with the 3D printer and mount the keyboard directly at the RAM opening so that I can get it in a pinch. But....the remote control works and why should I get to the buttons?
And now we come to the most important point. At the beginning I was quite quickly ready to get a matte screen. That reflected bothered me more than I guess. I only knew it from my small Macbook, so it was OK. But on the big screen...so lala. From a photographer's point of view.
In the meantime, I got used to it a bit and it fits. Fantastic display. But I think the next screen is something matte like the studio display nano texture or so.
Otherwise, I'm still considering whether I don't unscrew the stand and screw on VESA. The stand doesn't really bother me and the height also fits well. But I also like it when the monitor floats and you have a little more space underneath.
If you have more tips for the points, I would be happy to thank you. The most important thing for me is to solve the fan problem and also to mount the keypad somewhere.
///EDIT: As soon as I unplug the laptop and plug it back into the iMac, the sound stays with the laptop and does not automatically switch to the large iMac. Can I somehow set this in MonitorControl or BetterDisplay?
Last edited:
Hello everyone,
I was able to test my board and the monitor for some time now and I have to say that it works well. The fan turns on and off cleanly and the display also works well.
But I have to say that I still find the fan of the R1811 quite loud. I have used 150Ohm but still I hear it clearly and find it disturbing. But the RAM flap is still open...
Do I have any other way to get more quiet there?
@usert888 does it work for you with the big fan? Is there anything to consider? I would like the whole thing silently.
Otherwise, I find the speakers OK, but no more. As soon as I change the sound to my MacBook Pro 2021, the sound sounds much better. Now, of course, I wonder if I may have infected something wrong or if it is normal that the iMac speakers from 2017 do not sound as good as those of the MacBook 2021? The bass is much better on the MacBook Pro.
Otherwise, I am satisfied. It is also quite well calibrated. I adjust the brightness and sound in macOS with BetterDisplay. Controlling the sound via the keyboard is not so linear (loudness over macOS).
Otherwise, I am glad to haven't installed the additional board for the extra brightness. The display is already way too bright and I have downgraded it significantly as a photographer.
Currently, the iMac is still temporarily glued. I'll test it for a while and at some point it will be glued shut (when I've solved the fan problem). I still have to think about how to mount the keyboard inside. Had considered just pushing it in sideways (without mounting). I then want to control the monitor menu via the remote control through the ventilation slot. I don't use it that often or never...
Or I print a small holder with the 3D printer and mount the keyboard directly at the RAM opening so that I can get it in a pinch. But....the remote control works and why should I get to the buttons?
And now we come to the most important point. At the beginning I was quite quickly ready to get a matte screen. That reflected bothered me more than I guess. I only knew it from my small Macbook, so it was OK. But on the big screen...so lala. From a photographer's point of view.
In the meantime, I got used to it a bit and it fits. Fantastic display. But I think the next screen is something matte like the studio display nano texture or so.
Otherwise, I'm still considering whether I don't unscrew the stand and screw on VESA. The stand doesn't really bother me and the height also fits well. But I also like it when the monitor floats and you have a little more space underneath.
If you have more tips for the points, I would be happy to thank you. The most important thing for me is to solve the fan problem and also to mount the keypad somewhere.
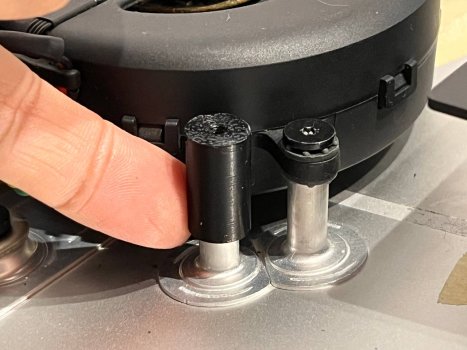
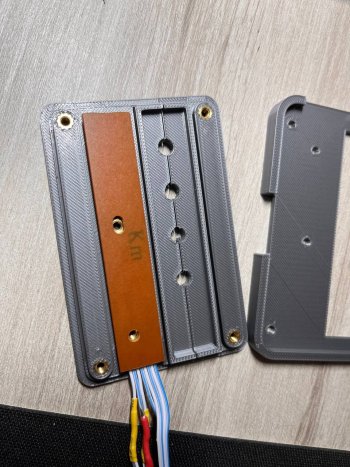
My solution has been this, cut the PCB, extract the ON/OFF cables to use the original and negative + Green + Red button to put the LEDs in the LED hole of the camera (in progress).
If you need the STL..I have used m3x5x5 inserts and m3 screw.
Attachments
@DisraeliGears "Just wondering if there's a recommended monitor controller board compared to others. I'd prefer easier over complex (I don't solder, nor 3D print, so the super cool full feature conversions are a bit beyond me)"
Very British user name reference – Cream?
People buy on price, or features.
The more expensive, generally, the better featured, which helps in a 'complex' build.
Or they buy on availability - eBay, seller's website or AliExpress (rated from easiest to most complex).
There are 2 cheaper boards:
JRY-W9CUHD - AA1 - 5K @ 8 bit, DP, HDMI 2.0* and USB-C. 12/24V.
JRY-W9RQUHD-FA1 - 5K @ 10 bits, DP, HDMI 2.1 only. 12/24V.
And 5 mid-price boards:
JRY-W9RQUHD-SA1 - 5K @ 10 bits, DP, HDMI 2.1 and USB-C. 12/24V.
R9A18 - 5K @ 8 bit, DP, HDMI 2.0. only (single cable), 5K @ 10 bit, DP (dual cable). 12V. With I/R remote control.
Haijing Cool T18 - 5K @ 10 bits, DP, HDMI 2.0 and USB-C. 12/24V.
Haijing Cool T19 - 5K @ 10 bits, DP, HDMI 2.1 only. 12/24V.
U49 - 5K @ 8 bit, DP, HDMI 2.0 and USB-C. Maybe EOL, no longer sold?
And one fully featured option, in two variants:
R1811 - 5K @ 10 bits, DP, HDMI 2.1 (5K) and USB-C, 24V. With I/R remote control.
R1811 - 5K @ 10 bits, DP, HDMI 2.0 (4K) and USB-C, 24V. With I/R remote control.
Finally, there is an 8K board, the R1815, which does 8K with a Dell 8K panel, and also 5K with an iMac screen.
It's twice the price of an R1811 board, so only suitable for buyers who value 'future-proofing' as the most important factor.
For a simple conversion (without soldering) then you probably can't fit an internal PSU, so buying from a vendor who sells a good quality PSU is easiest. AliExpress PSUs are not necessarily a good idea...
If you want to use the internal speakers, then the cross-over kit from AliExpress will allow easy solder-free installation.
A 2017 iMac has a good P3 color screen, so it's worth using a 10 bit board, but the cheaper 8 bit boards will give a good image.
* Some of the HDMI 2.0 boards (particularly JRY--AA1) can do 8 bit 5K, but only at 30Hz.
All the info (and links) to make the choice is contained in this thread.
Ask if you need more info on anything.
Good luck!
Last edited:
Very British user name reference – Cream?
Haha, yep, went through a 60s rock phase, oh about 20 years ago now and it's been my username everywhere ever since.
Thank you so much for the awesome breakdown! My only remaining question would be the necessity of a fan, that was kind of pushing me to the R1811 (and realizing I can do the speakers with no soldering is also very appealing...)
The R1811 board is the most featured, and seems to run more efficiently than the others, meaning running on less power/less heat - for the same brightness.
I think that is down to having the most developed firmware.
There are good solderless crimp/screw connectors available so you could fit the PSU internally, and lower the R1811 fan speed a bit to reduce noise.
Having the RAM hatch closed, using cable pass-through grommets , and the exhaust vents soundproofed, would also help reduce external noise.
More info is known about R1811 conversions, and its audio seems to be better than the alternatives.
But the other choices all seem to give good results, although this long thread only has one T19, one JRY--FA1, one U49 and no JRY--SA1 conversions, as of now.
Unless someone else knows more...
Last edited:
Register on MacRumors! This sidebar will go away, and you'll see fewer ads.