Become a MacRumors Supporter for $50/year with no ads, ability to filter front page stories, and private forums.

T-Bone90

macrumors regular
Feb 8, 2018
100
25
@PaulD-UK I have to ask you again...

I have now put a second 150 Ohm adapter between the R1811 fan. In total, 300 ohms. I can still hear the small fan clearly. He just has such a dull sound, which bothers me.

Do you think it makes sense to make more ohms in between to make it spin even slower? Because I still have the iMac fan, it shouldn't get too warm.

I already have everything in my shopping cart for the 80mm fan, but I am afraid of the conversion, because I will certainly get space problems, because I do not have a VESA, for example, and it will be tight.

Or try the Noctua 40x10mm?
 
Last edited:

5lives

macrumors newbie
Sep 22, 2024
7
10
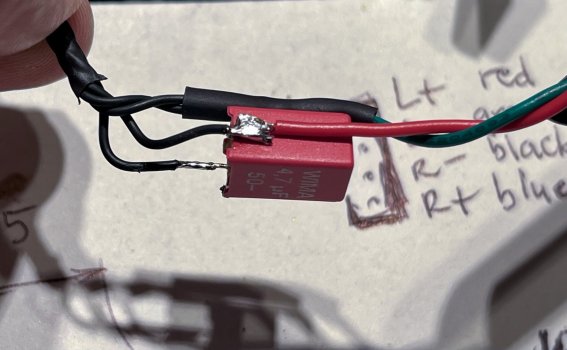
Here is a picture of the "simple crossover", and the internals.
 

Attachments

  • IMG_0070.jpeg
    IMG_0070.jpeg
    307.2 KB · Views: 63
  • IMG_0072.jpeg
    IMG_0072.jpeg
    613.1 KB · Views: 60

PaulD-UK

macrumors 6502a
Oct 23, 2009
860
458
@T-Bone90 "Do you think it makes sense to make more ohms in between to make it spin even slower?"

Yes it's fine to slow the fan down even more.
But check the heatsink doesn't get too hot before you finally seal the case up.

I don't think the Noctua 40x10 will be any quieter, because its fan blade profile isn't designed to be embedded in a heatsink.
 
Last edited:
  • Like
Reactions: T-Bone90

PaulD-UK

macrumors 6502a
Oct 23, 2009
860
458
Only by using a thermometer or maybe an infra-red heat gun thermometer.
Or a circuit board with a probe and temperature readout.

This one, W1209, could be adjusted to speed the heatsink fan up if the temp gets too hot by being connected to bypass the additional resistors, which would make the fan run faster.

When the heatsink cools the W1209 would switch the resistors back in to lower the fan speed.

TempProbe-W1209.jpg
 
Last edited:
  • Like
Reactions: T-Bone90

T-Bone90

macrumors regular
Feb 8, 2018
100
25
@PaulD-UK
Thank you very much! I ordered the W1209 (comes tomorrow). I'll also get a few more resistances tomorrow and will solder something.

How exactly do I connect the W1209? So how exactly did you attach the temperature sensor? It's just next to the heatsink, right? How did you fix it?

If I understand it correctly, then K0 and K1 are the fan. 12V and GND then comes from the 12V connection of the R1811? Or?
 

PaulD-UK

macrumors 6502a
Oct 23, 2009
860
458
You connect K0 to one end of the resistor and K1 to the other.
You set the W1209 to make contact when the heatsink gets hot and that makes contact between K0 to K1 and bypasses the resistor so the fan goes fast again
You can adjust the temperature this happens at.

I clipped the probe to the heatsink.
Picture in this post.
I used a different speed controller.
 
  • Like
Reactions: T-Bone90

T-Bone90

macrumors regular
Feb 8, 2018
100
25
Ah OK so all resistors in a row?

I can't see it 100% on the picture but how does the temperature sensor hold? Did you stick it on? Or did you make something with the round ring?

I still didn't understand the connection 100%, sorry.
I have red and black cable coming from the fan and red and black cable coming from the board. Where does something have to go in now and where are the resistors?

The following two pictures also tell me different things:
 

PaulD-UK

macrumors 6502a
Oct 23, 2009
860
458
I used a spring clip to hold the sensor.

As you have your fan wired now, connect K0 to one end of the resistor and K1 to the other.
 
  • Like
Reactions: T-Bone90

T-Bone90

macrumors regular
Feb 8, 2018
100
25
OK I don't have a spring clip but I think I can tape it with High temperature polyimide tape, the yellow one.

So somehow I don't get smart about it... but maybe I also get it wrong.

Currently 12V comes from the board and goes to the fan. In between the resistors are clamped.

So I only solder an additional cable to each end of the resistors and go to K0 and K1 with it?
Which end of the resistance comes to which side doesn't matter?

Is this Sketch right?

Bildschirmfoto 2024-10-12 um 00.53.00.png
 
  • Like
Reactions: PaulD-UK

PaulD-UK

macrumors 6502a
Oct 23, 2009
860
458
@T-Bone90 That is fine, but it can be simplified:

W1209Diagram.jpg


The extra resistor slows the fan down to get lower fan noise - when the heatsink is still cool.
Its value needs to be determined by seeing how big (in ohms) it needs to be to make the fan silent enough.

Keeping the 150 ohm resistor means the fan will never run at maximum speed, but fast enough to give extra cooling to the heatsink if it gets too hot.

The W1209 is set to 'Cooling' mode, and it's Switch will close when the temperature of the probe gets too hot.
When the Switch closes it will bypass the extra resistor and increase the speed of the fan.

This should be set to be at about 50ºC, with the Switch set to open again when the temp drops to about 45º C.
Do a trial, running the monitor long enough to find the temperatures that work best for your setup
 
  • Like
Reactions: T-Bone90

PaulD-UK

macrumors 6502a
Oct 23, 2009
860
458
The first thing to do is attach the W1209 temp probe to the heatsink and run the monitor for a good time with just 150 ohms to see how hot the heatsink gets.
Once you know that then the best settings can be worked out.

There are instructions for setting the W1209.
 

Xarl-li

macrumors newbie
Sep 22, 2024
25
23
Barcelona
@T-Bone90 That is fine, but it can be simplified:

View attachment 2436379

The extra resistor slows the fan down to get lower fan noise - when the heatsink is still cool.
Its value needs to be determined by seeing how big (in ohms) it needs to be to make the fan silent enough.

Keeping the 150 ohm resistor means the fan will never run at maximum speed, but fast enough to give extra cooling to the heatsink if it gets too hot.

The W1209 is set to 'Cooling' mode, and it's Switch will close when the temperature of the probe gets too hot.
When the Switch closes it will bypass the extra resistor and increase the speed of the fan.

This should be set to be at about 50ºC, with the Switch set to open again when the temp drops to about 45º C.
Do a trial, running the monitor long enough to find the temperatures that work best for your setup

Paul I ask? Wouldn't it be simpler and efective to put a pwm regulator?
For example: https://es.aliexpress.com/item/1005...Xs8PUCIP&utparam-url=scene:search|query_from:
 
  • Like
Reactions: PaulD-UK

PaulD-UK

macrumors 6502a
Oct 23, 2009
860
458
I was suggesting a temperature sensor with readout, and which would also work with voltage reduction resistors already fitted.

My own build with that 2-wire PWM controller:
 

Attachments

  • 1728759582829.jpeg
    1728759582829.jpeg
    212.9 KB · Views: 39
Last edited:

T-Bone90

macrumors regular
Feb 8, 2018
100
25
I have now connected the W1209 and provisionally attached the temperature sensor. Let the monitor just heat up.

Unfortunately, there were no instructions included. I have no idea how to set it up. Can you possibly tell me this?

Currently it only shows 25.5.

In total, I now have 150 ohms on it.

I now also have the small Noctua fan there as a test and will also check again whether it matters.

/Edit: I have found an instruction but there are a few settings tust I dont know… See picture

IMG_8670.jpeg


//Edit2: the iMac Runs now over 1h and the max temp ar the moment is 31,5 degrees. But the ram Flap was open. So i think I add +5 degrees on top. From 30 degrees he has switched on the additional resistors.

The temperature sensor was glued to the edge of the hestsink with adhesive tape.
 
Last edited:

PaulD-UK

macrumors 6502a
Oct 23, 2009
860
458
The W1209 should show the temperature of the probe as soon you connect power.

Is your probe attached to the heatsink and showing 25.5º?
That is really cool if the R1811 is running.
The heatsink fan is only needed if it gets much hotter.

You need to see how hot the heatsink gets with no fan to work out the best temperature for the fan to switch on,
I think 50ºC is the highest choice.
You must change this as the default setting (110ºC) is far too high.

Setting instructions:
The thermostat will display the current temperature in ºC by default.

To set the trigger temperature press the button marked 'SET'.
The display will flash.
You set a trigger temperature (in ºC) using the '+' and '-' buttons, in 0.1º increments.
If no buttons are pressed for approximately 2 seconds the trigger temperature will be stored and the display will return back to the current temperature.

For your use the only P modes that need setting are P0 = C, and P1 = 5.

To set up or change modes, first long-press the 'SET' button for at least 5 seconds.
The display should now display 'P0'.
Pressing the '+' or '-' buttons will cycle though the various parameters, P0 to P6 (or P8 on some versions of the W1209).

Pressing the 'SET' button will allow you to change the value for that parameter using the '+' and '-' buttons.
When no buttons are pressed for approximately 5 seconds the thermostat will exit the P options and will return back to temperature display.

P0 has two settings, C and H. Cooling and Heating. Default is C.
When set to C the controller will turn ON the relay switch K0/K1 when the temperature rises.
H is the opposite, OFF when the temperature rises.

P1 sets how much change in temperature must occur before the relay switches back on (or off) after reaching the trigger temperature. Setting this helps stop the controller from continually triggering when the temperature drifts around the trip temperature. Default is 2ºC.

P2 limits the maximum trigger temperature that can be set. It can be used as a safety to stop an excessively high trigger temperature from accidentally being set by the user. Default 1is 110ºC.

P3 limits the minimum trigger temperature that can be set. Default is -50ºC.

P4 is to correct a difference between the displayed temperature and the actual temperature. Default is 0ºC.

P5 allows for delaying switching of the relay when the trigger temperature has be reached. The parameter can be set in one minute increments up to a maximum of 10 minutes. Default is 0.

P6 sets a visual display alarm, and will also cause the relay to switch off (or on) when the temperature reaches this setting. Default is OFF.

[P7 ºC or ºF.

P8 Factory reset to defaults.]
 
Last edited:
  • Like
Reactions: T-Bone90

T-Bone90

macrumors regular
Feb 8, 2018
100
25
Wow thank you for the great detail instruction.
I'll work through this in peace.

So currently I am at 31.5°. I don't think it gets much hotter (the fan runs at 150 ohms) and over 2 h.
Yes the probe is glued at the bottom edge of the heatsink. Like your build.

Should I really turn off the fan completely and test the iMac?

As I said, the RAM flap is open. I enclose it to get a few degrees warmer when it's closed (I can't do it in the test now).
 

PaulD-UK

macrumors 6502a
Oct 23, 2009
860
458
31.5ºC is a really good (low) temp for the heatsink.
You can definitely put another resistor with the 150Ω resistor you have, to lower the fan speed.

You could see how high the temp goes if you turn off the fan, but don't let it get really hot.
 
  • Like
Reactions: T-Bone90

T-Bone90

macrumors regular
Feb 8, 2018
100
25
So I have to say one thing. I just tested the Noctua fan and I find it quieter. But it has much more to do with the fact that the original fan makes an unpleasant noise. It is not necessarily the volume, but this unpleasant sound, which the Noctua does not have.

Again, it is not so easy to install the Noctua fan. I also don't know how to attach the Noctua fan to the board.

I think I'll try the original and do so much 150 ohm resistors in between until it has a volume that I like and still runs.

Then I will set the W1209 so that it closes from 50° in C mode K0 and K1 and thus the additional resistances are bypassed. That is, from 50° it rotates only with one (or two) 150 ohm resistor. I just have to see how I do it with me, since I also connected the iMac fan and it should stay out. Would the procedure be so okay or do I have a thinking error?

By the way, the iMac fan could also be a little quieter. Can I just pack a 150 ohm resistor in between the red 12V cable?
I have the Noctua Fc1.
 

PaulD-UK

macrumors 6502a
Oct 23, 2009
860
458
The Noctua fan will definitely sound quieter unmounted, but it's exhaust airflow isn't designed to come out of the sides if it is buried in the heatsink. That will make it noisier, and less efficient.

Your plan for the W1209 sounds fine.

You can add a resistor to the main iMac fan - it will work with as low as 4.5 volts.
The FC1 also works at 5 volts.
So you could put resistors before the FC1.
 
  • Like
Reactions: T-Bone90

T-Bone90

macrumors regular
Feb 8, 2018
100
25
So with the iMac fan unfortunately no resistance goes. I tried it with 150 ohms. Either before or after the FC1. But with both the fan tries to run on but stops right away. No start.

Unfortunately, I don't have a smaller resistor here.

With the R1811 fan I now have a total of 4x150ohm and find the volume now great. 2 are always on when it gets too hot. If it stays cooler then every 4.
But I still have to check the temperature.

Now the iMac fan is the loudest. Too bad I can't get it even quieter.

But I'll leave it like that now. It's much quieter with the four resistors. Now I'm testing the temperature.
 
Last edited:

PaulD-UK

macrumors 6502a
Oct 23, 2009
860
458
150 ohms is much too much for the iMac fan, more like less than 50.

But the knob on the Noctua FC-1 should slow it right down.
Is it noisy when slowed right down?
 
  • Like
Reactions: T-Bone90

T-Bone90

macrumors regular
Feb 8, 2018
100
25
Yes, so I hear the iMac fan, although if I turned the FC1 all the way down. But I'll leave it now. The volume has improved significantly with the four resistors and I only hear a slight noise. I'm probably most used inaudible things and when I hear something slightly buzzing somewhere, I notice it very much.

I have now set the W1209 like this:

P0 = C
P1 = 5

And the trigger temperature to 45°. So as soon as the iMac gets 50° warm, two of the four 150 Ohm resistors go out. I think that will never happen (since the iMac fan also blows directly on the heatsink). The iMac is now temporarily glued again. Now I can no longer check the temperature but I think I will hear if the temperature goes high.

I'm honest...slowly I don't really feel like tinkering with the iMac project any longer. Would like to end it promptly. ;-)
Especially since the reflective display already bothers me quite a lot. Maybe I'll sell the converted iMac to anyone (if anyone is interested write me (Germany)) ;-)

Otherwise, it runs very well and I see a radiantly brilliant display in front of me.

///Edit: After more than an hour of testing with the slow speed, the temperatures are 36.8°. So still very cool.
Presumably the iMac fan alone is also sufficient or only the R1811 fan. Maybe it would not have needed the iMac fan at all...
 
Last edited:
  • Like
Reactions: PaulD-UK

Xarl-li

macrumors newbie
Sep 22, 2024
25
23
Barcelona
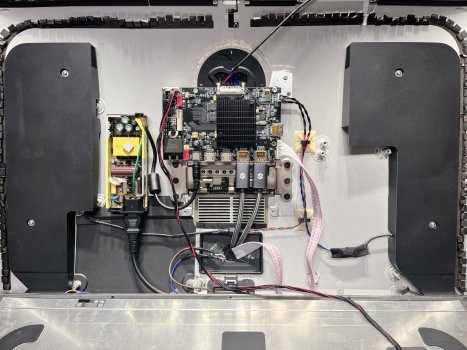
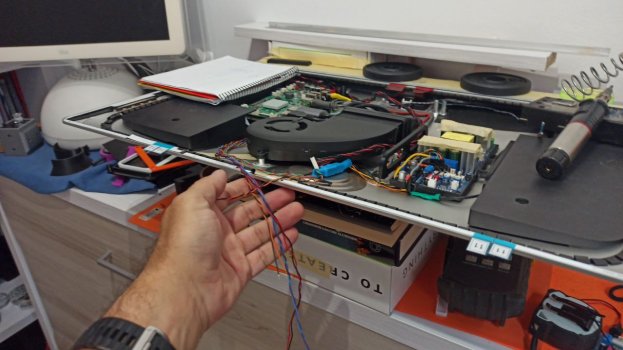
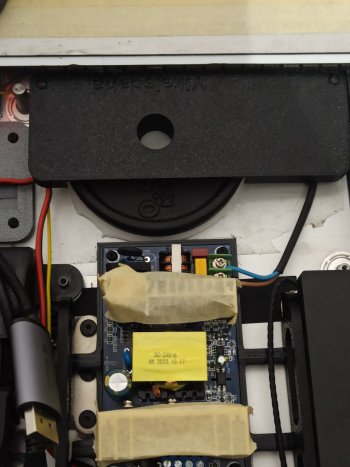
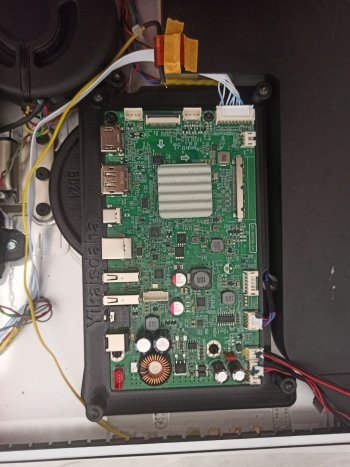
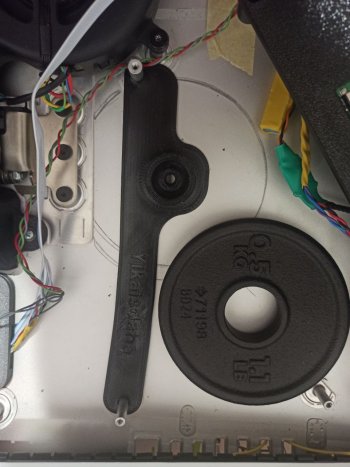
Well, my projecto has not finished, but we are working on it. At the moment everythink works well, o am missing the USB module camera and micrphone with noise cancel, for included insight.

When removing the motherboard and the power supply, the add up to a weight of 1,3Kgrs, i have been forced to add two weights of 1/2Kgr each, now it fits comfortably movement/orientation.

The only drawback and what i don't like. i have lost native control volume on keyboard//osx apple, i can adjust level only from menu, and is not direct up/donw, ypu have to acces the audio menu/submenu.

The 3Wx2 for audio is enough to watch videos.
The resolution on DP to USB4/Thunderbolt connect my macmini 5120x2880 60Hz


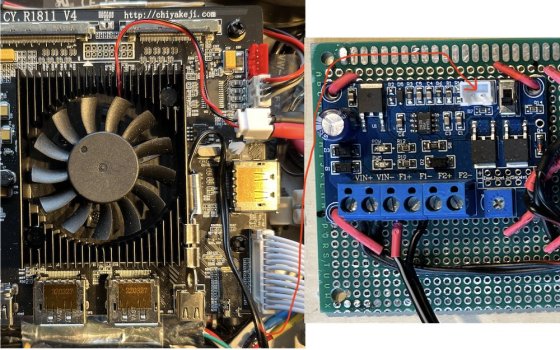
I have two probes test with a external meter, one measures the same place where the pwm module control, and the othes above the cpu JYR. I don't hear the fan to 20% and it seems like they stay between 32º internal, its ok.

I would like that fan not to be permanently at 20%, perhaps a controlled shutdown and second supervision module to extrat heat generated by the power supply....i am thinking abaut it and perhaps an Arduino is a solution to control the module PWM...


Under construction.


Attachments

  • photo_2024-10-14 8.02.20 p. m..jpeg
    photo_2024-10-14 8.02.20 p. m..jpeg
    129 KB · Views: 42
  • photo_2024-10-14 8.02.18 p. m..jpeg
    photo_2024-10-14 8.02.18 p. m..jpeg
    153.4 KB · Views: 49
  • photo_2024-10-14 8.02.22 p. m..jpeg
    photo_2024-10-14 8.02.22 p. m..jpeg
    217.7 KB · Views: 44
  • photo_2024-10-14 8.02.15 p. m..jpeg
    photo_2024-10-14 8.02.15 p. m..jpeg
    160.2 KB · Views: 48
Register on MacRumors! This sidebar will go away, and you'll see fewer ads.