Become a MacRumors Supporter for $50/year with no ads, ability to filter front page stories, and private forums.
Status
The first post of this thread is a WikiPost and can be edited by anyone with the appropiate permissions. Your edits will be public.
So I have to say one thing. I just tested the Noctua fan and I find it quieter. But it has much more to do with the fact that the original fan makes an unpleasant noise. It is not necessarily the volume, but this unpleasant sound, which the Noctua does not have.

Again, it is not so easy to install the Noctua fan. I also don't know how to attach the Noctua fan to the board.

I think I'll try the original and do so much 150 ohm resistors in between until it has a volume that I like and still runs.

Then I will set the W1209 so that it closes from 50° in C mode K0 and K1 and thus the additional resistances are bypassed. That is, from 50° it rotates only with one (or two) 150 ohm resistor. I just have to see how I do it with me, since I also connected the iMac fan and it should stay out. Would the procedure be so okay or do I have a thinking error?

By the way, the iMac fan could also be a little quieter. Can I just pack a 150 ohm resistor in between the red 12V cable?
I have the Noctua Fc1.


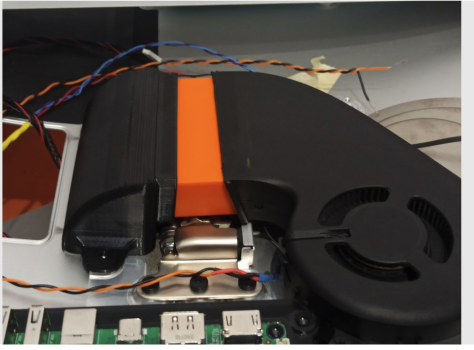
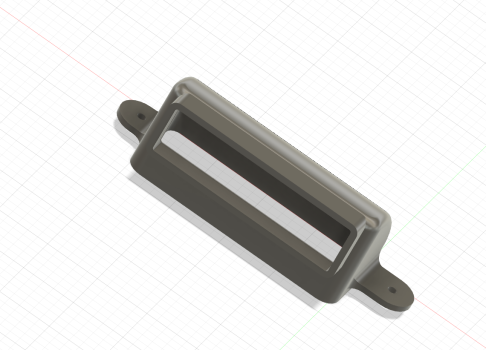
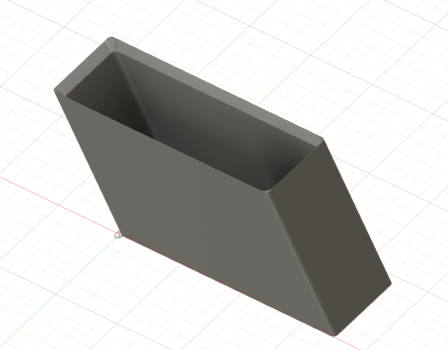
The original fan with Paul's regulator at rest is at 20%, it is barely noticeable once you have closed the monitor. If you are going to use it, I have uploaded the two STLs to thingiverse to print.
There are two STL and it fits in the original position including the screw fixing position.
 

Attachments

  • Captura de pantalla 2024-10-14 a las 8.27.08 p. m..png
    Captura de pantalla 2024-10-14 a las 8.27.08 p. m..png
    1.5 MB · Views: 147
  • Captura de pantalla 2024-10-14 a las 8.26.09 p. m..png
    Captura de pantalla 2024-10-14 a las 8.26.09 p. m..png
    398.9 KB · Views: 85
  • Captura de pantalla 2024-10-14 a las 8.32.56 p. m..png
    Captura de pantalla 2024-10-14 a las 8.32.56 p. m..png
    147.2 KB · Views: 82
  • Like
Reactions: tock and T-Bone90
[USUARIO=1388463]@Xarl-li[/USUARIO] ¡Buena construcción! Puedes usar Monitor Control (o Better Display) desde Github para controlar los niveles de audio y brillo desde el teclado del Mac. Bonitas piezas impresas en 3D, especialmente la unidad de escape del ventilador. Una cosa, ¿viste la publicación en Reddit sobre la fuente de alimentación DTS100-ES que tiene voltaje peligroso en su disipador de calor? Veo que has puesto cinta...


Thank you for this detail.
Well, I hadn't seen it, in theory... these heat sinks should be insulated. I manipulated them while it was running and... and...i'm still here :). I just put tape on it so I wouldn't scratch myself while handling the 3D supports, etc... and left the tape attached, but... I should put Kapton tape on it. :

When I open it again to add the microphone and the camera, I will check those heatsinks, at least the pwm input one, as the area is not isolated.
 
Okay, rounding 3rd on this project!

Got my FA1 in, tested it and got 5K output using DP->TB3. Since I'm not saving the speakers or fan, I found a spot where two of the screwholes match and so I was able to screw the board into the iMac case. Got the power/DP/spare HDMI run, now it's just re-attaching the board cables for one final test before adhering everything back together.
IMG_0675.JPG


Any advice on external enclosures for iMac SSDs? I'd love to take the 512GB SSD and turn it into spare storage.
 
  • Like
Reactions: PaulD-UK
Ah well, was just hoping to put more of the system to use rather than junking it. I might take the heatsink off the logic board and use the board as wall art.

And it works! Attached everything, hooked it up to the Mac Mini, figured out how to change the menu language to English.

Small issues that have cropped up, on Day 1 it didn't wake with the Mac Mini, but I think that may be because I had attached the HDMI cord to my vintage mini and the board was confused on where input was coming from. In the last two or three days it's woken up fine each time (I've kept the HDMI disconnected unless actively using it).

Also, the HDMI is atrocious compared to DP. Max resolution is 1080p and the colors are horrid. Some of this might be just in comparison to the glorious 5K, or maybe it's the cord I ran (I don't even remember what spec, it's just a random one I got from Parts Express). Works for vintage computing purposes or in a pinch though.

Finally, I do have pink fringing on the borders. Really only visible with stark white backgrounds, and I've switched to dark mode everywhere I can anyhow. If there's an easy recommended fix I'd do it, but overall the colors and resolution are insanely gorgeous so I can deal.
 
  • Like
Reactions: PaulD-UK
All Mac minis before 2018 only had HDMI 1.4, or lower, supporting up to 1080p.
So that doesn’t give a clue as to what the JRY—FA1 can do with its HDMI ports - HDMI 2.0 (4K) or HDMI 2.1 (5K).
 
Last edited:
All Mac minis before 2018 only had HDMI 1.4, or lower, supporting up to 1080p.
So that doesn’t give a clue as to what the JRY—FA1 can do with its HDMI ports - HDMI 2.0 (4K) or HDMI 2.1 (5K).
Ah, I wasn’t super clear. On my M1 Mini the HDMI looks like trash (and was limited to 1080p). I haven’t even tested it on the vintage Mini (2006) but I expect that to look trashy haha. Perhaps my cord is 1.4, it was a cheapy one.
 
  • Like
Reactions: PaulD-UK
1080p is the HiDPI resolution for 4K, but full 4K should be available from a M1 Mac mini, with good colour and saturation.
But it needs an HDMI 2.0-capable cable.
Thanks for explaining.
 
Last edited:
Any advice on external enclosures for iMac SSDs? I'd love to take the 512GB SSD and turn it into spare storage.
I now have three of these sitting gathering dust. They are non-standard connections so unfortunately just not worth it! I couldn't even sell them on ebay.
 
Okay, after a few days I'm still having some wake issues with the monitor. Seems like after a deep sleep sometimes (but not always) the monitor doesn't want to read the Mac Mini wake signal. If I press the monitor input button on the back, that'll often wake up the monitor and then cause it to recognize.
 
Is the OSD input set to DP or is it set to an Auto-seek setting?
It sounds like the Mac times-out and stops sending the 'Wake Up' signal before the JRY card is ready to see the input.
 
The OSD for the JRY board doesn't have an auto-seek setting (or it's always autoseek) that I can find. It just lets me select 1 of the 4 valid inputs (though the other 3 aren't connected). Dug through all the OSD settings and didn't see anything there that obviously address this issue.
 
  • Like
Reactions: PaulD-UK
Well another 3 months of heavy daily use now with my T18 conversion running flawlessly. I love how cool it runs (no fan), but I'm definitely going to get an M4 MacBook Air when they become available because the noise of my MBP fans completely negates the silent monitor 😂

Probably have to order another T18 board soon... I think I might be close to getting hold of a bargain donor iMac so I can have dual matching displays 🙌 Honestly can't recommend the T18 board highly enough - I know I'm only using part of the boards capability using the DP input exclusively but for a quality 5K monitor build it has been perfect.
 
Does anyone know a program for Mac where I can edit 10 band EQ from the sound for the iMac speakers?
It is important for me that the editing only counts for the speakers on the iMac. As soon as another output device is selected, it should be "default", without EQ.

I have already tested eqMac, but the app is extremely faulty and often the sound does not work at all. Here, however, there is a possibility to set that EQ is only active with a certain device.

I also tried SoundSource, but you can only adjust EQ from all devices at the same time.

Does anybody have an idea?


I also wanted to ask if you can set somewhere that the iMac speakers are automatically taken, if available. If I had unplugged my Macbook and plugged it in again, the output remains with the Macbook by default... but should go to the iMac. I then have to manually select the iMac speakers every time.

Thank you in advance.
 
Hi,

I'm planning to try this. I do have a few questions:
1. I'd actually like to repurpose the actual imac as a server... Has anyone done that? What case did you use to fit the motherboard etc...
2. For an imac 2019 5k 27 inch, what kind of board can I use to connect the microphone and camera to USB? I'd like to still be able to use it...
3. I'm planning on getting the JRY-W9RQUHD-FA1, I've noticed that unlike the R1811 it doesn't have a fan. Do I need a plan for a fan? or it just doesn't heat that much?

Thanks in advance
 
1. Problematic as the iMac logic board won't run headless:

2. @Aiwi has the best experience of webcam and microphone conversion.

3. All the conversion boards generate 50-70 watts of heat, more if a USB-C PD board is used to power a laptop. The sealed iMac case will get warm.
Using a slow-turning fan will help dissipate this heat, especially if it vents through the grille to the exterior.
 
Last edited:
  • Like
Reactions: zalg
1. Problematic as the iMac logic board won't run headless:

2. @Aiwi has the best experience of webcam and microphone conversion.

3. All the conversion boards generate 50-70 watts of heat, more if a USB-C PD board is used to power a laptop. The sealed iMac case will get warm.
Using a slow-turning fan will help dissipate this heat, especially if it vents through the grille to the exxterior.
1. Ah yes, I came across this link after posting here. It seems that the only unsolved problem is the gpu throttling (kind of a bummer since I wanted it to see if I could run some basic inference model.
I don't have an iMac yet to test with (buying one for this) but if the problem is that a sensor is missing that is included in the screen, could we take that sensor from the screen and connect it? or could we make a pcb to return what the logic board is expecting?

2. Thanks, it seems he achieved that by replacing the existing webcam and microphone... so I'm guessing reusing the existing webcam and microphone is unfortunately not possible?
EDIT: ok, it seems that the imac 2019 webcam is not great anyhow, so it makes sense to use the much better one from taobao

3. Ok, yeah the board I'm planning to use doesn't use a PD board (mostly because I plan to connect it to my dock which does that) and I plan to use an external power (even though Aiwi's setup with the internal power supply looks rather sexy). But being able to service it without opening the imac is also nice...
I have some unused noctua fan I can add and maybe put in a cheap zigbee temperature sensor to track the internal temperature.

Another question I forgot to ask. What is the best tape to close the imac? I saw ifixit sells some but I've read that it's thiner than the original and doesn't hold as well. Since I live in a high humidity warm country (Hong Kong), I'm a bit worried about the screen falling down...
Alternatively I thought about using neodynium magnets but in that case I guess I'll need to be precise in term of the magnet strength so that it holds well while still being relatively easy to open...
 
Last edited:
1. it's not a sensor, it's the actual screen controller chip that has to handshake with the iMac logic board.

2. The existing webcam has a PCIe interface which has no controller circuitry in it - it is in the iMac logic board.
The microphones are controlled by the logic board, so also have no interface.
So you have to use a USB webcam/microphone.

3. With no USB PD power, and an external PSU the interior of the case probably won't get too hot. Running the Noctua fan near the grille should work and be virtually inaudible.

The screen glass is extremely fragile, and the best solution is the one Apple designed.
As you say, if the adhesive tape is too thin it won't hold the screen in the right place.
The Apple replacement set of strips is part number 076-00332, but there are good strong-adhesive sets available with the thick foam core to make them the right thickness.
 
Last edited:
  • Like
Reactions: zalg
Thanks for the clarification

3. With no USB PD power, and an external PSU the interior of the case probably won't get too hot. Running the Noctua fan near the grille should work and be virtually inaudible.

I also saw one user post here about replacing the heatsink with a copper heatsink. With how cheap it is on taobao, I guess I could also do that after adding thermal paste. It's a pity that the case is so annoying to reopen, otherwise I'd just wait and see what the temperature is like.
 
  • Like
Reactions: PaulD-UK
One more question. Are there significant differences between years in term of panel quality? And how durable is the panel?
I'm hesitating between getting a second hand imac late 2014 for 200 usd, a 2017 imac for 400 usd or an imac 2019 for 550 usd. Given that running headless is probably not going to work well (or could running linux allow me to get around the gpu throttle?), it doesn't really make sense to pay more for the internals...

I did read about the image retention on panels prior to 2015, but I'm not sure if it's a problem that can develop on panels on which there were no problems before or if it's a defect that happened during manufacturing for some of the panels.
On the other hand, I've read about the red tinge of 2015 panels and I know I wouldn't be able to stand it (my current dell monitor has this along with other issues and it's what pushing me to get a new monitor)

Sorry for all the questions
 
Last edited:
Between late 2014 to mid 2015 there were three revisions of the 5K screen panel - LM270QQ1-(SD)A1, A2 and A3.
All were 400 nits max brightness. All reportedly suffer from some degree of image retention problems.
This is, in theory, reversible, but the fact that there were so many manufacturing revisions means that there was likely to be some deeper problem?

With the late 2015 iMac came the B1 panel, with 500 nits max brightness, and introduced DCI-P3 colour space. Less image retention, but as they age some develop a pink tinge around the edges, or get dust drawn in to the edges.

The 2017 iMac had a C1 panel, and the iMac Pro had the D1 model. This was the same 500 nits max brightness, and DCI-P3 colour space.

The 2019 iMac had a E1 panel, and the 2020 had an F1 panel. These were basically the same but the F1 panel had the webcam integral with the screen, not attached to the case like previous iMacs.

C1-F1 panels have far fewer reports of aging problems, so will probably last longer.
The more recent the panel, the longer it will most likely last.

Since Linux is a variant of the Unix core of Mac OS, I would guess that the hardware management would be the same for both?
 
  • Like
Reactions: Xarl-li and zalg
Between late 2014 to mid 2015 there were three revisions of the 5K screen panel - LM270QQ1-(SD)A1, A2 and A3.
All were 400 nits max brightness. All reportedly suffer from some degree of image retention problems.
This is, in theory, reversible, but the fact that there were so many manufacturing revisions means that there was likely to be some deeper problem?

With the late 2015 iMac came the B1 panel, with 500 nits max brightness, and introduced DCI-P3 colour space. Less image retention, but as they age some develop a pink tinge around the edges, or get dust drawn in to the edges.

The 2017 iMac had a C1 panel, and the iMac Pro had the D1 model. This was the same 500 nits max brightness, and DCI-P3 colour space.

The 2019 iMac had a E1 panel, and the 2020 had an F1 panel. These were basically the same but the F1 panel had the webcam integral with the screen, not attached to the case like previous iMacs.

C1-F1 panels have far fewer reports of aging problems, so will probably last longer.
The more recent the panel, the longer it will most likely last.

Since Linux is a variant of the Unix core of Mac OS, I would guess that the hardware management would be the same for both?
Ok, so no real point in getting the 2019 vs 2017 (since the difference between C1 and E1 doesn't really matter that much). Which leaves me now with 2 options.

If I decided to get a 2014 model to save money and later needed to replace the panel, would I be able to use a 2017 panel with the 2014 case?
I know that wouldn't work for the imac internals but since we're getting rid of this, I wonder if the parts fit?

Main reason for getting the 2014 is if I screw up and break the glass, I'll feel significantly less bad :)
 
Last edited:
All 2014-2020 A1-F1 panels fit any cases from 2012 on - except that the top Bluetooth antenna is in a different, more central position from 2017 on. So it has to be removed to fit a post 2017 screen in an earlier case.
The right side Wi-Fi antennas are OK I think, but it would probably be best to check that.

When Apple developed the iMac Pro in 2017 I think they increased the level of quality control on subsequent screens. I'm not sure if the earliest 2017 iMacs benefitted from that, but I think all 2018-21 screens are probably the best. That would be from any iMac with the 4th character in its serial number being W, possibly V, or later.
 
Last edited:
  • Like
Reactions: Xarl-li and zalg
Register on MacRumors! This sidebar will go away, and you'll see fewer ads.