Is it the same behaviour if you restart and press the option key? Do you also don't see the BigSur volume there?Got Beta 9 installed on my Mac Pro 5,1 with the newest patcher.. easy peasy...... runs perfectly fine (except the WiFi isn't working)
I can boot back into my 10.13.6 NVMe drive just fine.... I CAN NOT though boot back into Big Sur!! The disks just do not show up in the disk restart pane. Something I'm missing??
Got a tip for us?
Let us know
Become a MacRumors Supporter for $50/year with no ads, ability to filter front page stories, and private forums.
macOS 11 Big Sur on Unsupported Macs Thread
- Thread starter dosdude1
- WikiPost WikiPost
- Start date
-
- Tags
- 10.16 macos unsupported
- Sort by reaction score
You are using an out of date browser. It may not display this or other websites correctly.
You should upgrade or use an alternative browser.
You should upgrade or use an alternative browser.
- Status
- The first post of this thread is a WikiPost and can be edited by anyone with the appropiate permissions. Your edits will be public.
Thanks, I tried exactly this today and currently I cannot get the patched USB installer to boot a 2010 (i3-540) system. Get the stop sign - whatever I try to get around this")
Clarkdale i3 and Arrandale i5 and i7 are unable to boot BigSur kernel since beta 1 due to ACPI kp at early booting, I guess only very experts could fix this boot issue.
I specified that my BaseSystem legacy usb fix is for Penryn Core2Duo cpus then works for iMac equipped with a Penryn cpu, but works also for Sandy Bridge and Ivy Bridge, even if for these machines architecture micropatcher is advisable to use.
Honestly it is hard to follow all specifications on the thread even if one uses a fair amount of time to search and sort (out). I still hope this can be solved somehow in the future...thanks again for all your help here!Clarkdale i3 and Arrandale i5 and i7 are unable to boot BigSur kernel since beta 1 due to ACPI kp at early booting, I specified that my BaseSystem legacy is for Penryn Core2Duo cpus then works for iMac equipped with a Penryn cpu, but works also for Sandy Bridge and Ivy Bridge, even if for these machines micropatcher is advisable to use.
I can hold down the option key and my HS NVMe drive is there, plus “Big Sur Data” drive. I booted back to the USB installer to try to boot to Big Sur, and got this error message in the attached photo.Is it the same behaviour if you restart and press the option key? Do you also don't see the BigSur volume there?
Attachments
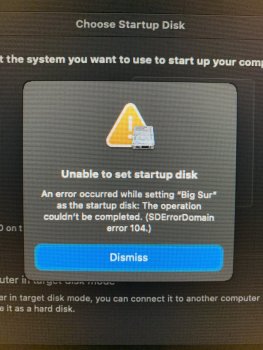
Ok, for me after reboot with option key, there is a volume named BigSur (where I installed BS B9 some minutes ago) and one named SSD (where my Catalina is on).I can hold down the option key and my HS NVMe drive is there, plus “Big Sur Data” drive. I booted back to the USB installer to try to boot to Big Sur, and got this error message in the attached photo.
Big Sur Data sounds strange to me on the start-up screen because that should normally be hidden.
Can you erase the partition and re-Install? Maybe that helps.
@Barry K. Nathan very appreciated for your knowledge and hard work.
cMP 5,1 mid 2012 updated BT 4.2, AMD Radeon HD 7950 Mac Edition GPU.
I’m using BKN V0.3.2 micropatcher update Beta6 to Beta9 for NVMe drive without any issue.
I just followed Barry “Quick instruction for use” step 1 - 6.
This all I used in Recovery Terminal.
/Volumes/Image\ Volume/set-vars.sh

cMP 5,1 mid 2012 updated BT 4.2, AMD Radeon HD 7950 Mac Edition GPU.
I’m using BKN V0.3.2 micropatcher update Beta6 to Beta9 for NVMe drive without any issue.
I just followed Barry “Quick instruction for use” step 1 - 6.
This all I used in Recovery Terminal.
/Volumes/Image\ Volume/set-vars.sh
It seems a lot has happened since I was last here. (Sorry I had some pretty important tests in multiple subjects so I couldn't be here). Can someone fill me in? (I got as far as the fact that beta 9 came out)
One step ahead of you..... wiped the SSD and did a clean install with no migration. Just booted to my HS NVMe drive.Ok, for me after reboot with option key, there is a volume named BigSur (where I installed BS B9 some minutes ago) and one named SSD (where my Catalina is on).
Big Sur Data sounds strange to me on the start-up screen because that should normally be hidden.
Can you erase the partition and re-Install? Maybe that helps.
Nope.... clean install did not help. Still not getting my Big Sur SSD showing up in the startup disk pane.... and curious enough, the USB install is not showing up eitherOk, for me after reboot with option key, there is a volume named BigSur (where I installed BS B9 some minutes ago) and one named SSD (where my Catalina is on).
Big Sur Data sounds strange to me on the start-up screen because that should normally be hidden.
Can you erase the partition and re-Install? Maybe that helps.
Ok... odd... my issue of not being able to choose my Big Sur SSD from my High Sierra NVMe drive.... the only way I’m able to boot to BS from High Sierra is to restart the Mac Pro, then zap the PRAM.... it starts into BS after a PRAM zap.
So I can boot to High Sierra 10.13.6 on a NVMe drive from beta 9 of Big Sur on a SSD.... but I can NOT boot to Big Sur from High Sierra without zapping the PRAM. Any one have any ideas why this is???
So I can boot to High Sierra 10.13.6 on a NVMe drive from beta 9 of Big Sur on a SSD.... but I can NOT boot to Big Sur from High Sierra without zapping the PRAM. Any one have any ideas why this is???
Ok... odd... my issue of not being able to choose my Big Sur SSD from my High Sierra NVMe drive.... the only way I’m able to boot to BS from High Sierra is to restart the Mac Pro, then zap the PRAM.... it starts into BS after a PRAM zap.
So I can boot to High Sierra 10.13.6 on a NVMe drive from beta 9 of Big Sur on a SSD.... but I can NOT boot to Big Sur from High Sierra without zapping the PRAM. Any one have any ideas why this is???
I have have the same issue before.
You have to install Big Sur on separate drive, not partition with other OS drive.
As you see the attachment.


Last edited:
Maxsp97.... read my posts.... I have a NVMe drive for High Sierra, and a SSD with Big Sur installedI have have the same issue before.
You have to install Big Sur on separate drive, not partition with other OS drive.
As you see the attachment.
View attachment 962069View attachment 962071
Update your High Sierra to Catalina.Maxsp97.... read my posts.... I have a NVMe drive for High Sierra, and a SSD with Big Sur installed
thank you I was able to successfully install Big Sur dp9 on my iMac late 2013.Go to BarryKN's GitHub, download his latest micropatcher (ver 0.2.1 today). Read his README file. All the steps are expertly given.
Prepare your USB just as if you have a supported Mac (lots of sites give these instructions):
1. Download copy of the macOS Big Sur InstallAssistant.pkg. For BigSur Beta5 the link was: http://swcdn.apple.com/content/down...767kq54klqanh09mrcted2kw/InstallAssistant.pkg
Run the pkg in Downloads to place Install macOS Big Sur Beta in Applications.
2. Create bootable USB of at least 16GB using DiskUtility. Format as MacOS Extended (Journaled) with GUID Partition Map. I named the stick MacOS.
3. From Terminal type: (note: in this step you are creating your bootable USB installer)
sudo /Applications/Install\ macOS\ Big\ Sur\ Beta.app/Contents/Resources/createinstallmedia --volume /Volumes/MacOS
Follow the screen’s instructions. After several minutes Terminal will say the Install macOS Big Sur Beta USB was created.
Now follow BarryKN's instructions and let us know if you are successful -- as explained in several posts just above this, no one has been able to get past the gray screen lock.
Ummmm... no! I have HS on that Mac Pro for a reason.Update your High Sierra to Catalina.
Zapping the PRAM from a High Sierra restart is working. Had to do that with BS beta 6.
Read this Step 12 from BarryKN's README file:Can we enable SIP after installing and patching?
12. (Optional, for very advanced users only, 99.9% of users should just pretend this step doesn't even exist) This patcher normally disables APFS system volume sealing. If you wish to enable APFS system volume sealing, then open Terminal, run the command /Volumes/Image\ Volume/insert-hax.sh --seal and quit Terminal. If you have no idea what any of this means, just skip this step. (Also, note that even though volume sealing is disabled by default with this patcher, snapshot root is still enabled. Just mentioning this because people sometimes confuse the two issues. If you have some need to disable snapshot root, that is beyond the scope of this README. Personally, I would suggest learning to live in harmony with snapshot root rather than declaring war on it; the section "Modifying the System volume yourself" at the end of this README may help in that regard.)
Guys anyone knows how to resize the Finder window permanently? This will drive me crazy. I tried many things include the down below but it never happens. is this some kind of a bug in Big Sur or is there a way to fix this which I don't know?
- Open Finder and adjust the size as per your wish.
- Close the Finder window.
- Now, this is the main step. Press the Option key and right-click (Control+click, or a Two-Finger click on the trackpad) on the Finder. You would see a list of the options, click on relaunch.
Any InstallAssistant download links? The links posted above are not working anymore
Last edited:
BS beta 9 working perfect on MBP 13 mid 2012, has anybody tried auto-switch feature on AirPods? I can't make it work, I was thinking maybe there was a hardware requirement, maybe with the 2013 wifi card?
Thanks, but what is “your normal Big Sur disk” ?You have to startup from the USB installer again, next choose Terminal from the Menu then type
/Volumes/Image\ Volume/patch-kexts.sh /Volumes/XXX
XXX is the name of your normal Big Sur disk
For me that would be
/Volumes/Image\ Volume/patch-kexts.sh /Volumes/SSD
Then restart.
Usually you just set up a window as you like it, then close that window and all others. Now request a new Finder window (cmd-N). I sometimes have to do this twice.Guys anyone knows how to resize the Finder window permanently? This will drive me crazy. I tried many things include the down below but it never happens. is this some kind of a bug in Big Sur or is there a way to fix this which I don't know?
- Open Finder and adjust the size as per your wish.
- Close the Finder window.
- Now, this is the main step. Press the Option key and right-click (Control+click, or a Two-Finger click on the trackpad) on the Finder. You would see a list of the options, click on relaunch.
The other way almost always works. Navigate ~/Library/Preferences/com.apple.finder.plist. Trash/Empty this plist file. Although not necessary, you might want to quit Finder and open it again. Now make your new window as you like it. Close it and open another to see if the parameters stick.
As an aside, plist files can get corrupted, especially the ones in your home folder. It never hurts to trash one of any kind (just your Home ones again!). They will be rebuilt as soon as you open the plist's associated app.
Double-aside: I used to advise members of a forum I moderated years ago to create a second user with admin privileges. Log into that pristine user and see if your problem disappears. If it does, the culprit was almost always a corrupted plist file. If that is the case, you can trash the entire contents of the Preferences folder (just yours again!).
Last edited:
Successfully installed beta 9 on a MacBook Air 2012 with patcher 0.3.2. Everything is working, WIFI, Airdrop, Continuity, etc.
But there is something new.
Disk utility is showing a snapshot volume taking 101 Gb. Usually there is only 2 volumes, Big Sur and Big Sur data.
In storage those 101 GB show as "other volumes in container".
I mean, the OS is taking 33gb and there is this usage space of around 100 GB being used but unmanned. Is this normal?
Friends of my system is what you see in the picture
I installed Big Sur
But it is a bit stuck
If the software is a little heavy, it causes the system to slow down
And when I minimize a window, it hangs for a few seconds
And ....
Is there a way to solve this problem?
Of course, Big Sur Beta 1 was not good at all
It is much better now
But not much has changed since the release of Beta 6
Will the problem be solved with the arrival of the original version?
Attachments
Register on MacRumors! This sidebar will go away, and you'll see fewer ads.