Become a MacRumors Supporter for $50/year with no ads, ability to filter front page stories, and private forums.
Status
The first post of this thread is a WikiPost and can be edited by anyone with the appropiate permissions. Your edits will be public.

ammoune78

macrumors member
Oct 20, 2017
65
13
Not really.

I do monitor my CPU RAM temperatures, but pretty much the same range as in Mojave.

34 sounds like at real ideal temperature. And just little bit of background process can bring it to 50.

Can you share please the EFI so i can use it instead of mine, and do you keep the iMac Pro?
 
  • Like
Reactions: TimothyR734

quaccOS

macrumors regular
Apr 19, 2020
126
208
My Big Sur (Beta 1) Installation on MacBook Pro 7,1 (13-inch, Mid 2010)
  1. Create a blank APFS partition using Disk Utility, separate from your Catalina partition
  2. Download InstallAssistant.pkg containing macOS 11.0 Developer Beta 1 (20A4299v)
  3. Run the installer package to place the Install macOS Beta.app at /Applications
  4. Download @ASentientBot's Hax.dyliband move it to your home folder
    1. mv ~/Downloads/Hax.dylib ~/ or /Users/myHomeFolderName/
    2. Disable System Integrity Protection (SIP) via csrutil disable in recovery terminal
  5. Disable Library Validation
    1. sudo defaults write /Library/Preferences/com.apple.security.libraryvalidation.plist DisableLibraryValidation -bool true”
  6. Inject the Hax dynamic library file to force the Big Sur installation without error
    1. launchctl setenv DYLD_INSERT_LIBRARIES ~/Hax.dylib
    2. Failure to complete this step will result in The operation could not be completed (BIErrorDomain Error 3)
  7. Run the macOS Beta installer app and choose your blank partition for installation
    1. Your computer will restart several times. The grey Apple logo may turn white.
    2. You will eventually reach a grey circle-backlash symbol. Return to Catalina.
  8. Add these NVRAM boot arguments in Terminal
    1. sudo nvram boot-args="-no_compat_check amfi_get_out_of_my_way=1"
  9. Create a bootable USB installer for Big Sur using a suitable external drive
    1. sudo ~/Downloads/Install\ macOS\ Beta.app/Contents/Resources/createinstallmedia --volume /Volumes/MyVolume
    2. Visit Apple's page on the createinstallmedia command for more information
  10. Edit the boot properties list of your Big Sur USB installer
    1. /Volumes/Install\ macOS\ Beta/Library/Preferences/SystemConfiguration/com.apple.Boot.plist
      XML:
      <?xml version="1.0" encoding="UTF-8"?><!DOCTYPE plist PUBLIC "-//Apple//DTD PLIST 1.0//EN" "http://www.apple.com/DTDs/PropertyList-1.0.dtd">
      <plist version="1.0">
      <dict>
      <key>Kernel Flags</key>
      <string>root-dmg=file:///BaseSystem/BaseSystem.dmg -no_compat_check cs_enforcement_disable=1 cs_debug=1 amfi_allow_any_signature=1 amfi_get_out_of_my_way=1</string>
      </dict>
      </plist>
    2. Restart your computer and hold the ⌥ Option key to boot into your external Big Sur installer
  11. If you have a Penryn Core 2 Duo CPU, you will need to delete the Telemetry plugin to prevent kernel panic
    1. Mount the system volume as writable via the recovery Terminal
      1. Use diskutil list to find the Big Sur system volume
      2. Mount the system volume diskutil mount diskXsY
      3. Remount as read-write mount -uw "/Volumes/Big Sur"
    2. Find & delete the Telemetry plugin
      1. Change directory cd /Volumes/Big\ Sur/System/Library/UserEventplugins
      2. Remove it rm -r com.apple.telemetry.plugin
        1. Or rename it mv com.apple.telemetry.plugin com.apple.telemetry.plugin2
      3. Return to Catalina
  12. Edit the Boot property lists in Big Sur's Preboot volume
    1. Use diskutil list to find the Preboot volume that Big Sur uses
    2. Mount the Preboot volume diskutil mount diskXsY
    3. Edit these two com.apple.Boot.plist files
      1. /Volumes/Preboot/UUID-BigSurData/Library/SystemConfiguration/com.apple.Boot.plist
      2. /Volumes/Preboot/UUID-BigSurData/Library/Preferences/SystemConfiguration/com.apple.Boot.plist
        XML:
        <?xml version="1.0" encoding="UTF-8"?><!DOCTYPE plist PUBLIC "-//Apple//DTD PLIST 1.0//EN" "http://www.apple.com/DTDs/PropertyList-1.0.dtd">
        <plist version="1.0">
        <dict>
        <key>Kernel Cache</key>
        <string>System\Library\PrelinkedKernels\prelinkedkernel</string>
        <key>Kernel Flags</key>
        <string>-no_compat_check amfi_get_out_of_my_way=1</string>
        </dict>
        </plist>
      3. Copy the same plist to a third location /Volumes/Preboot/UUID-BigSurData/System/Library/CoreServices/
  13. Create another external USB partition with USBOpenCoreAPFSloader3.app
    1. OpenCore boot loader will dynamically block the Telemetry plugin being copied or reused from snapshot booting, but it needs to load the prelinkedkernel (not BootKernelExtensions.kc) in order to utilise the telemetrap.kext
    2. Once created, reboot and hold the ⌥ Option key to select the unique EFI icon. Choose Big Sur in the OpenCore boot menu.
  14. Setup your Mac as normal
    1. If your Mac crashes at the Choose Your Language prompt, it may indicate that the Telemetry plugin has loaded. OpenCore should prevent this however
    2. Your Wi-Fi card & internal audio devices will likely not be detected. Proceed patiently through the setup, as the lack of graphics acceleration will make things much slower to start off
  15. Fix the Wi-Fi
    1. Use @jackluke's script to copy his ready-made prelinkedkernel file into your Big Sur Preboot volume
  16. Graphics acceleration (NVIDIA GeForce 320M 256 MB)
  17. Internal audio devices (Speakers & Microphone)
  18. Display Brightness Control, Night Shift, and the Menu Bar Clock
View attachment 931554
View attachment 931555 View attachment 931557
Source: Rewrote my long-winded method in post #796 to be more clear and concise.
All credits go to @jackluke and @ASentientBot not only for their hard work in creating patches and scripts, but for taking the time to answer people's queries – and essentially fix their problems. Thank you
Is there any way to install beta 2 as an incremental update? Or if we have to reinstall the entire OS, should we use a dylib file other than Hax 1? I can't use mount -uw / in an open terminal, so maybe some newer Hax could potentially solve this

I'm hoping to fix graphics acc, speakers/mic, display brightness control (and maybe even night shift and the buggy menu bar clock and its preferences). However, replacing kexts via recovery terminal, chown & chmod beforehand, then kextcache -i, kmutil, and kcditto don't seem to make any visible difference to the system. The only thing that has worked so far, has been replacing my prelinkedkernel with @jackluke's pre-baked prelinkedkernel which fixed the Wi-Fi & Ethernet, but this could prove unsustainable in the long term.

I know it's been only 2 weeks since beta release, but we already have a functional macOS 11 system running on 11 year old machines…it's a bit crazy. We're getting closer and closer to full stability.
 

jackluke

macrumors 68040
Jun 15, 2018
3,321
8,068
Is there any way to install beta 2 as an incremental update? Or if we have to reinstall the entire OS, should we use a dylib file other than Hax 1? I can't use mount -uw / in an open terminal, so maybe some newer Hax could potentially solve this

I'm hoping to fix graphics acc, speakers/mic, display brightness control (and maybe even night shift and the buggy menu bar clock and its preferences). However, replacing kexts via recovery terminal, chown & chmod beforehand, then kextcache -i, kmutil, and kcditto don't seem to make any visible difference to the system. The only thing that has worked so far, has been replacing my prelinkedkernel with @jackluke's pre-baked prelinkedkernel which fixed the Wi-Fi & Ethernet, but this could prove unsustainable in the long term.

I know it's been only 2 weeks since beta release, but we already have a functional macOS 11 system running on 11 year old machines…it's a bit crazy. We're getting closer and closer to full stability.

To install "as an update" you should remove this file :

/Volumes/BigSurSystemLabel/System/Library/CoreServices/SystemVersion.plist

@ASentientBot HaxLib.dylib method still work with BigSur beta 2 (Install macOS Big Sur Beta.app), provided that you add in nvram this:
nvram boot-args="-no_compat_check amfi_get_out_of_my_way=1"
 

Maclinux

macrumors member
Jul 2, 2020
54
96
Yes, and I add that now the name after InstallAssistant.pkg extraction is Install macOS Big Sur Beta.app

Go for Beta 2!

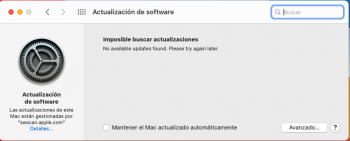
I have a couple of doubts (we started well) I have copied com.apple.softwareupdated.plist in LaunchDaemons but cannot update from System Preferences.

I have tried to install Beta 2 as 1, but now the terminal returns an error writing:

sudo / Applications / Install \ macOS \ Beta.app/Contents/Resources/createinstallmedia --volume / Volumes / Untitled

The mistake is:
sudo: / Applications / Install macOS Beta.app/Contents/Resources/createinstallmedia: command not found

So I can't create an installation USB ...
 

Attachments

  • Captura de pantalla 2020-07-07 a las 22.44.39.png
    Captura de pantalla 2020-07-07 a las 22.44.39.png
    64.5 KB · Views: 175
  • Like
Reactions: TimothyR734

19SK91

macrumors 6502
Aug 4, 2014
338
641
Go for Beta 2!

I have a couple of doubts (we started well) I have copied com.apple.softwareupdated.plist in LaunchDaemons but cannot update from System Preferences.

I have tried to install Beta 2 as 1, but now the terminal returns an error writing:

sudo / Applications / Install \ macOS \ Beta.app/Contents/Resources/createinstallmedia --volume / Volumes / Untitled

The mistake is:
sudo: / Applications / Install macOS Beta.app/Contents/Resources/createinstallmedia: command not found

So I can't create an installation USB ...

Had the same issue, I think it should be

sudo /Applications/Install\ macOS\ Big\ Sur\ Beta.app/Contents/Resources/createinstallmedia --volume /Volumes/Untitled
 

webg3

macrumors 6502a
Jul 19, 2018
507
774
Go for Beta 2!

I have a couple of doubts (we started well) I have copied com.apple.softwareupdated.plist in LaunchDaemons but cannot update from System Preferences.

I have tried to install Beta 2 as 1, but now the terminal returns an error writing:

sudo / Applications / Install \ macOS \ Beta.app/Contents/Resources/createinstallmedia --volume / Volumes / Untitled

The mistake is:^
sudo: / Applications / Install macOS Beta.app/Contents/Resources/createinstallmedia: command not found

So I can't create an installation USB ...

Try :
sudo / Applications / Install \ macOS \ Big \ Sur \ Beta.app/Contents/Resources/createinstallmedia --volume / Volumes / Untitled
 

Maclinux

macrumors member
Jul 2, 2020
54
96
To install "as an update" you should remove this file :

/Volumes/BigSurSystemLabel/System/Library/CoreServices/SystemVersion.plist

@ASentientBot HaxLib.dylib method still work with BigSur beta 2 (Install macOS Big Sur Beta.app), provided that you add in nvram this:
nvram boot-args="-no_compat_check amfi_get_out_of_my_way=1"

Is it preferable to install Beta 2 as an update or from the beginning as Beta1?
 
  • Like
Reactions: TimothyR734

19SK91

macrumors 6502
Aug 4, 2014
338
641
To install "as an update" you should remove this file :

/Volumes/BigSurSystemLabel/System/Library/CoreServices/SystemVersion.plist

@ASentientBot HaxLib.dylib method still work with BigSur beta 2 (Install macOS Big Sur Beta.app), provided that you add in nvram this:
nvram boot-args="-no_compat_check amfi_get_out_of_my_way=1"

How do I delete SystemVersion.plist? I had SIP disabled, I tried changing permissions in the Get Info window. Google didn't help me.
[automerge]1594155505[/automerge]
Have you tried plugging your phone into the computer as a hotspot? That's what I did until I got WiFi fixed.

That's a good idea, I'm gonna give it a try. Thanks!
 
  • Like
Reactions: TimothyR734

jackluke

macrumors 68040
Jun 15, 2018
3,321
8,068
BigSur beta 2 build version 11.0 Beta (20A4300b) installed through ASentientBot Hax3.dylib , now I also have a sealed snapshot System Volume diskXsYsZ, mount and tmutil localsnapshot

can't use "sudo mount -uw /", but can delete the snapshot from a BigSur Recovery, so for me not a big deal.

But at least my prelinkedkernel fix for beta 1 still work.
 

h9826790

macrumors P6
Apr 3, 2014
16,656
8,587
Hong Kong
Can you share please the EFI so i can use it instead of mine, and do you keep the iMac Pro?
Sure, but you better change the serial number, MLB, UUID.

If everyone use the same serial number, it may cause issues.

Also, my recommendation is that you just extract the PlatformInfo section, and inject that into your own config to perform Big Sur installation / update. Do NOT use my whole EFI folder. My config is quite customised for my own use, may not fit for your hardware.

Last but not least, there is no need to keep the SMBIOS spoofing. You can boot with the original SMBIOS once the update / installation is completed.
Screenshot 2020-07-08 at 4.58.26 AM.png
 

Attachments

  • 0.6 beta.zip
    2.4 MB · Views: 199

jackluke

macrumors 68040
Jun 15, 2018
3,321
8,068
Indeed, this has worked! Now my question is whether I should reinstall everything from the beginning or update ... A detail, everything works for me thanks to @jackluke

As you want, maybe better on a new partition, I used an HFS+ 48 GB Volume, and using the ASentientBot Hax3.dylib, the stage2 installer automatically converted to an APFS container, from BigSur beta 1 the process went smoothly.
 

eksu

macrumors 6502
Aug 3, 2017
329
151
I am working with a fresh SSD here and a build of OpenCore I compiled this morning.

Last but not least, there is no need to keep the SMBIOS spoofing. You can boot with the original SMBIOS once the update / installation is completed.

I'm curious how you went about installing Beta 2. Did you upgrade in place from Beta 1? I can run 'Install macOS Big Sur Beta' and target my new APFS drive, but when it boots from OpenCore into the 'macOS Installer' I end up on a screen asking for my language preference, runs 'macOS Updater' then closes in a boot loop. This happens with and without SMBIOS spoofing.

My machine is offline because I didn't want it to be online while I spoofed with the serial from your iMacPro1,1 PlatformInfo xml. Does the installer only run online, and is it safe for me to put my MacPro5,1 serial and such into the iMacPro1,1 PlatformInfo?
 
  • Like
Reactions: TimothyR734

19SK91

macrumors 6502
Aug 4, 2014
338
641
Have you tried plugging your phone into the computer as a hotspot? That's what I did until I got WiFi fixed.

Didn‘t get it to work unfortunately. Turned off WiFi on iPhone, even booted into Catalina to turn off WiFi and to make sure both are connected. I can‘t find any network settings when booting from usb.
 
  • Like
Reactions: TimothyR734

h9826790

macrumors P6
Apr 3, 2014
16,656
8,587
Hong Kong
I am working with a fresh SSD here and a build of OpenCore I compiled this morning.

I'm curious how you went about installing Beta 2. Did you upgrade in place from Beta 1? I can run 'Install macOS Big Sur Beta' and target my new APFS drive, but when it boots from OpenCore into the 'macOS Installer' I end up on a screen asking for my language preference, runs 'macOS Updater' then closes in a boot loop. This happens with and without SMBIOS spoofing.

My machine is offline because I didn't want it to be online while I spoofed with the serial from your iMacPro1,1 PlatformInfo xml. Does the installer only run online, and is it safe for me to put my MacPro5,1 serial and such into the iMacPro1,1 PlatformInfo?
Just update from beta 1, the whole process is very native. No extra input from me through out the whole process.

I let it stay online, not sure if that make the difference.

If you have concern, just logout your Apple ID, then you should be fine.

I am not sure if there is any adverse effect if we use the Mac Pro 5,1 serial number but completely spoof the SMBIOS to iMac Pro. I did that when I tried to figure out how to get HWAccel on the cMP. It was fine. But I really don't know it's 100% safe.
 
  • Like
Reactions: TimothyR734

jackluke

macrumors 68040
Jun 15, 2018
3,321
8,068
Didn‘t get it to work unfortunately. Turned off WiFi on iPhone, even booted into Catalina to turn off WiFi and to make sure both are connected. I can‘t find any network settings when booting from usb.

It works, first boot from a macOS Recovery or USB macOS Installer, open a recovery terminal and type this:

Code:
mount -uw /
nvram boot-args="-no_compat_check amfi_get_out_of_my_way=1"
csrutil disable
reboot

then directly from BigSur desktop (or Catalina) use this ASentientBot Hax3.dylib app : https://forums.macrumors.com/thread...unsupported-macs-thread.2242172/post-28619108

and open the "Install macOS Big Sur Beta.app".

The Hax3.dylib fixed also the apple request to download additional packages.
 

19SK91

macrumors 6502
Aug 4, 2014
338
641
It works, first boot from a macOS Recovery or USB macOS Installer, open a recovery terminal and type this:

Code:
mount -uw /
nvram boot-args="-no_compat_check amfi_get_out_of_my_way=1"
csrutil disable
reboot

then directly from BigSur desktop (or Catalina) use this ASentientBot Hax3.dylib app : https://forums.macrumors.com/thread...unsupported-macs-thread.2242172/post-28619108

and open the "Install macOS Big Sur Beta.app".

The Hax3.dylib fixed also the apple request to download additional packages.

Thank you, I‘m gonna give it a try tomorrow!
 
  • Like
Reactions: TimothyR734

eksu

macrumors 6502
Aug 3, 2017
329
151
Just update from beta 1, the whole process is very native. No extra input from me through out the whole process.

Boot loop again offline with Beta 1 so I think it needs to be online or have the VMM flag set, I’ll try those (vmm first then online second) and see what makes it work.
 
  • Like
Reactions: TimothyR734

Starmina

macrumors member
Jul 7, 2020
46
14
Hi everyone,

I created an account to ask where can i find reliable informations on how to install Big Sur on MacBook Pro (Late 2012), i scrolled trough this topic but there's a LOT of informations between older models or ones with an nvidia gpu and i'm confused as of which post exactly should i follow.

Thanks a lot.
 
  • Like
Reactions: TimothyR734

Maclinux

macrumors member
Jul 2, 2020
54
96
As you want, maybe better on a new partition, I used an HFS+ 48 GB Volume, and using the ASentientBot Hax3.dylib, the stage2 installer automatically converted to an APFS container, from BigSur beta 1 the process went smoothly.

I see this solution more complicated, so I opt for a clean installation of Beta 2 from USB.

Still, I have problems:

The terminal gave me another error in the first steps, when creating the installation USB. I was able to create the USB "Install macOS Big Sur Beta" but after typing:
xattr -c [...] patch_installer.sh

and then write patch_installer.sh [...] Install macOS Big Sur Beta

It returns the following error:

mv: rename / Volumes / Install macOS Big Sur Beta / Install macOS Beta.app to / Volumes / Install macOS Big Sur Beta / _Install macOS Beta.app: No such file or directory

Is a different patch_installer.sh necessary?

Also the famous failed 66 ...


mount_apfs: volume could not be mounted: Permission denied


mount: / failed with 66
 
Last edited:
  • Like
Reactions: TimothyR734

ammoune78

macrumors member
Oct 20, 2017
65
13
Sure, but you better change the serial number, MLB, UUID.

If everyone use the same serial number, it may cause issues.

Also, my recommendation is that you just extract the PlatformInfo section, and inject that into your own config to perform Big Sur installation / update. Do NOT use my whole EFI folder. My config is quite customised for my own use, may not fit for your hardware.

Last but not least, there is no need to keep the SMBIOS spoofing. You can boot with the original SMBIOS once the update / installation is completed.
View attachment 931624

For sure I'll not use the same System Serial I'll generate a new one with the help of terminal: "uuidgen" that will generate a system uuid then generate a new SystemSerial by OpenCoreConfigurator, because the generated system uuid by the terminal is the best, it will be valid but need to generate a multiple onesat least 25 or more to be sure that it is not used by someone in the world.
We have the same model, only GPU rx 580 pulse and CPU X5675 and HDD that are different I think.
My interesting is the config and a working OC structure, because I used 5 different releases even if I compiled two, but I still don't know which is the best, because each install makes different things if changing OC release, this is my experience with that.
Here is the current EFI that I'm using with both iMacPro and defaults Mac Pro serial, if you have time to check it if I did a mistake, so I'll better understand what I'm doing and what I don't have to do!
Thanks mate, I'll use yours and report back!

Edit:
Checked it now, there's RadeonBoost which I guess I don't need for the RX 580 pulse, also GOPRendering in config, but some of the bootlegs that I don't know what they do.
Last thing the sensors if I use iMacPro they will not shows up.
 

Attachments

  • EFI.zip
    905.6 KB · Views: 143
Register on MacRumors! This sidebar will go away, and you'll see fewer ads.