Become a MacRumors Supporter for $50/year with no ads, ability to filter front page stories, and private forums.
Status
The first post of this thread is a WikiPost and can be edited by anyone with the appropiate permissions. Your edits will be public.

jackluke

macrumors 68040
Jun 15, 2018
3,321
8,068
Any chance somebody can help with this? Camera is working fine as I can see myself in photo booth but the likes of Zoom, Teams etc will not allow me to add them in Privacy settings to use the camera and mic??

View attachment 932929 View attachment 932930

If you used my "IvyBridge prelinkedkernel Wifi fix" then try this attached BigSur tccutil fix, should work on BigSur to fix that camera mic app permissions.
[automerge]1594540319[/automerge]
View attachment 932976

Finally, managed to install Beta 2 on my Imac 10,1 with the precious help from jackluke, thanks.
It is not perfect yet, not working sound, wifi, and transparency.
After install applied your beta patch, should apply the other or not?
Help is welcome, thank you all!

You installed the Beta 1 (but they are almost the same), for that GPU you should use in System Preferences General tab the "dark mode" because on "light mode" there are issues on showing icons on the upper right Finder, and also run this from BigSur terminal: defaults write com.apple.universalaccess reduceTransparency -bool true ; killall Finder

for Wifi try to select your SSID manually from System Preferences Network (otherwise try with ethernet).
 

Attachments

  • BigSur tccutil fix.command.zip
    1.5 KB · Views: 279
Last edited:
  • Like
Reactions: iMac-iPad

PeterHolbrook

macrumors 68000
Sep 23, 2009
1,625
441
I’ve used dosdude1’s awesome Patcher to successfully install Catalina on my Mac Pro 5,1 and am very interested in the various developments in this thread regarding installation of Big Sur betas. One of the things that has struck me is the possibility (if not necessity) of using OpenCore as an alternative to the native boot process. Perhaps this isn’t the best place to ask questions about that, but, considering there seem to be a bunch of knowledgeable people here that have first-hand experience with OpenCore on vintage Macs, here goes:
  • I think I roughly know how to install OpenCore, but, if I were to have second thoughts, what exactly should I do to remove OpenCore and go back to the native boot system? Just delete the EFI folder of my Catalina (or Big Sur) main disk and somehow “bless” boot.efi?
  • From time to time, I boot a legacy (Boot Camp) 64-bit Windows 10 that resides in an MBR disk by itself. I understand the legacy Windows must be reconverted to UEFI (GPT) from within itself, thereby crippling Boot Camp access, which will force me to use OpenCore. Has anyone here faced problems in this process? Are there any major difficulties in this area? For instance, will I be able to back up that GPT Windows disk using Paragon Hard Disk Manager?
  • From time to time, I also boot Mac OS X Snow Leopard. Will I be able to continue to do so if I go the OpenCore route?
  • If I download the OpenCore 0.5.9 or 0.6.0 package (with Bless, Clover and the EFI folder), does that include, without modification, the iMac Pro 1,1 identification, the VMM flag set, video acceleration, et cetera? If it doesn’t, how exactly do I alter such settings, in addition to serial numbers, et cetera? Or, should OpenCore be installed with fake information (like the computer identification and its serial number) and then, once it boots up for the first time, substitute true information for the fake one?
  • Must Lilu be used for something? If so, how?
  • In case I purchase something like a flashed Gigabyte GC-Titan Ridge Thunderbolt 3 PCI card, will I be able to boot from an external USB 3 or Thunderbolt disk? Be that as it may, will the normal USB 2 ports of the Mac Pro still work?
  • Are there any caveats in the use of FaceTime and Messages under OpenCore, provided all the information is genuine?
  • If I finally manage to set up OpenCore on my Mac Pro 5,1, will it effectively become a “supported” computer? In other words, will it be able to install Big Sur without any tricks (other than, perhaps, disabling SIP), or will I still want to circumvent some of Big Sur’s restrictions?
  • Is there any extra advice I should be aware of regarding the more obscure aspects of OpenCore?
Many thanks for your help.
 

justperry

macrumors G5
Aug 10, 2007
12,627
9,933
I'm a rolling stone.
The IO1080211Family.Kext in /Library/Extensions is from Catalina when I reinstalled Big Sur this evening when I checked the /Library/Extensions folder it did not have a IO1080211Family.Kext at all so that's why I took the one from Catalina which I know works. And from what I was told to compare both IO80211Family.kexts the one in /System/Library/Extensions is 12.2b1 and so is the one from Catalina

You should have a look at this post I posted a while ago, you can clearly see that is not the case.
Catalina is 1200.12.2, the one in Big Sur is 120.12.2b1

https://forums.macrumors.com/thread...d.2242172/page-53?post=28631136#post-28631136


  • If I finally manage to set up OpenCore on my Mac Pro 5,1, will it effectively become a “supported” computer? In other words, will it be able to install Big Sur without any tricks (other than, perhaps, disabling SIP), or will I still want to circumvent some of Big Sur’s restrictions?

This is the one I have an answer for, short answer..No.

Longer answer/explanation, I installed BS on my 2012 Mac Mini which is unsupported, tried updating from Software Update, with Dev. profile, didn't work, I am 100% sure it checks what machine you are on, I had to install beta 2 more or less in the same way I did with the first one.
Actually, after finding out how to update to beta 2 it was easier than beta 1, I installed the first one from within my Catalina working environment, I made an USB installer for the second beta, this was easier than from Big Sur, I ran into problems, disk greyed out, couldn't install from BS directly.
 
Last edited:
  • Like
Reactions: TimothyR734

LuisN

macrumors 6502a
Mar 30, 2013
737
688
Torres Vedras, Portugal
I do have one additional question:

The link you sent me to implied that future betas might break the WiFi driver and that I'll need to basically install the whole OS over the top of my existing installation rather than run an easy in-line package. Is there any way around doing this that you know of?
Nothing to do with betas. What I meant was that WIFI card only works with models from 2012 to 2015. They will work until 2015 models are discontinued. From 2016 the WIFI chip is integrated in the logic board. As you can see in the image bellow, it's a genuine supported airport card.

Captura de ecrã 2020-07-12, às 10.37.16.png

Very good performance as you can see in the image bellow of my iMac WIFI connection.

Captura de ecrã 2020-07-12, às 10.48.35.png Captura de ecrã 2020-07-12, às 10.51.59.png
ISP VODAFONE PT. 500 down 100 up
 
Last edited:
  • Like
Reactions: TimothyR734

jackluke

macrumors 68040
Jun 15, 2018
3,321
8,068
I guess I fixed in different way the "sudo mount -uw /" for my BigSur Beta 2 installation, it should work even with "csrutil authenticated-root enable" , only condition to make it working is to have this :

Code:
nvram boot-args="-no_compat_check"

nvram csr-active-config
(w%00%00%00)

csrutil disable

I simply used bless on the BigSur Preboot Volume and this seems ignored any snapshot booting.
In few words use the attached script, better if you run it directly from BigSur , and after reboot select BigSurFix
and from normal booting, open terminal and type: sudo mount -uw / ; killall Finder
you should have an unsealed non-snapshot BigSur System .

edit:
if doesn't worked maybe check these additional steps:
https://forums.macrumors.com/thread...unsupported-macs-thread.2242172/post-28667064
 

Attachments

  • BigSur snapshot fix.command.zip
    1.5 KB · Views: 221
  • Screenshot 2020-07-12 at 15.59.09.png
    Screenshot 2020-07-12 at 15.59.09.png
    955.8 KB · Views: 225
Last edited:

justperry

macrumors G5
Aug 10, 2007
12,627
9,933
I'm a rolling stone.
Breaking news: I guess I fixed the "sudo mount -uw /" for any BigSur installation, it should work even with "csrutil authenticated-root enable" , only condition to make it working is to have this :

Code:
nvram boot-args="-no_compat_check"
nvram csr-active-config w%00%00%00
csrutil disable

I simply used bless on the BigSur Preboot Volume and this ignored any snapshot booting.

In few words use the attached script, better if you run it directly from BigSur , and after reboot select BigSurFix

and from normal booting, open terminal and type: sudo mount -uw / ; killall Finder

Now you should have an unsealed non-snapshot BigSur System .

sudo /Users/perry/Downloads/BigSur\ snapshot\ fix.command

Welcome to the BigSur beta snapshot this should fix sudo mount -uw /
BigSur snapshot fix can't be executed as standard user if you want to suspend the script just press CTRL+Z
to apply this fix your current account password is required
otherwise the script can't process
Setting nvram parameter to enforce compatibility check
Done
Detecting and adjusting BigSur APFS Preboot
Volume Preboot on Preboot mounted
Done
After reboot your BigSur should use sudo mount -uw /

Password:
mount_apfs: volume could not be mounted: Permission denied
mount: / failed with 66


No dice

NVRAM
boot-args -no_compat_check
csr-active-config w%08%00%00
csrutil status
System Integrity Protection status: disabled.
csrutil authenticated-root status
Authenticated Root status: disabled

Erm..seems like the one in red is different...

How do I change w%08%00%00 to w%00%00%00

I tried this


nvram csr-active-config w%00%00%00
csr-active-config w%08%00%00
nvram: Error getting variable - 'w%00%00%00': (iokit/common) data was not found
 
Last edited:
  • Like
Reactions: TimothyR734

jackluke

macrumors 68040
Jun 15, 2018
3,321
8,068
I tried this

nvram csr-active-config w%00%00%00
csr-active-config w%08%00%00
nvram: Error getting variable - 'w%00%00%00': (iokit/common) data was not found

I meant it works also if the output of nvram csr-active-config is that w%00%00%00, it's equivalent to csrutil disable , I am using the stock BigSur boot.efi , and the purpose of the fix is to boot from apple startup manager (without opencore) targeting the BigSurFix volume, it's based on this my earlier experiment: https://forums.macrumors.com/thread...unsupported-macs-thread.2242172/post-28607464

Maybe retry "BigSur snapshot fix" using this: BigSur prelinkedkernel fix.command.zip

and boot targeting the additional "BigSurFix" volume.

Then to return to your stock or updated BootKernelExtensions.kc use this: BigSur generic BKE.command.zip
 

jhowarth

macrumors 65816
Jan 13, 2017
1,122
1,500
Breaking news: I guess I fixed the "sudo mount -uw /" for any BigSur installation, it should work even with "csrutil authenticated-root enable" , only condition to make it working is to have this :

Code:
nvram boot-args="-no_compat_check"
nvram csr-active-config w%00%00%00
csrutil disable

I simply used bless on the BigSur Preboot Volume and this ignored any snapshot booting.

In few words use the attached script, better if you run it directly from BigSur , and after reboot select BigSurFix

and from normal booting, open terminal and type: sudo mount -uw / ; killall Finder

Now you should have an unsealed non-snapshot BigSur System .

I
Breaking news: I guess I fixed the "sudo mount -uw /" for any BigSur installation, it should work even with "csrutil authenticated-root enable" , only condition to make it working is to have this :

Code:
nvram boot-args="-no_compat_check"
nvram csr-active-config w%00%00%00
csrutil disable

I simply used bless on the BigSur Preboot Volume and this ignored any snapshot booting.

In few words use the attached script, better if you run it directly from BigSur , and after reboot select BigSurFix

and from normal booting, open terminal and type: sudo mount -uw / ; killall Finder

Now you should have an unsealed non-snapshot BigSur System .

Okay, so what happens now under an unsealed volume when you execute

sudo mount -uw /
sudo touch /Library/Extensions/
sudo kextcache -i /

when only the patched IOUSBHostFamily.kext is present instead of the usb injection kext? Does the complete (both Info.plist) patching of IOUSBHostFamily.kext allow for booting kernels on legacy usb like it does under Catalina?

ps Using 'diskutil mount Preboot' seems to misbehave in the case of multiple drives. On my MacPro3,1, when I executed that command, the Preboot that was mounted did not belong to the booted drive but another (at least for a 'cmd-s; exit' safe boot.


% sudo diskutil unmount Preboot
Volume Preboot on disk4s2 unmounted

when the booted Big Sur's Preboot is actually on disk7s2.
 
Last edited:

jackluke

macrumors 68040
Jun 15, 2018
3,321
8,068
I


Okay, so what happens now under an unsealed volume when you execute

sudo mount -uw /
sudo touch /Library/Extensions/
sudo kextcache -i /

when only the patched IOUSBHostFamily.kext is present instead of the usb injection kext? Does the complete (both Info.plist) patching of IOUSBHostFamily.kext allow for booting kernels on legacy usb like it does under Catalina?

I've tried any patched IOUSBHostFamily.kext but can only boot with CMD+S and "exit" , anyway I guess now with an unsealed volume the kextcache , kmutil and any System modification (included renaming the Volume) is easier.
 

jackluke

macrumors 68040
Jun 15, 2018
3,321
8,068
ps Using 'diskutil mount Preboot' seems to misbehave in the case of multiple drives. On my MacPro3,1, when I executed that command, the Preboot that was mounted did not belong to the booted drive but another (at least for a 'cmd-s; exit' safe boot.


% sudo diskutil unmount Preboot
Volume Preboot on disk4s2 unmounted

when the booted Big Sur's Preboot is actually on disk7s2.

That's why I suggested to apply it directly from BigSur normal booting, because from there surely the Preboot UUID is unique and already mounted at /System/Volumes/Preboot/ , and from there my simple script can correctly tag it as bootable path.
 
  • Like
Reactions: iMac-iPad

jhowarth

macrumors 65816
Jan 13, 2017
1,122
1,500
That's why I suggested to apply it directly from BigSur normal booting, because from there surely the Preboot UUID is unique already mounted at /System/Volumes/Preboot/ , and from there can correctly tag it as bootable path.

Okay, then how about recreation of the previous legacy usb kernel with a virgin copy of IOUSBHostFamily.kext and the usual LegacyUSBInjector.kext? Does the new approach to a successful 'mount -uw /' restore your ability to build such prelinkedkernels? I ask because usb is really rather special case. It is the only set of kext that have any dext user space device drivers. So the possibility remains that changes are being made across beta releases which might eventually break the ability of working prelinked kernels to be built for those kext that are coupled to dext.

Update: Your snapshot hack doesn't work here when this recipe

sudo diskutil mount disk7s2
sudo bless --folder /System/Volumes/Preboot/*/System/Library/CoreServices --label "BigSurFix"

*** rebooting under BigSurFix ***

For both a normal and a safe boot, this still results in 'sudo mount -uw /' or 'mount -uw /' fails with the 66 error.
 
Last edited:
  • Like
Reactions: TimothyR734

jackluke

macrumors 68040
Jun 15, 2018
3,321
8,068
Update: Your snapshot hack doesn't work here when this recipe

sudo diskutil mount disk7s2
sudo bless --folder /System/Volumes/Preboot/*/System/Library/CoreServices --label "BigSurFix"

*** rebooting under BigSurFix ***

For both a normal and a safe boot, this still results in 'sudo mount -uw /' or 'mount -uw /' fails with the 66 error.

It's strange because I had sealed system and snapshot booting, and I guess after that command I can use "sudo mount -uw /", otherwise you should use this other method (based on ASentientBot apfs_systemsnapshot ):

Code:
mount

(locate your diskXsYsZ and use diskXsY)

sudo mkdir ~/Snapshot/

sudo mount -o nobrowse -t apfs /dev/diskXsY ~/Snapshot/

cd ~/Snapshot/S*/L*/F*/apfs.fs/C*/R*/

(or also cd /S*/L*/F*/apfs.fs/C*/R*/ )

sudo ./apfs_systemsnapshot -v "~/Snapshot/" -r ""

(-r "" should tag no snapshots)

not totally sure if before or after -r "" I made a new snapshot of it (I guess no):

sudo bless --folder ~/Snapshot/System/Library/CoreServices/ --bootefi --create-snapshot

or maybe I done this: sudo bless --folder ~/Snapshot/System/Library/CoreServices

but I am sure that after -r "" on "BigSur beta 2" I got these system messages:
Code:
Attempting tagging of snapshot on volume: /Volumes/mountpoint/BigSur
fs_snapshot_root: Operation not permitted
fs_snapshot_root failed with /Volumes/mountpoint/BigSur

but apparently even with those warnings it worked anyway.
 
Last edited:

jhowarth

macrumors 65816
Jan 13, 2017
1,122
1,500
It's strange because I had sealed system and snapshot booting, and I guess after that command I can use "sudo mount -uw /", otherwise you should use this other method (based on ASentientBot apfs_systemsnapshot ):

Code:
mount

(locate your diskXsYsZ and use diskXsY)

sudo mkdir ~/Snapshot/

sudo mount -o nobrowse -t apfs /dev/diskXsY ~/Snapshot/

cd ~/Snapshot/S*/L*/F*/apfs.fs/C*/R*/

(or also cd /S*/L*/F*/apfs.fs/C*/R*/ )

sudo ./apfs_systemsnapshot -v "~/Snapshot/" -r ""

(-r "" should tag no snapshots)

not totally sure if before or after -r "" I made a new snapshot of it (I guess no):

sudo bless --folder ~/Snapshot/System/Library/CoreServices/ --bootefi --create-snapshot

I don't know what to make of those instructions. You seem to be trying to delete the existing snapshot so that none exist yet your last command to bless recreates a snapshot.
 

jackluke

macrumors 68040
Jun 15, 2018
3,321
8,068
I don't know what to make of those instructions. You seem to be trying to delete the existing snapshot so that none exist yet your last command to bless recreates a snapshot.

I used those instructions before "guessing" that using bless on BigSur Preboot fixed "sudo mount -uw /" but at this point I don't know exactly how it worked.
 

jhowarth

macrumors 65816
Jan 13, 2017
1,122
1,500
I used those instructions before "guessing" that using bless on BigSur Preboot fixed "sudo mount -uw /" but at this point I don't know exactly how it worked.

To be clear, my confusions are where executing 'sudo mount -uw /' falls in between...

Code:
mount

(locate your diskXsYsZ and use diskXsY)

sudo mkdir ~/Snapshot/

sudo mount -o nobrowse -t apfs /dev/diskXsY ~/Snapshot/

cd ~/Snapshot/S*/L*/F*/apfs.fs/C*/R*/

(or also cd /S*/L*/F*/apfs.fs/C*/R*/ )

sudo ./apfs_systemsnapshot -v "~/Snapshot/" -r ""

(-r "" should tag no snapshots)

and
Code:
sudo bless --folder ~/Snapshot/System/Library/CoreServices/ --bootefi --create-snapshot

or
Code:
sudo bless --folder ~/Snapshot/System/Library/CoreServices

Did that fall somewhere in between or at the end. Also didn't you have to reboot after removing the snapshot to be running without any?

Update: I don't know if applying your previous BigSurFix approach fouls the above approach but here I get for...


/dev/disk7s5s1 on / (apfs, sealed, local, read-only, journaled)


% sudo mkdir ~/Snapshot/
% sudo mount -o nobrowse -t apfs /dev/disk7s5 ~/Snapshot/
% cd ~/Snapshot/S*/L*/F*/apfs.fs/C*/R*/
% sudo ./apfs_systemsnapshot -v "~/Snapshot/" -r ""
Attempting tagging of snapshot on volume: ~/Snapshot/
open: No such file or directory
open failed with ~/Snapshot/
% cd /S*/L*/F*/apfs.fs/C*/R*/
% sudo ./apfs_systemsnapshot -v "~/Snapshot/" -r ""
Attempting tagging of snapshot on volume: ~/Snapshot/
open: No such file or directory
open failed with ~/Snapshot/

Is this something that has to be done from a safe boot?
 
Last edited:

Ronald Steven

macrumors member
Jun 29, 2020
39
48
to invoid error 66
11a install 3 min screen (takes a little bit longer)
12. reboot about 32 min screen install
13. reboot wait install up to the mid of the apple logo
14. press power button to shut down the computer
15. press option key to select the visible BigSur volume -not the install volume
16. several reboots - select always the BigSir volume
17. install finished
18. no error 66 - sudo mount -uw / now works and BigSur volume is visible
19. install wifi kext
This is what the youtube video shows.

@coolio2004 awsomeeee! Perfect to me! Installed beta2 on mbp A1278 mid 2012 unsealed disk, and WiFi works! Good option to install not the better but works!??
 
  • Like
Reactions: TimothyR734

thingstoponder

macrumors 6502a
Oct 23, 2014
916
1,100
I installed Beta 1 in the first couple days on my 2012 MacBook Pro and everything was fine but I ran into the “error 66” bug when trying to enable WiFi with the simples terminal script. I didn’t want to bother digging deeper until an easier fix was out. Has beta 2 fixed this?
 
  • Like
Reactions: TimothyR734

TimothyR734

macrumors 68030
Apr 10, 2018
2,723
2,753
Logsden Oregon
I fixed my Failed with 66 and I don't have the Ivy Bridge prelinked kernel patch installed:
Phase1 3 min install I only have SIP disabled and no combat check in nvram
Phase 2 29 min install I have SIP disabled, authenticated-root disabled, and no compact check AMFI get out of my way
Phase 3 Black screen Apple Logo progress bar it seemed to take a while but I rebooted and held the option button and the name of my drive macOS Big Sur Beta was listed choose that instead of macOS install
Phase 4 Black screen I didn't know if my screen would turn grey for the next phase but waited until the progress bar got a bit past half way rebooted this time I waited for the progress bar to finish
Phase 5 grey screen Apple logo progress bar I waited until just a bit past halfway and let it load and I was able to us sudo mount -uw /
 

Ronald Steven

macrumors member
Jun 29, 2020
39
48
I installed Beta 1 in the first couple days on my 2012 MacBook Pro and everything was fine but I ran into the “error 66” bug when trying to enable WiFi with the simples terminal script. I didn’t want to bother digging deeper until an easier fix was out. Has beta 2 fixed this?

The beta2 have the same sealed disk, but if you reinstall bs following the steps you can fix WiFi on big sur default boot doing “sudo mount -uw /“ via terminal and replancing the .ext in the folder extensions for fixing the WiFi. See this tutorial


Alex-Microsmeta

macrumors 6502
Jul 14, 2018
376
630
Rome
My Big Sur (Beta 1) Installation on MacBook Pro 7,1 (13-inch, Mid 2010)
  1. Create a blank APFS partition using Disk Utility, separate from your Catalina partition
  2. Download InstallAssistant.pkg containing macOS 11.0 Developer Beta 1 (20A4299v)
  3. Run the installer package to place the Install macOS Beta.app at /Applications
  4. Download @ASentientBot's original Hax.dylib and move it to your home folder
    1. Hax 1working mv ~/Downloads/Hax.dylib ~/ or /Users/myHomeFolderName/
    2. Hax 2 – don't use
    3. Hax 3 – testing
    4. Disable System Integrity Protection (SIP) via csrutil disable in recovery terminal
  5. Disable Library Validation
    1. sudo defaults write /Library/Preferences/com.apple.security.libraryvalidation.plist DisableLibraryValidation -bool true”
  6. Inject the Hax dynamic library file to force the Big Sur installation without error
    1. launchctl setenv DYLD_INSERT_LIBRARIES ~/Hax.dylib
    2. Failure to complete this step will result in The operation could not be completed (BIErrorDomain Error 3)
  7. Run the macOS Beta installer app and choose your blank partition for installation
    1. Your computer will restart several times. The grey Apple logo may turn white.
    2. You will eventually reach a grey circle-backlash symbol. Return to Catalina.
  8. Add these NVRAM boot arguments in Terminal
    1. sudo nvram boot-args="-no_compat_check amfi_get_out_of_my_way=1"
  9. Create a bootable USB installer for Big Sur using a suitable external drive
    1. sudo ~/Downloads/Install\ macOS\ Beta.app/Contents/Resources/createinstallmedia --volume /Volumes/MyVolume
    2. Visit Apple's page on the createinstallmedia command for more information
  10. Edit the boot properties list of your Big Sur USB installer
    1. /Volumes/Install\ macOS\ Beta/Library/Preferences/SystemConfiguration/com.apple.Boot.plist
      XML:
      <?xml version="1.0" encoding="UTF-8"?><!DOCTYPE plist PUBLIC "-//Apple//DTD PLIST 1.0//EN" "http://www.apple.com/DTDs/PropertyList-1.0.dtd">
      <plist version="1.0">
      <dict>
      <key>Kernel Flags</key>
      <string>root-dmg=file:///BaseSystem/BaseSystem.dmg -no_compat_check cs_enforcement_disable=1 cs_debug=1 amfi_allow_any_signature=1 amfi_get_out_of_my_way=1</string>
      </dict>
      </plist>
    2. Restart your computer and hold the ⌥ Option key to boot into your external Big Sur installer
  11. If you have a Penryn Core 2 Duo CPU, you will need to delete the Telemetry plugin to prevent kernel panic
    1. Mount the system volume as writable via the recovery Terminal
      1. Use diskutil list to find the Big Sur system volume
      2. Mount the system volume diskutil mount diskXsY
      3. Remount as read-write mount -uw "/Volumes/Big Sur"
    2. Find & delete the Telemetry plugin
      1. Change directory cd /Volumes/Big\ Sur/System/Library/UserEventplugins
      2. Remove it rm -r com.apple.telemetry.plugin
        1. Or rename it mv com.apple.telemetry.plugin com.apple.telemetry.plugin2
      3. Return to Catalina
  12. Edit the Boot property lists in Big Sur's Preboot volume
    1. Use diskutil list to find the Preboot volume that Big Sur uses
    2. Mount the Preboot volume diskutil mount diskXsY
    3. Edit these two com.apple.Boot.plist files
      1. /Volumes/Preboot/UUID-BigSurData/Library/SystemConfiguration/com.apple.Boot.plist
      2. /Volumes/Preboot/UUID-BigSurData/Library/Preferences/SystemConfiguration/com.apple.Boot.plist
        XML:
        <?xml version="1.0" encoding="UTF-8"?><!DOCTYPE plist PUBLIC "-//Apple//DTD PLIST 1.0//EN" "http://www.apple.com/DTDs/PropertyList-1.0.dtd">
        <plist version="1.0">
        <dict>
        <key>Kernel Cache</key>
        <string>System\Library\PrelinkedKernels\prelinkedkernel</string>
        <key>Kernel Flags</key>
        <string>-no_compat_check amfi_get_out_of_my_way=1</string>
        </dict>
        </plist>
      3. Copy the same plist to a third location /Volumes/Preboot/UUID-BigSurData/System/Library/CoreServices/
  13. Create another external USB partition with USBOpenCoreAPFSloader3.app
    1. OpenCore boot loader will dynamically block the Telemetry plugin being copied or reused from snapshot booting, but it needs to load the prelinkedkernel (not BootKernelExtensions.kc) in order to utilise the telemetrap.kext
    2. Once created, reboot and hold the ⌥ Option key to select the unique EFI icon. Choose Big Sur in the OpenCore boot menu.
  14. Setup your Mac as normal
    1. If your Mac crashes at the Choose Your Language prompt, it may indicate that the Telemetry plugin has loaded. OpenCore should prevent this however
    2. Your Wi-Fi card & internal audio devices will likely not be detected. Proceed patiently through the setup, as the lack of graphics acceleration will make things much slower to start off
  15. Fix Wi-Fi & Internal Audio Devices (Speakers + Mic)
    1. Use @jackluke's script to copy his ready-made prelinkedkernel file into your Big Sur Preboot volume
    2. Follow @jackluke's instructions below
  16. Graphics acceleration (NVIDIA GeForce 320M 256 MB), Display Brightness Control & Night Shift
View attachment 931554
View attachment 931555 View attachment 931557
Source: Rewrote my long-winded method in post #796 to be more clear and concise.
All credits go to @jackluke and @ASentientBot not only for their hard work in creating patches and scripts, but for taking the time to answer people's queries – and essentially fix their problems. Thank you
Are you dire that acceleration works? I don't see trasparencies on dock amd menu bar
 

jhowarth

macrumors 65816
Jan 13, 2017
1,122
1,500
Hey everyone! After wasting half the day on this, I finally figured out one piece of the snapshots/error 66 puzzle.

The TL;DR is that you can just call apfs_systemsnapshot -v /Volumes/... -r "" to boot from the live volume. I haven't seen this published anywhere yet, and the accepted wisdom seems to be that you can't boot the live volume in BS. Hopefully this method will continue to work. It will make patching much easier.

Long version:
- disable SIP, including ARV (funnily enough, my very early boot.efi patch with all the 0xffffffffs actually works for this, even though @dosdude1's 0x67 one does not Edit: posted the new patch)
- boot into Big Sur or a BS recovery/install disk
- diskutil mount diskXsY the real system volume (not the root snapshot, which will already be mounted at diskXsYsZ)
- find the path to the mounted volume (if you're booted into the same system, it will be volume_name 1 because of the previously mounted snapshot)
- /S*/L*/F*/apfs.fs/C*/R*/apfs_systemsnapshot -v "/Volumes/volume_name" -r ""
- reboot
- mount -uw / should now work, changes will apply immediately to the live volume, and you can remove all the snapshots with diskutil apfs deletesnapshot if desired

(I spent ages reverse engineering apfs_systemsnapshot and learning about the fs_snapshot_* functions before realizing you could just call the tool with an empty string. But if anyone is interested in the code for programmatically managing snapshots, I am happy to share it.)

Thanks to @mac_4eva/this post for the starting point.

One remaining mystery is figuring out how to mount the BS root from Cat. With the sealing/snapshots disabled, I don't see any reason why it shouldn't be possible.

I hope this works for others!

I am seeing some baffling behavior trying to execute these commands from a beta 2 usb installer on a supported machine with a freshly installed beta 2 on an external usb drive. After install beta 2 on the usb external drive, I booted into the usb installer and in the terminal set 'csrutil disable' and 'csrutil authenticated-root disable' then rebooted. While the same external drive shows this in 'diskutil list' when booted from the installed beta 2 external usb drive itself...

Code:
/dev/disk7 (external, physical):
   #:                       TYPE NAME                    SIZE       IDENTIFIER
   0:      GUID_partition_scheme                        *250.1 GB   disk7
   1:                        EFI >EFI                     209.7 MB   disk7s1
   2:                 Apple_APFS Container disk8         249.8 GB   disk7s2

/dev/disk8 (synthesized):
   #:                       TYPE NAME                    SIZE       IDENTIFIER
   0:      APFS Container Scheme -                      +249.8 GB   disk8
                                 Physical Store disk7s2
   1:                APFS Volume BigSur - Data           11.3 GB    disk8s1
   2:                APFS Volume Preboot                 342.1 MB   disk8s2
   3:                APFS Volume Recovery                740.3 MB   disk8s3
   4:                APFS Volume VM                     1.1 MB     disk8s4
   5:                APFS Volume BigSur                  14.0 GB    disk8s5
   6:              APFS Snapshot com.apple.os.update-... 14.0 GB    disk8s5s1

under the beta 2 installer, the 'diskutil list' in the terminal shows only...

Code:
/dev/disk7 (external, physical):
   #:                       TYPE NAME                    SIZE       IDENTIFIER
   0:      GUID_partition_scheme                        *250.1 GB   disk7
   1:                        EFI >EFI                     209.7 MB   disk7s1
   2:                 Apple_APFS Container disk8         249.8 GB   disk7s2

/dev/disk8 (synthesized):
   #:                       TYPE NAME                    SIZE       IDENTIFIER
   0:      APFS Container Scheme -                      +249.8 GB   disk8
                                 Physical Store disk7s2
   1:                APFS Volume BigSur - Data           11.3 GB    disk8s1
   2:                APFS Volume Preboot                 342.1 MB   disk8s2
   3:                APFS Volume Recovery                740.3 MB   disk8s3
   4:                APFS Volume VM                     1.1 MB     disk8s4
   5:                APFS Volume BigSur                  14.0 GB    disk8s5

which makes it impossible to execute...

S*/L*/F*/apfs.fs/C*/R*/apfs_systemsnapshot -v "/Volumes/BigSur" -r ""

as the recovery volume doesn't believe the external usb has any snapshots. What exact configuration did you test this approach on and has it broken in beta2?

Earlier, I tried your suggesting of mounting disk8s5 when booted from the unsupported machine (MacPro 3,1) and using...

S*/L*/F*/apfs.fs/C*/R*/apfs_systemsnapshot -v "/Volumes/BigSur 1" -r ""

The response that command was that the snapshot was tagged for modification but on rebooting under a unsupported machine, it still blocked 'mount -uw /'. Does that approach work on unsupported machines or do you have to be on a supported machine with Big Sur friendly bootroms?
 

TimothyR734

macrumors 68030
Apr 10, 2018
2,723
2,753
Logsden Oregon
Thank you jackluke WifI is working I tried chmod -R 755 and chown -T 0:0 both times asked from my password and nothing happened so I used this sudo touch /System/Library/Extensions && sudo kextcache
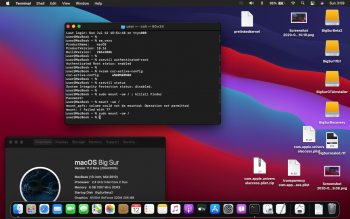
Screen Shot 2020-07-12 at 5.46.31 PM.png
-u / then kextcache -i /, kmutil install --update-all, kcditto then I rebooted and win was was on thank you :)
 
Last edited:

quaccOS

macrumors regular
Apr 19, 2020
126
208
Are you dire that acceleration works? I don't see trasparencies on dock amd menu bar
Step 16 is in grey because I haven’t found a solution to that problem. Acceleration isn’t working. WiFi & audio will randomly not work on some startups, and I have to redo the patches.

I’m gonna wait it out…it’s fun, tinkering with Big Sur – but it can be time consuming.
 
  • Like
Reactions: Alex-Microsmeta

Ronald Steven

macrumors member
Jun 29, 2020
39
48
i made migration from time machine and now can't change the lock screen and desktop pictures background, I have a MBP mid 2012 A1278, somebody knows how fix it?

update: can change the desktop background but not lock screen ???????
 
Last edited:
Register on MacRumors! This sidebar will go away, and you'll see fewer ads.