Become a MacRumors Supporter for $50/year with no ads, ability to filter front page stories, and private forums.
@dosdude1 can u help me with this
Hi guys and thanks @dosdude1 for all this effort, my question is, i've done the bypass by wires as on page 1, both macs work perfect for like a month or two, but now one mac is showing blue or purple screen with chime but no apple logo, the other one is doing some artifacts al over the screen and going like pinkish. Any ideas? both have MUX removed, and one has a missing AMD GPU
best regards
 
@dosdude1 Tremendous work. Thank you for all your effort. Could I kindly request the wiring diagram for a 17? 2914 board? I noticed you've provided one for the 15' on the first post on this threaf but can't find one for the 17.

Thank you!
 
Last edited:
ok, i tring now, but i cant locate the "other side of the board" PCH U1800.
Can some one give me a hint?
Thanks in advance.

Hi everyone!
Im still lost on find the other side of the board . I dont have any schematics to search on.

side.JPG
 
Hi everyone!
Im still lost on find the other side of the board . I dont have any schematics to search on.

View attachment 927280
Hi @Erik Soto you should download openboardview, and then look for the schematics for that board, for example look on google for 820-3115-B.brd. Open openboardview.exe and open the file you downloaded for example 820-3115-B.brd. Than you can easily go into search and type tha component you look for.
 
Hi @Erik Soto you should download openboardview, and then look for the schematics for that board, for example look on google for 820-3115-B.brd. Open openboardview.exe and open the file you downloaded for example 820-3115-B.brd. Than you can easily go into search and type tha component you look for.

Thanks GSpiegel!
I found teh schematics, and made the las connectin.
Now i have chime sound and backlight on bu no image, just black screen.
Ithink ist a progress but i dont know what can be the problem.
 
While troubleshooting a failed flash on my 17", I lifted the pad for PP3V3. Is there an easily accessible alternate point to tie in?

TIA,
Chris
 
I recheck this like dosdude1 says

Wire your enable lines like so (you should follow the wiring diagram in the OP EXCEPT for the following -- I still need to update it):

- Connect LVDS_IG_BKL_ON to LCD_BKLT_EN
- Connect LVDS_IG_PANEL_PWR to LCD_PWR_EN
- Connect PP3V3_S0 to LCD_BKLT_PWM (only if not using DyingLight for brightness control) Im not using DyingLight
- Connect PP3V3_S0 to LVDS_DDC_SEL_IG (this is probably what you're missing)

Once done, the display should come on and show an image.

No image just black screen with backlight on
I forgot to say, the chime sound and fans are spining on
 
Last edited:
hello everybody.
just done the mod from this thread
ive removed gmux chip (didnt notice the edit saying that is not nessesery)
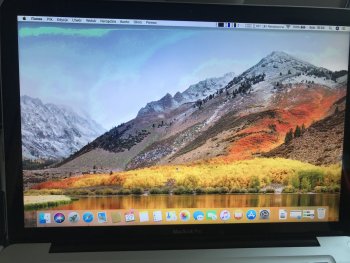
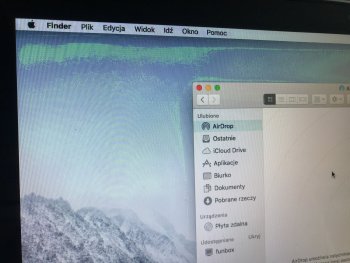
ive solder all the wires, macbook running but ive got the artefacts, ive attached the pictures below
what could cause this? im guessing that wiring is done in proper way otherwise it wouldnt work at all?

MacBook Pro early 2011 15' running on 10.13.6 high sierra, system shows hd3000 only.

thanks, Tom
 

Attachments

  • IMG_2489.jpg
    IMG_2489.jpg
    473.7 KB · Views: 386
  • IMG_2490.jpg
    IMG_2490.jpg
    722.1 KB · Views: 362
Did anyone find the right pogo pin adapter with 1.2mm pitch?
I tried soldering it myself but it's way too small :(
 
The button itself could be bad, causing the line to go low. Make sure you soldered the wire to the correct side of that resistor right next to the SMC... The other side is connected to GND, which will keep the line low all the time if connected there.
The actually I pulled out the button and noticed water damage on the side button which was 821-0962, I have reflowed the chip on the board and noticed that one of the larger caps seems to be toast. Anyway to find the schematic for this so that I can figure out the caps that need to be replaced?
 
I've seen several posts and could't find the answer, so sorry if i'm repeating someone else questions.
The solution of removing the resistor + flash seems to work for most people that had they macs turning on and showing the apple logo.
In my case, I had this motherboard repaired many years ago and the repair didn't lasted.
It was done GPU memory and GPU reballings, but as you imagine, it is now dead again.

It turns on, chime, show a grey/purplish or a blue screen and fans goes full speed.
No Apple logo, no recovery, no verbose, no nothing, just the chime and this grey screen.

Anyone had something similar? Would the flash and resistor removal work?
Or even the hardwiring...

Cheers
 
@dosdude1 - thanks for all your hard work simply awesome! this is OT but I need some advice re:2011 MacBook Pro.
Successfully updated using CAT patcher to 10.15.5 - everything worked like a charm BUT audio (no internal spkr option).
Started looking for fixes & reset SMC & PRAM which broke the CAT install ;-( Now I'm attempting to do a re-install via
the patcher but getting errors for the Install Mac OS X Catalina & the CAT patcher + my GPU workaround went away...
I've downloaded a new patcher 1.4.4 (same version I used yesterday) & will redo my CAT HDD per your instructions but should I try to fix the GPU issue first? will the patcher fix the GPU issue? am I missing something for the RE-Install via patcher & bootable HDD? I appreciate you help & thank you in advance for any info.
 
Yes, I received a board where the gpu had been totally removed, after gmux flash it worked fine. My comment was more in relation to messing with the circuit that feeds the gpu with 1.8v. That circuit needs to remain intact (and not shorted) up to the point where it's pgood signal meets all_sys_pwrgd, otherwise the board will obviously not turn on fully. 1v8 is also required by the PCH (u1800). If you look for all_sys_pwrgd on the board view, you can trace it back to where 1v8s0_pgood meets it. If 1v8 is missing or shorted it will pull all_sys_pwrgd low through r7966. In saying that it is also unnecessary to remove any of these components as dosdude1's gmux takes care of that. If you REALLY want to make sure the gpu gets no power you can safely remove U7880 or the gpu_en resistor R9932.

@Analias what is the difference between removing U7880/R9932 vs removing R8911?
 
[QUOTE = "tomeszek, post: 28615685, membro: 1223043"]
Ciao a tutti.
ho appena fatto la mod da questo thread
ho rimosso il chip gmux (non ha notato la modifica dicendo che non è nessesery)
Iive saldare tutti i cavi, macbook in esecuzione ma ive ha ottenuto i manufatti, ho allegato le immagini qui sotto
cosa potrebbe causare questo? Immagino che il cablaggio sia eseguito in modo corretto altrimenti non funzionerebbe affatto?

MacBook Pro inizio 2011 15 'in esecuzione su sierra alta 10.13.6, il sistema mostra solo hd3000.

grazie Tom
[/CITAZIONE]
I also made the change on a 15-inch MacBook Pro from 2011, Does the exact same graphic defect, can anyone help us?
my mounts 1gb video card
[automerge]1596056628[/automerge]
hello everybody.
just done the mod from this thread
ive removed gmux chip (didnt notice the edit saying that is not nessesery)
ive solder all the wires, macbook running but ive got the artefacts, ive attached the pictures below
what could cause this? im guessing that wiring is done in proper way otherwise it wouldnt work at all?

MacBook Pro early 2011 15' running on 10.13.6 high sierra, system shows hd3000 only.

thanks, Tom

I also made the change on a 15-inch MacBook Pro from 2011, Does the exact same graphic defect, can anyone help us?
my mounts 1gb video card
 
Just flashed my 15" early 2011 MacBook Pro. Worked first time. Also added wire link for battery button screen brightness workaround and this also functions really well. Hopefully this will increase battery hours and cut down the heat. I applied the real mac mods fix previously, which was ok but a bit of a pain when OS was updated, SMC reset etc.

Like others here I look forward to the keyboard functionality being iplemented but big thanks to Collin for figuring out and reverse engineering a solution for this GPU nightmare. Superb job.
 
Last edited:
Hi, just came across this thread after using solely software mods on my MBP 2011 15" with GPU issues. This doesn't seem to work so well anymore, and I wonder if someone could TL;DR to me if there's a -simple- hardware mod that totally disables the AMD GPU and solves all these issues, there are 29 pages here so there must have been many changes and updates to the procedure... also, has anyone tried replacing the tantalum cap as on the MBP 2010, and found it not to solve the 2011 issue? I thought it might as well be just the same fault (and solution).

Thanks!
 
Just flashed my 15" early 2011 MacBook Pro. Worked first time. Also added wire link for battery button screen brightness workaround and this also functions really well. Hopefully this will increase battery hours and cut down the heat. I applied the real mac mods fix previously, which was ok but a bit of a pain when OS was updated, SMC reset etc.

Like others here I look forward to the keyboard functionality being iplemented but big thanks to Collin for figuring out and reverse engineering a solution for this GPU nightmare. Superb job.


Hi @anfirmor i also have a flashed 15'' late 2011 board, and everything is fine, I want to add the ability to control brightness using battery button, I downloaded the diagram but is difficult for me to understand, could you take a pic of the welded wire on your board for me to see better please ? I'm afraid to weld it bad. My battery on full brightness lasts 2h30-3hours max
 
Hi @anfirmor i also have a flashed 15'' late 2011 board, and everything is fine, I want to add the ability to control brightness using battery button, I downloaded the diagram but is difficult for me to understand, could you take a pic of the welded wire on your board for me to see better please ? I'm afraid to weld it bad. My battery on full brightness lasts 2h30-3hours max

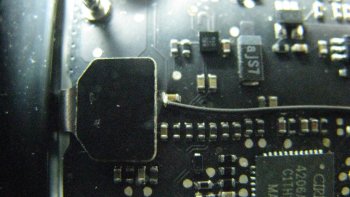
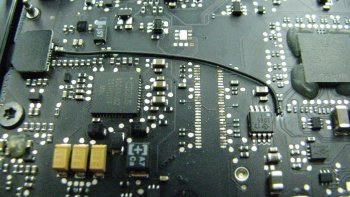
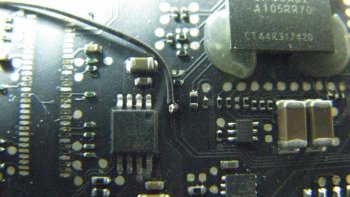
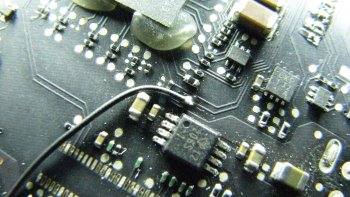
Can do. Here are some macros of the bodge wire. best shots I could do hand held. The pcb looks filthy but the macro mode and strong light make it look worse (honest).

I used 100-30BK Kynar wire wrapping wire (Farnell 143-381 in the UK). It's single strand, 0.25mm diameter conductor and 0.5mm diameter outer. Needs to be something that fine really, Used the same stuff for flashing. You don't want to use anything that could stress components or pcb pads. A broken wire is easier to repair than a track thats ripped of the board. Also use a good, temperature controlled iron. I used standard 60/40 multicore (0.38mm diameter). Not lead free as, besides being totally crap, it also requires more heat. You need to apply heat for the shortest time to get a good joint, no more.

Hope this helps and good luck.
 

Attachments

  • 2.JPG
    2.JPG
    1.6 MB · Views: 367
  • 1.JPG
    1.JPG
    1.7 MB · Views: 303
  • 3.JPG
    3.JPG
    1.6 MB · Views: 335
  • 4.JPG
    4.JPG
    1.7 MB · Views: 371
  • Like
Reactions: Macmekie
Can do. Here are some macros of the bodge wire. best shots I could do hand held. The pcb looks filthy but the macro mode and strong light make it look worse (honest).

I used 100-30BK Kynar wire wrapping wire (Farnell 143-381 in the UK). It's single strand, 0.25mm diameter conductor and 0.5mm diameter outer. Needs to be something that fine really, Used the same stuff for flashing. You don't want to use anything that could stress components or pcb pads. A broken wire is easier to repair than a track thats ripped of the board. Also use a good, temperature controlled iron. I used standard 60/40 multicore (0.38mm diameter). Not lead free as, besides being totally crap, it also requires more heat. You need to apply heat for the shortest time to get a good joint, no more.

Hope this helps and good luck.

Thank you so much for the advice @anfirmor i will try my best
 
I have screen artifacts, (see below video), can someone confirm its GPU issue. The LCD glass is cracked. Can this be something like LVDS cable issue?

@rnt0 Do you have similar issue ?
 
Register on MacRumors! This sidebar will go away, and you'll see fewer ads.