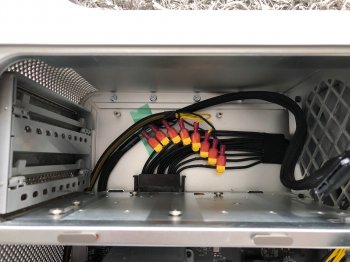
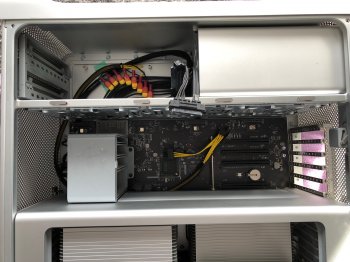
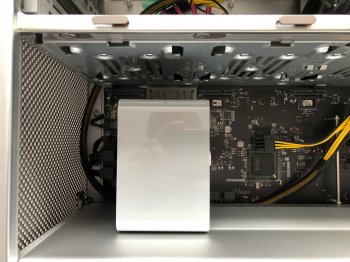
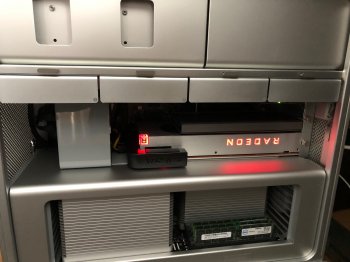
Following the KCL the sum of all currents entering and leaving the junction must be equal to 0. So tapping into the cables will almost double the current from the PSU to the tapping point. Aside from the fact that the strength of the electrical circuit is equal to its weakest point (the tapping point if it is not based on solid soldering) the cable part from the PSU to the junction becomes undersized. Much better solution is solid soldering of properly sized cables directly to the PSU terminals.
Got a tip for us?
Let us know
Become a MacRumors Supporter for $50/year with no ads, ability to filter front page stories, and private forums.
Pixlas 4.1 Mac Pro mod
- Thread starter AndreeOnline
- Start date
- Sort by reaction score
You are using an out of date browser. It may not display this or other websites correctly.
You should upgrade or use an alternative browser.
You should upgrade or use an alternative browser.
Some More pictures showing routing.
Now just need another evga 680 mac edition to test SLI on it !
Or a pair of 970 or 980 in SLI.
Hey MVC, need a beta tester for dual card setups? lol
Is there any tutorial to do it directly to the psu? Would be much better and cleaner solution in the end, need to do it soon, like to order the new gpu
Yes this one and further in this thread there is more .
Last edited:
Yeah, based on the comments in this thread I didn't even try the primary link, went straight to the second one. Worked like a charm.One question, Did you do the secondary Bios Flash from that Sapphire 64 Nitro+ card?
I am looking for the Limited edition Card, not a chance where I live. Where did you find it? eBay?
I'm in Latvia, stumbled upon the card on our local Craigslist-like site, practically for peanuts. It does have a coil whine though, but I'm not too bothered by it.
If one examines the close ups of the Apple 12v and Ground wires, one will note that the conductors are rated to 105 degrees C. As such, each of the eight wires (which are not bundled) can carry up to 18 amps. Based on this fact, it does not appear that there is any significant benefit to be gained by wiring directly from power supply terminals, but I do feel the "solder at motherboard connector pins" method will almost certainly provide a connection superior to the offered by clamp-on splicing blocks. The cable run is short, so voltage drop will be nominal.
Call me old-fashioned, but I like solder.
Call me old-fashioned, but I like solder.
Hi guys, can someone post please a wire connection Diagramm Graphic, I still didn’t figured out, like to get a AMD WX 9100, like to do the mod but, just need to know how to connect, have this file, but don’t really know, how to connect the 4 yellow and 4 black, does It matter or just bridge yellow to 12V and the blacks to Ground? Thx
Think I posted this already. Or to the FB group...
HERE


That was my reason for the changeIf one examines the close ups of the Apple 12v and Ground wires, one will note that the conductors are rated to 105 degrees C. As such, each of the eight wires (which are not bundled) can carry up to 18 amps. Based on this fact, it does not appear that there is any significant benefit to be gained by wiring directly from power supply terminals, but I do feel the "solder at motherboard connector pins" method will almost certainly provide a connection superior to the offered by clamp-on splicing blocks. The cable run is short, so voltage drop will be nominal.
Call me old-fashioned, but I like solder.
[doublepost=1552425700][/doublepost]I never thought the 4.1 or 5.1 community still had momentum ! I still have some interesting mods to undertake with the old 5.1 system ! I think it is time I gave them a break from mining and getting back to giving the old dogs a use
We're looking into doing this for Mac Mac Pro 5,1 at work to run a Vega 64 FE that my boss bought and wound up not needing for his machine. I wanted to try and confirm a few things though since this method
seems like it would work better than the original tapping method.
First, Does the connector easily come apart? It looks almost broke in that image but another user said it pulls apart easily. Second, I assume it's best to remove the PSU completely to make the soldering much easier? Third, (and I'm pretty sure on this) and you confirm that you are simply soldering the GND and 12V wiles to the same ones from the PSU. Lastly, do you have a list of parts used? I assume it's just an 8pin to bare wires and then an extension of it?
Thanks for this great forum! I made this modification to my 5,1 Mac Pro Over the weekend in order to power a Vega 64 Card. The only issue was on the initial power up where the Mac just powered down and wouldn't turn back on. After resetting the SMC it seem to come right and I have not had any issues since, even when stress testing the system. I think my initial issue was caused by using the wrong 6 Pin connector on the Plug, so just be mindful when plugging it in.
For what its worth, you can route the power Cable behind the PCI fan (you have to take it out and then put the cable behind it), this makes for an even more stock look as the cable looks like its come from the existing mini 6 pin connectors. I've seen a couple of post saying this looks ugly or unruly but in my opinion it looks even better than stock.


For what its worth, you can route the power Cable behind the PCI fan (you have to take it out and then put the cable behind it), this makes for an even more stock look as the cable looks like its come from the existing mini 6 pin connectors. I've seen a couple of post saying this looks ugly or unruly but in my opinion it looks even better than stock.


Last edited:
I made this modification to my 5,1 Mac Pro Over the weekend in order to power a Vega 64 Card.
Wow, this looks super flashy. Normally only see this card in the Hackintosh land.
Wonder if this is a huge improvement in performance for your typical workflows. I sort of having the impression that a single CPU cMP would become CPU-bounded for such a high power GPU.
Wow, this looks super flashy. Normally only see this card in the Hackintosh land.
Wonder if this is a huge improvement in performance for your typical workflows. I sort of having the impression that a single CPU cMP would become CPU-bounded for such a high power GPU.
This is definitely over kill for what I use it for. The Mac Pro acts a server most of the time but is connected to a TV so ideal for some casual gaming from time to time. This Mac Pro is a fun little project which I tinker with every now and then, it’s far more powerful than it needs to be. Does look super sleek with the Vega 64 card in it, looks super cool with the door off.
I noticed, that the fan was not running after a few hours and the PSU heated up to ~90Celsius :-(
Anything I could do/check/change to resolve that issue?
I installed today the Pixlas Mod on my cMP and now my PSU fan is dead. It is no longer recognized by the system. Macsfancontrol, does only show an orange 0. I unplugged the cable attached to my titan ridge card, but still no success. I reconnected the cable from the PSU with no success.
I noticed, that the fan was not running after a few hours and the PSU heated up to ~90Celsius :-(
Anything I could do/check/change to resolve that issue?
How you do the mod? You solder something to the PCB?
Is there any room in the optical cage to add an extra fan as temporary solution (or permanent if you can't fit it).
How you do the mod? You solder something to the PCB?
Is there any room in the optical cage to add an extra fan as temporary solution (or permanent if you can't fit it).
Nope no soldering. I used the initial method or rather original Pixlas Mod. With the wire connectors. Because I have nothing installed in the optical bay I could put there another fan, or replace the original one, if needed.
[doublepost=1555779102][/doublepost]<3 <3 <3 I reconnected everything again, changed a bit the routing of the cables, cleaned the connectors another time and guess what, my fan is working again... I am soooo happy
Nope no soldering. I used the initial method or rather original Pixlas Mod. With the wire connectors. Because I have nothing installed in the optical bay I could put there another fan, or replace the original one, if needed.
That sounds strange to me. The PSU fan is actually separated to the PSU, mod the wires shouldn't cause any PSU fan issue.
I assume you already try remove the PSU again and check if there is anything block the fan.
Or at least SMC reset, correct?
That sounds strange to me. The PSU fan is actually separated to the PSU, mod the wires shouldn't cause any PSU fan issue.
I assume you already try remove the PSU again and check if there is anything block the fan.
Or at least SMC reset, correct?
I assume the main root cause, was my routing of the cable, or rather I did not connected the connector 100% properly, eventhough everything was fitting fine.
I assume the main root cause, was my routing of the cable, or rather I did not connected the connector 100% properly, eventhough everything was fitting fine.
Better not to assume but physically check it. It may be as simply as something jamming the fan. Reseat the PSU may help.
That PSU output is really nothing more than power output. As I said before, the fan is completely separated from the PSU. When you do the mod, you should pull out the PSU, and you should still remember that the PSU fan stick to the case, not on the PSU.
If you kill some output from the PSU, may be you can kill the fan's power supply. However, I doubt if you only kill the PSU fan power supply if you actually damaged the PSU output wires.
If the fan output was killed you can connect the fan to stable 5 Volts. Should not be too noisy.
Installed the 10.14.5 beta, can confirm that this resolves the high fan speed issue on Vega 64.
My Pixlas Mode. I can also drive the cable back. So I think it's more beautiful.
Do you have a link for those connectors? Sorry, if you posted already and I just overlooked it...these threads get pretty looooooong!
EDIT: Actually, quick google search (link for others reading this thread):
https://kit.com/TheHouseOfMoth/pixlas-mod-kit
Last edited:
Yes, it's good. I bought aliexpress there cheaper....Do you have a link for those connectors? Sorry, if you posted already and I just overlooked it...these threads get pretty looooooong!
EDIT: Actually, quick google search (link for others reading this thread):
https://kit.com/TheHouseOfMoth/pixlas-mod-kit
That is a very clean, professional looking setup indeed. Well done.My Pixlas Mode. I can also drive the cable back. So I think it's more beautiful.
Now you only have to remove all of those hot SATA II drives, locate, some SSDs in the DVD drive area.
Big spinner drives to external PCI USB 3.0 external dock
But seriously, you have inspired me to take a serious look at the Pixlas mod. Bravo !
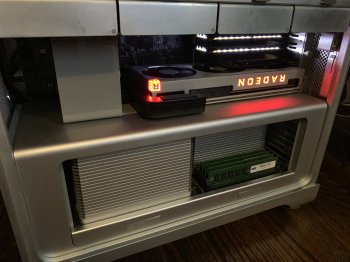
Thank you to all the people that contributed to the thread. I took the plunge and modified my Mac Pro 5,1. One thing that made the mod super easy was using Posi Taps to tap the power supply cables:
https://www.amazon.com/gp/product/B01EINJLB8/ref=ppx_yo_dt_b_asin_title_o01_s00?ie=UTF8&psc=1
Using those I didn't need to cut into the cable's thick insulation and it made the process much easier than expected. Happy with the results. Radeon VII works well under any benchmark.
https://www.amazon.com/gp/product/B01EINJLB8/ref=ppx_yo_dt_b_asin_title_o01_s00?ie=UTF8&psc=1
Using those I didn't need to cut into the cable's thick insulation and it made the process much easier than expected. Happy with the results. Radeon VII works well under any benchmark.
Attachments
As an Amazon Associate, MacRumors earns a commission from qualifying purchases made through links in this post.
Thank you to all the people that contributed to the thread. I took the plunge and modified my Mac Pro 5,1. One thing that made the mod super easy was using Posi Taps to tap the power supply cables:
https://www.amazon.com/gp/product/B01EINJLB8/ref=ppx_yo_dt_b_asin_title_o01_s00?ie=UTF8&psc=1
Using those I didn't need to cut into the cable's thick insulation and it made the process much easier than expected. Happy with the results. Radeon VII works well under any benchmark.
See POSI TAP at 1 min 33 sec
thanks for the tips
As an Amazon Associate, MacRumors earns a commission from qualifying purchases made through links in this post.
Register on MacRumors! This sidebar will go away, and you'll see fewer ads.


