I did the Pixlas mod on my cMP 5,1 so I could run two R9 280X GPUs with Final Cut Pro X. It was surprisingly easy, and seems to be working great. The cards are quiet, temps are normal.
With the latest FCPX (10.3.3) on El Cap 10.11.6, using a flashed GTX 980 (not the Ti version) I got a BruceX time of 43 seconds. With a single R9 280X I got 32 seconds. With two R9 280X cards I get 21 seconds, and a LuxMark of just over 26k.
============
I made a couple of changes to the standard procedure:
- I used the Posi-Tap connectors someone suggested earlier in this thread — they can be hand-tightened easily without a tool, even with the tapped wires against the far back wall of the case, so there's no need to remove the PSU; here's the posi-tap guide.
- I used a couple of standard off-the-shelf 8-pin PCIe cables, rather than having a custom cable created by modDIY. Here's the extension cable, and here's the splitter. I cut off the female end of the extension cable, pushed back the cloth covering on the wires, and stripped 1/2" off each end using this tool to get them ready for splicing with the posi-taps.
Although I ordered an extension cable with black and white wires, it turns out they just alternated the colors to "look cool", they do NOT represent Ground and Positive! So I followed the
8-pin PCIe diagram carefully (that image is looking at the male end), and tracing from the male plug, I taped together three wire bundles and labeled them, for “+12” (3 wires), “Sense” (2 wires), and “Ground” (3 wires). Then I pushed the bundles (actually all wires at once) up through the gap at the back of the optical bay.
I attached each of three +12 wire ends onto a different +12 wire from the inner four PSU wires (see the diagram in post #1), and each of three Ground wire ends onto a different Ground wire from the outer four PSU wires. Finally I attached the two Sense wires onto the fourth outer PSU ground wire.
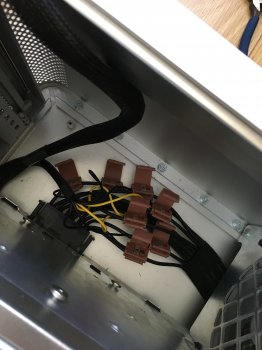
Here's what my taps look like ("+" is for +12, "S" is for Sense, and "G" is for Ground):
View attachment 701115
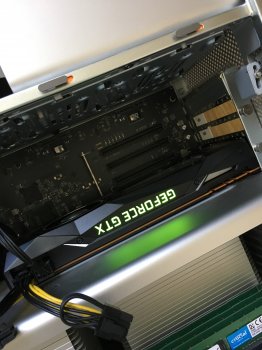
Here's the lower compartment, showing how the extension cable plugs into the 2-to-1 splitter, which then plugs into each of the R9 280X cards (each card also gets a 6-pin connection to the Mac Pro's backplane board):
View attachment 701117
One problem: the Posi-Taps may be too fat to allow replacing the power supply cable cover. I tried pushing them flat against the back wall, but couldn't get the tab on the bottom right side of the cover to engage, so I just left it off. But no problem getting the optical bay unit to latch back in place.
I used a multimeter and the 8-pin diagram to verify each pin was getting the correct voltage before attaching the splitter plugs to my GPU cards.
======
One of the problems with installing a 2nd GPU is that you lose *two* PCIe slots -- only slot 1 is double-wide, like most graphics cards. I really wanted to use both my USB 3.0 card and my PCIe SSD card, but it seemed one would have to go.
However, I tried the approach outlined by AndreeOnline in posts #136 and #151 in this thread: a short
PCIe riser card to slightly elevate the 2nd GPU, and a
flexible PCIe extension cable for the blocked slot that can be folded sideways and then up and around the 2nd GPU card.
Now I can use all four PCIe slots.
Here is my slot layout:
4: (blocked) extension cable to Amfeltec Squid M.2 AHCI carrier board
3: Secondary GPU - R9 280X (on short riser card)
2: Sonnet Allegro 4-port USB 3.0
1: Main GPU - R9 280X
I saw a post by user h9826790 suggesting this layout for better heat distribution (GPUs in slots 1 and 3), rather than having one directly above the other in slots 1 and 2. Although slot 3 is only x4 instead of x16, people report the performance penalty is minimal, something like 5% on benchmarks.
Here's what it looks like with the Amfeltec temporarily hanging down in space (I also removed its rear bracket):
View attachment 701118
Here's a view looking up at the drive bays, showing how the extension cable snakes up and over the 2nd GPU:
View attachment 701119
And here's what it looks like with the cable folded up, and the Amfeltec card resting on the inner lip of the drive bays (I put insulating tape behind there):
View attachment 701120
Instead, I might try moving my two backup HDDs (for CCC and Time Machine) to drive bays 1 and 2, and make a little harness to hang the Amfeltec card in the unoccupied space of bays 3 and 4.
My Amfeltec card has three SSD blades on it: two Samsung SM951 @ 512GB, and one Kingston Predator @ 960GB. It's an x16 card running at x4 in slot 4, but single-drive access still runs at full speed since each blade is x4. I'm not using RAID striping, so I see no difference in Blackmagic Speed Test readings with this card in an x16 vs an x4 slot -- roughly 1300 r/w for each of the SM951 drives, and 1000 write / 1300 read for the Kingston. Of course, when I copy large files *between* the blades, I should get half the performance that I used to see in an x16 slot. If I ever need to do multi-blade RAID I will put the Amfeltec back in x16 slot 2, and the USB 3 card in slot 4 (and find a way to thread a cable out the back to a USB hub).
One problem with putting the 2nd GPU on a riser card is that it is heavy and doesn't get enough support, so it tends to sag downward. The Mac Pro's card bracket can't hold it in place, in fact I couldn't get the bracket/bar thing to fit at all in this config, so I used some short knurled thumbscrews to lock in the other cards. Also, at least one of the ports on the 2nd GPU is obstructed, and in fact you could easily unseat the card while plugging/unplugging since it is only secured by friction. I don't plan to use any ports on the 2nd GPU, so I will put tape over them. Here's what the rear panel looks like:
View attachment 701139
To address the sagging problem, I inserted a piece of stiff cardboard to give the card more support, while not obstructing airflow from the fan. This helped a lot, now everything is in alignment again:
View attachment 701140
So... it does work, even if it's a little ugly and definitely fragile. But I'm very happy having two GPUs plus USB 3.0 and PCIe SSDs.


