Become a MacRumors Supporter for $50/year with no ads, ability to filter front page stories, and private forums.

nifhanif

macrumors newbie
Nov 18, 2020
6
2
I tried to add a virtual display with 3440x1440 resolution, 100Hz refresh rate and HiDPI support and it works!
BUT after enabling mirroring, I see black fields on the display. The resolution in the screenshots is 3440x1440 or 1720x720 Hidpi. Does anyone have any ideas how to fix this?
Hi, this is quite interesting. I tried on a full HD screen, the background screen finder becomes black, is it because of color.
I tried to change the color profile, the background screen remained black
 

Ozboz

macrumors newbie
Sep 13, 2021
2
1
Hi,

Many users ask how to enable HiDPI on external QuadHD monitor (2560 x 1440) connected to your Mac Mini M1.

macOS does NOT allow you enable HiDPI on such monitor. And you see a very blurry picture with large fonts (low screen resolution), or sharp picture (with native screen resolution) with very small fonts.

SwitchResX or RDM utilities cannot force HighDPI on Apple M1 Mac Mini but it worked earlier with Intel Mac mini.

Solution

Buy dummy 4K HDMI emulator; USB-C to DisplayPort/HDMI converter; and enable Mirror Displays in macOS.

View attachment 1802303

Important! If you have Macbook Pro M1 or Air M1 you don't need to buy dummy 4K HDMI emulator. Just skip this step. More info

Step by step:

1. You need to buy any 4K HDMI EDID emulator on Amazon. It's a small device (like flash drive) which costs about 8..10 USD. This device should emulate 4K at 60p, check that a description contains word "EDID".

2. If your QuadHD monitor (2560 x 1440) has DisplayPort buy USB-C > DisplayPort converter.
Or if your monitor has HDMI buy USB-C > HDMI converter. I purchased VCOM CU422 USB-C to DisplayPort converter. It costs about 8 USD.

3. Connect your QuadHD monitor to USB-C > DisplayPort converter connected to your Mac. Make sure that it works as earlier (with non Retina resolutions).

4. Now connect dummy 4K HDMI EDID emulator to HDMI port of your Mac Mini.

macOS thinks that it's a real 4K monitor and enables HiDPI for native or scaled resolutions.

5. Open System Preferneces > Monitors. You'll see two pages for real QuadHD monitor and for dummy 4K monitor.
Click Arrangement tab. Then select Mirror Displays.

View attachment 1802288

6. In Display tab choose Optimize for your dummy 4K monitor. In my case I see "82E850". It means that dummy 4K monitor will be primary and will mirror screen for your real QuadHD monitor.

7. Now for this dummy 4K monitor enable any scaled HiDPI resolution. I could enable
1152 x 648 (it means 2304 x 1296 in HiDPI),
1504 x 846 (3008 x 1692 in HiDPI)
1920 x 1080 (it's 4K)

Picture already looks much better than earlier.

View attachment 1802289

8. Howerver we need to enable 1280 x 720 (2560 x 1440 in HiDPI) which looks native for this QuadHD monitor.

In System Preferences > Displays > Display tab. Switch "Resolution" to "Default for display". Now hold Option key and click "Scaled" option. You'll see a lot of scaled resolutions. Choose the best option for you.

Setting "1280 x 720" means HiDPI mode which is rendered at 2560 x 1440. Large fonts and sharp picture. It's native mode for your QuadHD display.

That's all.

When you restart macOS, or turns off Mac Mini, it remember all settings and you continue work with HighDPI screen when you turn on your Mac again.

In case of any problem, just unplug dummy 4K monitor emulator - and your Mac will work as earlier.

I tested with macOS 11 Big Sur 11.4

UPDATE. I successfully activated HiDPI modes in macOS 12 Monterey Beta 4.

WHEN YOU UPDATE macOS: On first run desktop may look incorrectly, small fonts.
Solution: unplug dummy 4K HDMI emulator. Wait 5-10 seconds. Then plug-in dummy 4K emulator again. macOS will enable HiDPI resolution correctly and desktop also will look correctly.

Import. This solution does NOT work correctly for Ultra wide monitors (3440 x 1440 for example), only with 16:9 monitors (2560 x 1440 or higher).

Good luck!

Thanks for members calpine and Thebnt who found this solution. I just wrote this tutorial with screenshots.
You can find more info in this thread.
Thanks a lot for the solution, i've been looking for this for the last 2 weeks. My Asus VG27AQL1A has been performing poorly.

I ordered an HDMI dummy plug. Also i'll connect my M1 Mac Mini to monitor via Mac's USBC port. I already have USB-C to HDMI cable, do i still need to buy converter etc? I guess i will not need converter.

My display port is connected to my PC that's why i have to try the solution through HDMI port on monitor.
 

jabbr

macrumors 6502
Apr 15, 2012
381
290
Any solution to the cursor stuttering when mirroring hiDPI to external? doesn’t appear on the internal MBA screen. I have to close and open the lid to quickly get the cursor smooth again. maybe my Dell monitor is running at 59Hz or something
 

Ozboz

macrumors newbie
Sep 13, 2021
2
1
Thanks a lot for the solution, i've been looking for this for the last 2 weeks. My Asus VG27AQL1A has been performing poorly.

I ordered an HDMI dummy plug. Also i'll connect my M1 Mac Mini to monitor via Mac's USBC port. I already have USB-C to HDMI cable, do i still need to buy converter etc? I guess i will not need converter.

My display port is connected to my PC that's why i have to try the solution through HDMI port on monitor.

Update: It works!

Yes, finally, thanks a million. I can't believe a dummy HDMI would be the solution. Now the images and texts much more better & bigger.
 
  • Like
Reactions: Aleksid1

sarkrui

macrumors newbie
Jan 22, 2018
14
11
Hi all, I had the same situation and found a sort of work around for that.
My specs:
  • m1 Macbook Air 8GPU,
  • AOC 34P2C (3440x1440, 21:9),
  • 12.0 beta6 OS,
  • SwitchResX 4.11.2
  • No need for HDMI dummy
Just install macOS 12.0 Beta6 to see if HiDPI works on 2K displays. Here's the process:
(You can simply download macOS 12.0beta6 from here and install it on a fresh volume for testing)

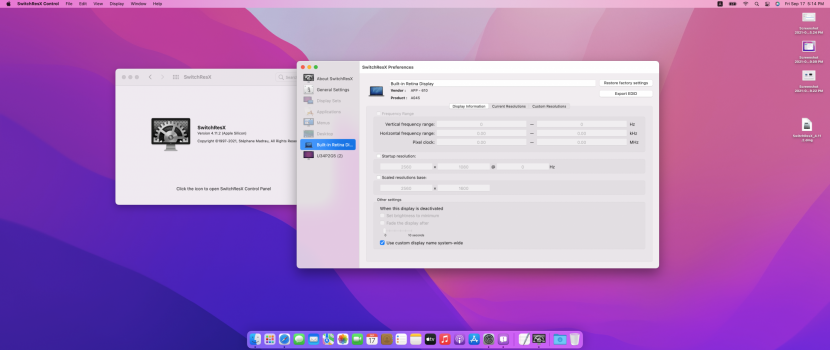
So first of all, (configuring via SwitchResX) I need to configure scaled resolutions on the built-in display and set external display to mirror the built-in display. Please note that setting HiDPI on the external one directly won't work.

⬇️HiDPI 5120x2160 renders like 2560x1080l; the UI looks like zoomed in a bit but the texts are much clearer now; but at least, it looks much better than viewing at 3440x1440.

IMG_6545.jpg


Don't know for what reason, I can't add any resolution beyond 5120x2160, showing as invaild, though M1 should be able to handle any resolution below 6K (6016x3384).

Screenshot 2021-09-17 at 5.05.24 PM.png


Use as: Mirror for Built-in Retina Display.

IMG_6547.jpg


This is still not perfect. I can't close the lid, neither to use two displays in extended mode.
Plus, I tried the same procedures on Big Sur 11.6 latest update, no luck, scaled resolution isn't indicated as installed, valid or needs to reboot. Will experiment with a HDMI treater.
Hope that helps.
 

Attachments

  • Screenshot 2021-09-17 at 5.14.39 PM.png
    Screenshot 2021-09-17 at 5.14.39 PM.png
    1.1 MB · Views: 232
Last edited:

chase_01

macrumors newbie
Sep 22, 2021
1
0

Kazliux

macrumors newbie
Oct 15, 2021
10
1
Hi, I use this setup and it works fine:
MBP M1
Dell D6000 docking station
EDID 4K emulator
Dell 2k monitor

1. MBP ->usb-c to D6000 -> DisplayPort to Dell 2k monitor.
2. I plug EDID to D6000 hdmi port
3. Installed RDM and DisplayLink Manager to MBP
4. Mirror Dell to EDID (keep option key and drag monitor on monitor)
5. RDM gets lightning (HiDPI) sign for Dell monitor on 1920x1080 resolution

Result: text is not blur anymore works in HiDPI mode and works on closed lid or on extended mode.
Though real estate is almost to small (limitation of DisplayLink - fullHD or 4k only on HiDPI), but fine - better for eyes :)

Maybe it helps.
 
Last edited:

livinlicious

macrumors newbie
Oct 15, 2021
6
0
Hi, I use this setup and it works fine:
MBP M1
Dell D6000 docking station
EDID 4K emulator
Dell 2k monitor

1. MBP ->usb-c to D6000 -> DisplayPort to Dell 2k monitor.
2. I plug EDID to D6000 hdmi port
3. Installed RDM and DisplayLink Manager to MBP
4. Mirror Dell to EDID (keep option key and drag monitor on monitor)
5. RDM gets lightning sign for Dell monitor on 1920x1080 resolution

Result: text is not blur anymore works in HiDPI mode and works on closed lid.
Though real estate is almost to small (limitation of DisplayLink - fullHD or 4k only on HiDPI), but fine - better for eyes :)

Maybe it helps.


This intridgues me, because I have a similiar situation.

I am using the WAVLINK Docking Station, with 2 DP/HDMI Out (here: https://www.wavlink.com/en_us/product/WL-UG69PD2.html)

I was trying to make it work with 2x 1440p scaled to 1080p, for UI scale reasons.

I used the D6000 for a while, but changed it to the Wavlink for a few reasons specific to my setup. (the D6000 has a low ESD resistance, and my monitors flicker a lot with it, the wavlink has a higher ESD specification - not important though)

Can you give me a few pointers how I could adapt my setup?
It seems to me that you basically solved the problem with 1 monitor, but I am not sure the reason for using the EDID adapter on the HDMI port. Maybe its specific to the D6000.

Thanks!
 

Kazliux

macrumors newbie
Oct 15, 2021
10
1
This intridgues me, because I have a similiar situation.

I am using the WAVLINK Docking Station, with 2 DP/HDMI Out (here: https://www.wavlink.com/en_us/product/WL-UG69PD2.html)

I was trying to make it work with 2x 1440p scaled to 1080p, for UI scale reasons.

I used the D6000 for a while, but changed it to the Wavlink for a few reasons specific to my setup. (the D6000 has a low ESD resistance, and my monitors flicker a lot with it, the wavlink has a higher ESD specification - not important though)

Can you give me a few pointers how I could adapt my setup?
It seems to me that you basically solved the problem with 1 monitor, but I am not sure the reason for using the EDID adapter on the HDMI port. Maybe its specific to the D6000.

Thanks!
hi,

I guess it might work with 2 monitors, but one will be mirrored from EDID and another from MBP (but you will not able to close the lid in that case) Also rotation does not work. For flickering maybe change cables will work?

p.s. without EDID adapter I never managed to reach HiDPI mode...

p.s.2 if you try with 2 EDID emulators it might work fine for both monitors for you
 
Last edited:

livinlicious

macrumors newbie
Oct 15, 2021
6
0
hi,

I guess it might work with 2 monitors, but one will be mirrored from EDID and another from MBP (but you will not able to close the lid in that case) Also rotation does not work. For flickering maybe change cables will work?

p.s. without EDID adapter I never managed to reach HiDPI mode...

p.s.2 if you try with 2 EDID emulators it might work fine for both monitors for you

So something like this? https://www.amazon.de/-/en/emulator-generation-compatible-Thunderbolt-Switches/dp/B07YMS5V7B

And then connect via HDMI, emulate 4k signal, while setting it to 4k HIDPI (which is scaled like 1080p for the UI)?
Thats what I understand works from all you guys writing here.
 

Kazliux

macrumors newbie
Oct 15, 2021
10
1
So something like this? https://www.amazon.de/-/en/emulator-generation-compatible-Thunderbolt-Switches/dp/B07YMS5V7B

And then connect via HDMI, emulate 4k signal, while setting it to 4k HIDPI (which is scaled like 1080p for the UI)?
Thats what I understand works from all you guys writing here.
yes, I believe if it is EDID emulator - it should do the trick.
DisplayLink supports HiDPI only for real 4k or fullHD, so connecting EDID to docking station I do see only HiDPI mode for fullHD resolution (don't know why 4k is not in HiDPI mode), which is enough for me. As I said UI size is about right, maybe I would like it one size smaller, but the bigger the better for my eyes. The most important thing is that no more blurry text.
 
  • Love
Reactions: livinlicious

livinlicious

macrumors newbie
Oct 15, 2021
6
0
I think I made some mistakes and had some misunderstandings.

What I tried now was the following:
EDID 4k Passthrough - HDMI Cable - Docking - USBC - Macbook

SwitchRes and RDM showed me all kinds of resolutions, for example the needed 1080p HDPI.
Sadly 1080p HDMI looked exactly as normal non hdpi, blurry etc.

I played a bit around and noticed, that I can reach HDPI if I use the mirror function. After a bit working around, some config worked to give me a good picture with 1080p HDPI.

Next Problem was only, that now I am only using 1 external monitor.

I know understand what you meant with Mirror from Macbook, and cant close lid.

So the idea is to basically have multiple monitors. Always mirrored to the monitor I want to use.

UFF... that seems like a far off solution. I dont know if this is going to work.
Maybe I can try not a passthrough EDID but a plain dummy EDID as well. I only have the passthrough adapters now.
 

Kazliux

macrumors newbie
Oct 15, 2021
10
1
I think I made some mistakes and had some misunderstandings.

What I tried now was the following:
EDID 4k Passthrough - HDMI Cable - Docking - USBC - Macbook

SwitchRes and RDM showed me all kinds of resolutions, for example the needed 1080p HDPI.
Sadly 1080p HDMI looked exactly as normal non hdpi, blurry etc.

I played a bit around and noticed, that I can reach HDPI if I use the mirror function. After a bit working around, some config worked to give me a good picture with 1080p HDPI.

Next Problem was only, that now I am only using 1 external monitor.

I know understand what you meant with Mirror from Macbook, and cant close lid.

So the idea is to basically have multiple monitors. Always mirrored to the monitor I want to use.

UFF... that seems like a far off solution. I dont know if this is going to work.
Maybe I can try not a passthrough EDID but a plain dummy EDID as well. I only have the passthrough adapters now.
hi, I do also use passthrough EDID and it works. So since you have docking with hdmi+DP and hdmi+DP. Try to plug EDIDs to HDMI and monitors to DP ports. Then you should have 5 in total monitors, so mirror 1 monitor to EDID1 and 2 monitor to EDID2. Then it should be 2 independent monitors in HiDPI and MBP monitor.
p.s. you need to have DisplayLink manager running and docking connected to MBP only via usb-c
p.s. using in passthrough mode I was unable to get HiDPI modes at all.
p.s. you need to select only resolutions with lightning icon in RDM, those are HiDPI ones
 

tvhung83

macrumors newbie
Oct 22, 2021
1
0
Hi all.
I tried to add a virtual display with 3440x1440 resolution and it works!
Now I don't need dummy HDMI dongle.
BUT OSx works incorrectly when i tried to mirror 100Hz virtual display to real 100hz external display. 60Hz works fine.
Can't believe that it actually works, thank you so much!
 

waydabber

macrumors 6502
May 27, 2010
363
272
I can confirm, that creating a virtual display using CGVirtualDisplay and then mirroring this to a QHD display on an M1 Mini works perfectly to achieve HiDPI mode (no need for a HDMI dummy + the HDMI port remains free).

FluffyDisplay does this for you quite nicely. You can add your desired custom resolution under predefResolutions to AppDelegate.swift (for example I added a 4608, 2592 to achieve 2304x1296 which looks best to my eyes on a 24" QHD by adding Resolution(4608, 2592, 200, true, "4608x2592", 60))

Upon building and launching FluffyDisplay you simply have to choose the desired resolution in the app menu which creates the new virtual screen. Then you can set this virtual screen as mirror main in Displays.

The downsides are that FluffyDisplay does not restore the virtual screen during startup and the virtual screen exists only while the app is running + the app requires an additional menu bar slot. These can be easily rectified by adding the relevant stuff to applicationDidFinishLaunching() in the code and adding a setting to make the icon optional (or just remove self.statusBarItem stuff from the code).

The app's main goal is to have a separate mac as a mirrored display, it is only a side-effect that it solves the Mac Mini HDPI issue. I'll make a slimmed-down adaptation that removes the extra functionality, can autostart and set up the virtual display properly automatically upon start and automatically engage mirror mode as well (whenever I have the time).

UPDATE: a serious problem with the CGVirtualDisplay route is that it seems to mess up display sleep (I am still investigating this).
 
Last edited:
  • Like
Reactions: altaic

waydabber

macrumors 6502
May 27, 2010
363
272
There is an initial version here:


No release yet, only source code. I'll be updating this app with several new features.

Tested to work nicely on an M1 mini running Monterey with a Lenovo 24" QHD display, without a HDMI dummy.

The app will create a plethora of scaled HiDPI resolutions for the given aspect ratio (in case of 16:9 all the way from 900p up to 3384p in 36p increments) so everybody can find the most perfect resolution for his/her eyes.

UPDATE: added an assortment of aspect ratios for various displays.
 
Last edited:

waydabber

macrumors 6502
May 27, 2010
363
272
It should work, I tested it on an M1 MacBook Air as well with a native UHD display connected instead of a QHD display (the app is still beneficial in this setup as it allows for more custom resolutions) + tested some of the additional aspect ratios I added as well.

I updated the app with the ability to restore settings upon startup if you want to autostart as well + there is now a detailed instructions in the README section on how to set up the app and the mirroring.

Also, there is now a binary beta release on the page.

menu.png


displayprefs.png
On the M1 mini this solution seems to be much better in the following ways as I tested the app:

  • Obviously you don't have to buy a dongle, the app is free to use and instantly available.
  • Does not need the HDMI port, so it remains free for an other display + the method can be used with a HDMI display.
  • Seems to be faster than the hardware HDMI dummy solution (probably because the display hardware is not utilized, the entire thing is logical only).
  • No annoying choppy mouse cursor issue that happens sometimes with the HDMI dummy.
  • Fine grained HiDPI resolutions allow for much more customization.

The solution is still beta, I welcome feedbacks and issues on the GitHub page.

I also updated MonitorControl to work better with BetterDummy (optimizations should be available in the upcoming version - it detects dummy displays created by DisplayDummy better and won't spare resources on it to try controlling it at all - but this is just a minor optimization as I already tested and optimized MonitorControl to work well with mirrored dummy scenarios since v3.0.0 on M1 and the currently available v4.0.0-rc1 available already works fine with BetterDummy as well as with HDMI dummies).
 

Kazliux

macrumors newbie
Oct 15, 2021
10
1
hi, I have tested it and it works even via DisplayLink docking station. Good job!
Now I can use my Dell 2k monitor on 2048x1152 HiDPI mode with very good real estate.

Some questions:
1. Is it possible to create 2 dummy displays?
2. I guess rotation is not possible using this method?

Thanks
 

waydabber

macrumors 6502
May 27, 2010
363
272
Yes, you can create 2 dummy displays, it will show up under Preferences/Displays with a (1) and (2) suffix. You can theoretically use two 2K displays, each a mirror of a different dummy (I did not try this however).

About rotation, it does not make much sense to rotate a virtual display (as it does not actually exist) but I can easily add portrait aspect ratios (like 9:16) which can be mirrored to a rotated physical display (don't forget to pop an issue about it here so I don't forget).
 

yalej

macrumors member
Mar 6, 2021
38
20
Wow, I cannot believe this works, but it does! Confirmed to work with Monterey 12.0.1. Installed both Monitor Control and BetterDummy. I'm on a 3440x1440 UW Dell display. Set the dummy to the 21.3:9 UW 4K/5K display, then use SwitchRX to access the HiDPI modes and use 3008x1269. Looks fantastic, not quite as good as true 4K display, but WAY better than before. Thank you! I will be sending you some $$ for this.
 

waydabber

macrumors 6502
May 27, 2010
363
272
Great! Actually you should not need SwitchResX with BetterDummy as it creates both standard and HiDPI resolutions as well (you need to scroll down to see HiDPI ones as there might be dozens of standard resolutions in the list beforehand as the app creates a fine grained list of resolution options).
 

Kazliux

macrumors newbie
Oct 15, 2021
10
1
I added portrait aspect ratios where it made sense:

wow, fast fix, but unfortunately it just rotates screen and shows 9:16 aspect ratio on horizontal screen. My problem is to rotate monitor physically and have full screen 9:16 there.
p.s. I use RDM just to select hiDpi resolutions.
p.s.1. using dell monitor ->usb-c - I get ypbpr color mode. But I guess this is not related to BetterDummy.
 
Last edited:
Register on MacRumors! This sidebar will go away, and you'll see fewer ads.