Become a MacRumors Supporter for $50/year with no ads, ability to filter front page stories, and private forums.

theodric

macrumors newbie
Jun 27, 2010
23
50
I've gently modified the official Debian ARM64 Openstack image to be more user-friendly for our purposes and posted it on MEGA at this location

Changes are mainly:
  1. 'root' and 'debian' users have a password now, and the password is 'debian', and you can use it both at the console and over SSH
  2. upgraded from 'buster' to 'testing'
  3. deleted the cloud stuff
  4. installed a few tools I used during setup, to-wit tmux, htop, curl
  5. useful info in /etc/issue
It takes a moment to boot after loading the initrd, but seems to work well otherwise. I've installed X on my own copy and it runs normal stuff very well, indeed.

if you want to know why you should trust me to provide an image for you, the answer is that you probably shouldn't, since you don't know me from Adam. But I solemnly swear I've done nothing malevolent. Enjoy.
 

Gnattu

macrumors 65816
Sep 18, 2020
1,107
1,671
ARM64 only
This is because M1 is an ARM64 only Soc.
ARM is different from x86, the x86_64 is automatically backward-compatible with 32bit because it is part of the design goal, but for ARM, the 32bit backward compatibility is optional, and Apple just choose not to support 32bit.

To run ARM32 code, you need something like Rosetta to do user-space emulation.
 
  • Like
Reactions: jdb8167 and DeanL

kupan787

macrumors member
Sep 17, 2014
54
33
California
Just updated ACVM. Main items of note are I added a image conversion option (so you can convert from any supported qemu image type into qcow2). This can be accessed from the File menu.

I also added checkboxes to quickly create the hostfwd lines on the network for RDP or SSH. Setup would still need to be done on any guest, and it sets the ports automatically (13389 and 10022).


I got a request to add a second CD image option and add the virtio-rng-pci device. I'll be working on adding that in next.

[Edit: Just a note that I had an issue with the auto-updater. This should be resolved now]
 
Last edited:
  • Like
Reactions: ollv and Susurs

dcbarry

macrumors newbie
May 26, 2009
3
1
First, thanks to all of you who are making such amazing progress.

From what I gather, the first post on the forum has already been long surpassed, in terms of added functionality and support. (And the pre compliled links may be stale at this point.)

wondering if anyone has a more up to date complilation or summary of instructions that can be used as a new checkpoint to follow along with the progress —- or if the originsl suthor of post #1 might consider editing the post if that is possible? Or maybe there is a wiki out there ive missed coveing this already?

basically looking for a way to rejoin the progress. Im especially interested in testing using the more recent windows insider builds which include x64 support —- my son is in robotics classes, and wants to see how some of the CAD apps look, but most of those apps are now x64. I did manage to build an up to date ISO using other tools out there, but was not able to get it functional yet under the post 1 instructions.

again, respect and saluting all of you with far greater brains! Trying to get myself more up to speed on qemu overall, but its a lot to dive into all at once
 
  • Like
Reactions: ascender

Gnattu

macrumors 65816
Sep 18, 2020
1,107
1,671
I saw someone post this over on one of the GitHub pull requests:

https://gitlab.freedesktop.org/osy86/virtio-gpu-wddm-dod

I was trying to build this inside my arm VM, but it kept failing for a missing WDK10 build tools. Was wondering gif anyone else wanted to take a stab at building this?
I compiled that but we need some further work:

- The driver does not have a digital signature, and you have to boot using advanced setting to "disable driver signature enforcement" every time you boot, or the driver will not load.

- The driver is using a "hardware cursor" that the cocoa display does not support, this will lead to an invisible cursor. We have to revert that and use the software cursor instead.

Proof of working:
Screen Shot 2020-12-18 at 23.08.45.png


The signature problem:

Screen Shot 2020-12-18 at 23.14.36.png
 

kupan787

macrumors member
Sep 17, 2014
54
33
California
- The driver does not have a digital signature, and you have to boot using advanced setting to "disable driver signature enforcement" every time you boot, or the driver will not load.

I know for the ethernet driver, we have to enable TESTSIGNING. Is there a way that we can sign this with a "test signature" so that it will work with the same setting?
 

JChips01

macrumors newbie
Nov 12, 2020
1
0

I was able to successfully virtualize Windows 10 for ARM on M1 with Alexander Graf's QEMU hypervisor patch.​


Screenshot:

View attachment 1682350

How to virtualize Windows 10 on M1:

1. 
Download qemu-m1.zip from https://mega.nz/file/QYB0QTrC#p6IMBJlFqqNKuGonwrDkPOVKQj8yHCVgiLOYVaGvs4M or this forum attachment. It contains pre-built versions of qemu-system-aarch64, efi-virtio.rom, and QEMU_EFI.fd. (All of these are open-source, and you can build them yourself by following instructions in the next section.)
2. Double click qemu-m1.zip to unzip it.
3. Download Windows Insider Preview ARM64 from Microsoft at https://www.microsoft.com/en-us/software-download/windowsinsiderpreviewARM64, which will get you a VHDX image.
4. Using Finder, move the downloaded VHDX image into the unzipped qemu-m1 folder.
5. Open Terminal and navigate to the qemu-m1 folder. Copy and paste the code below to Terminal, and press return.
Code:
cd ~/Downloads/qemu-m1
6. Start the QEMU virtual machine. Copy and paste the code below to Terminal (copy and paste the entire block all at once), and press return.
Code:
DYLD_LIBRARY_PATH=. \
./qemu-system-aarch64 \
-M virt \
-accel hvf \
-m 5G \
-smp 4 \
-cpu max \
-device ramfb \
-serial stdio \
-drive file=Windows10_InsiderPreview_Client_ARM64_en-us_20231.VHDX,if=none,id=NVME1 \
-device nvme,drive=NVME1,serial=nvme-1 \
-device nec-usb-xhci \
-device usb-kbd \
-device usb-tablet \
-device intel-hda -device hda-duplex \
-drive file=vars-template-pflash.raw,if=pflash,index=1 \
-bios QEMU_EFI.fd
7. Set up Windows 10 and enjoy!

How to increase resolution to 1024x768:​

1. Shut down Windows.
2. qemu-system-aarch64 > Quit QEMU > Quit.
3. Start the virtual machine with the same command line argument as listed in step 6 of the previous section.
4. When QEMU shows "Start boot option", press the escape key on your keyboard.
5. Use the arrow down key to move selection to "Device Manager", press return, then move down to "OVMF Platform Configuration", and press return. Changing selection may take a while to update after pressing the arrow key. It is normal.
6. Highlight <640x480> or <800x600> next to "Change Preferred", press the return key, and change selection to 1024x768.
7. Press both fn and F10 on your keyboard to save the changes. (If you're using a PC keyboard, just press F10).
8. Press esc to go back to the main menu.
9. Press down arrow a few times to move selection to "Continue", then press return on your keyboard.
10. After Windows has booted, shut down Windows.
11. qemu-system-aarch64 > Quit QEMU > Quit.
12. Start the virtual machine with the same command line argument as listed in step 6 of the previous section.

How to get internet access in the virtual machine:​

1. Download the virtio driver ISO from https://fedorapeople.org/groups/vir...o/virtio-win-0.1.190-1/virtio-win-0.1.190.iso
2. Move the downloaded ISO to the qemu-m1 folder.
3. In Windows 10, right click on the Start menu, then choose “Command Prompt (Admin)”.
4. Click “Yes” in the UAC prompt.
5. Allow drivers that are test-signed.
Code:
bcdedit -set TESTSIGNING ON
6. Shut down Windows.
7. qemu-system-aarch64 > Quit QEMU > Quit.
8. Boot QEMU again with updated arguments.
Code:
DYLD_LIBRARY_PATH=. \
./qemu-system-aarch64 \
-M virt \
-accel hvf \
-m 5G \
-smp 4 \
-cpu max \
-device ramfb \
-serial stdio \
-drive file=Windows10_InsiderPreview_Client_ARM64_en-us_20231.VHDX,if=none,id=NVME1 \
-device nvme,drive=NVME1,serial=nvme-1 \
-device nec-usb-xhci \
-device usb-kbd \
-device usb-tablet \
-device intel-hda -device hda-duplex \
-drive file=vars-template-pflash.raw,if=pflash,index=1 \
-drive file=virtio-win-0.1.190.iso,media=cdrom,if=none,id=cdrom -device usb-storage,drive=cdrom \
-net nic,model=virtio \
-net user \
-bios QEMU_EFI.fd
9. After Windows boots, right click on the Start menu, and choose “Device Manager”.
10. In the “Other devices” section, scroll all the way to the end.
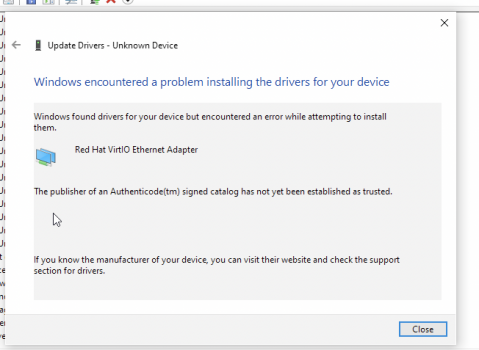
11. Right click on the last “Unknown device” > Update drivers > Browse my computer for drivers > Browse.
12. Choose the virtual CD Drive (D:) virtio-win > OK > Next > Allow.
13. You should now have internet in the Windows 10 virtual machine.

Tips:​

If you're getting any GateKeeper warnings, remove the Quarantine extended attribute (preferred) or temporarily turn off GateKeeper (not recommended):
Code:
xattr -rd com.apple.quarantine ~/Downloads/qemu-m1

How to build and run QEMU on M1 from source:​

This section is for advanced users who are comfortable using Terminal.
1. If you already installed Homebrew or required dependencies using Rosetta 2, follow https://github.com/homebrew/install#uninstall-homebrew to uninstall the Intel version of Homebrew and other dependencies.
2. Install the native arm64 version of Homebrew on Apple Silicon. Follow https://soffes.blog/homebrew-on-apple-silicon, and look for the “Multiple Homebrews” section, then add /opt/homebrew/bin to your path.
3. Download the python3.9 Homebrew formula from https://github.com/Homebrew/homebrew-core/raw/master/Formula/python@3.9.rb. Open it in any text editor, then edit line 124 into the following, and save the edited Ruby file.
Code:
args << "MACOSX_DEPLOYMENT_TARGET=11.0"
4. Install python3.9.
Code:
brew install ~/Downloads/python@3.9.rb
5. Install other required dependencies.
Code:
brew install pkg-config glib pixman ninja
6. Download Alexander Graf's QEMU hypervisor patch at https://patchwork.kernel.org/series/391797/mbox/
6. Checkout QEMU, then cd into it.
Code:
git clone https://git.qemu.org/git/qemu.git
cd qemu
7. Apply Alexander's patch.
Code:
git apply ~/Downloads/hvf-Implement-Apple-Silicon-Support.patch
8. Open ~/qemu/target/qrm/hvf/hvf.c in any text editor, and change the hvf_arch_init_vcpu method into:
Code:
int hvf_arch_init_vcpu(CPUState *cpu)
{
    ARMCPU *arm_cpu = ARM_CPU(cpu);
    CPUARMState *env = &arm_cpu->env;

    env->aarch64 = 1;

    hv_return_t ret;
    ret = hv_vcpu_set_sys_reg(cpu->hvf_fd, HV_SYS_REG_SCTLR_EL1,
                              arm_cpu->reset_sctlr);

    return ret;
}
8. Configure the build.
Code:
./configure --cpu=aarch64 --target-list=aarch64-softmmu
9. Build QEMU.
Code:
make
10. When QEMU is built, cd into the build directory.
Code:
cd build
11. Download EDK2 from https://www.kraxel.org/repos/jenkins/edk2/edk2.git-aarch64-0-20201023.1506.gf69a2b9a42.noarch.rpm
12. Extract EDK2.
Code:
tar -xf ~/Downloads/edk2.git-aarch64-0-20201023.1506.gf69a2b9a42.noarch.rpm
13. Move QEMU_EFI.fd to the build folder.
Code:
mv ./usr/share/edk2.git/aarch64/* ./
14. Run the QEMU virtual machine.
Code:
./qemu-system-aarch64 \
-M virt \
-accel hvf \
-m 5G \
-smp 4 \
-cpu max \
-device ramfb \
-serial stdio \
-drive file=Windows10_InsiderPreview_Client_ARM64_en-us_20231.VHDX,if=none,id=NVME1 \
-device nvme,drive=NVME1,serial=nvme-1 \
-device nec-usb-xhci \
-device usb-kbd \
-device usb-tablet \
-device intel-hda -device hda-duplex \
-drive file=vars-template-pflash.raw,if=pflash,index=1 \
-bios QEMU_EFI.fd
15. Set up Windows 10 and enjoy!

Source:
https://patchwork.kernel.org/project/qemu-devel/list/?series=391797
I can't seem to get wifi, am I doing something wrong?
 

Attachments

  • noWifiWindows.png
    noWifiWindows.png
    440.3 KB · Views: 133

Gnattu

macrumors 65816
Sep 18, 2020
1,107
1,671
I know for the ethernet driver, we have to enable TESTSIGNING. Is there a way that we can sign this with a "test signature" so that it will work with the same setting?
It's possible.

About the second issue: I managed to change the render mode using registry hack, but the cursor moving is... not very acceptable. The framerate seems to be very low and the cursor looks more like "jumping around."
 

Gnattu

macrumors 65816
Sep 18, 2020
1,107
1,671
Although we still have lots of problems, I'm uploading the virtio-gpu driver(unsigned) here.
If someone wants to sign it can look Microsoft's document here

To get the cursor to show in guest you have to:

- open regedit
- navigate to HKEY_CURRENT_USER\Control Panel\Mouse
- change MouseTrails to -1
- reboot
 

Attachments

  • vritio-gpu.zip
    360.6 KB · Views: 155
  • Like
Reactions: Susurs

kupan787

macrumors member
Sep 17, 2014
54
33
California
Although we still have lots of problems, I'm uploading the virtio-gpu driver(unsigned) here.
If someone wants to sign it can look Microsoft's document here

To get the cursor to show in guest you have to:

- open regedit
- navigate to HKEY_CURRENT_USER\Control Panel\Mouse
- change MouseTrails to -1
- reboot
I'll give signing a try in the morning by following:


and I'll report back any success.
 
  • Like
Reactions: Susurs

kupan787

macrumors member
Sep 17, 2014
54
33
California
Although we still have lots of problems, I'm uploading the virtio-gpu driver(unsigned) here.
If someone wants to sign it can look Microsoft's document here

To get the cursor to show in guest you have to:

- open regedit
- navigate to HKEY_CURRENT_USER\Control Panel\Mouse
- change MouseTrails to -1
- reboot
A note on the cursor, I found that if I just changed the cursor to the Black one from the default white, that it shows up ok and doesn't seem to lag at all.
 

Jinbei

macrumors member
Jul 18, 2018
72
72
Can someone explain how to append storage to the vm with acvm ? I tried to use an unbutu imp, I can boot without installing but I have not enough storage (only the size of the img) to install it !

Edit : Ok I installed the new version of acvm and now see the option to create a disk. However when I start the virtual machine it automatically stop afterwards... I use the iso of unbutu focal 64 arm
 
Last edited:

KShopper

macrumors member
Nov 26, 2020
84
116
While I can appreciate the appeal of hacking around trying to make this work well as a sort of fun hobby project, can someone explain to me why having ARM Windows working is much of a benefit anyway?

My understanding is that there are very few applications that support ARM Windows, so what would you even run on it that wouldn't be better done with a native Mac version of the application??
 

Gerdi

macrumors 6502
Apr 25, 2020
449
301
My understanding is that there are very few applications that support ARM Windows, so what would you even run on it that wouldn't be better done with a native Mac version of the application??

Applications which target either x86, x64, ARM32 and ARM64 are compatible with Windows ARM. Anyway, i assume we are talking about applications, which do not exist under MacOS.
 

Gnattu

macrumors 65816
Sep 18, 2020
1,107
1,671
While I can appreciate the appeal of hacking around trying to make this work well as a sort of fun hobby project, can someone explain to me why having ARM Windows working is much of a benefit anyway?

My understanding is that there are very few applications that support ARM Windows, so what would you even run on it that wouldn't be better done with a native Mac version of the application??
Windows has its own "Rosetta", you can run most apps.
 

thearm

macrumors newbie
Dec 12, 2020
17
3
Can some test and see if the e1000 works for the network emulation so we can avoid having to enable test signing?
 

kupan787

macrumors member
Sep 17, 2014
54
33
California
Although we still have lots of problems, I'm uploading the virtio-gpu driver(unsigned) here.
If someone wants to sign it can look Microsoft's document here

To get the cursor to show in guest you have to:

- open regedit
- navigate to HKEY_CURRENT_USER\Control Panel\Mouse
- change MouseTrails to -1
- reboot

Ok, so I got the driver signed with a test certificate I created. The below assumes you've already allowed TESTSIGN to enable the ethernet driver.

When you expand the archive, there are a few files:

ACVM.cer - this is the test cert, and will need to be added to the Windows Trust Store
viogpudo.* - various driver files.
InstallCerts and Driver.bat - This is a bat file I created which should show a UAC prompt, then install the cert into the Windows Trust Store, and then install the driver.

If you open the BAT file, you can see the last few lines to see what the command does, if you'd rather do the install manually.

After this is done, you should be able to shutdown Windows. Then in AVCM, switch the graphics option to from ramfb to virtio-gpu:

1608400758785.png


If you leave the "unhide mouse pointer" checked, then you will see the Mac cursor and it avoids the invisible cursor issue that @Gnattu discovered. Alternatively, you can switch the cursor option in Windows to use the Black cursor instead of the White cursor, and then uncheck the "unhide mouse pointer" in ACVM, and you will be using and see the black Windows cursor.

Let me know if you run into any install issues with this. It was my first time doing windows driver signing.
 

Attachments

  • viogpudo.zip
    349.3 KB · Views: 165
  • Like
Reactions: ollv and Susurs

kupan787

macrumors member
Sep 17, 2014
54
33
California
Can some test and see if the e1000 works for the network emulation so we can avoid having to enable test signing?
I just tried switching from:

-nic user,model=virtio

to

-nic user,model=e1000

and I get no network access in the VM anymore.

Is there a different driver we'd need (ARM driver for the e1000 I'm assuming?)
 
Last edited:

Gnattu

macrumors 65816
Sep 18, 2020
1,107
1,671
@kupan787
I got your signed version running in test mode.

I manually set -show-cursor to qemu also works for the cursor problem.
 

Gnattu

macrumors 65816
Sep 18, 2020
1,107
1,671
I just tried switching from:

-nic user,model=virtio

to

-nic user,model=e1000

and I get no network access in the VM anymore.

Is there a different driver we'd need (ARM driver for the e1000 I'm assuming?)
Do we actually have efi-e1000.rom?

Edit: got the rom, windows on arm does not have Intel nic driver, confirmed.

The officially supported nics are all USB based dongles besides the ones used by surface.
 
Last edited:

lionballs

macrumors newbie
Dec 20, 2020
10
20
After hitting the repair reboot cycle of death a few times ive finally gotten x64 support (windows 21277) working.

Key thing for me was to convert from VHDX to Qcow2 immediatly, do every update singularly and to remov e the windows.old directory whenever it was created after an update (it eats 4-13 gb each update)... reboot twice after each update and save the QCOW as a new image so i wouldnt have to start all over.

mikrotik64_win10_QEMU_M1.jpg
I also did some bench marking for ***** and giggles..

mac Geekbench m1/arm ------- 8cpu/8gb Single : 1714 multi: 7523
mac Geekbench x86/Rosetta -- 8cpu/8gb Single : 1313 multi: 5955
Win10 arm geekbench --------- 8cpu/8gb Single : 1466 multi: 5512
Win10 arm geekbench --------- 4cpu/4gb Single : 1460 multi: 4630


m1_Qemu_speeds.jpg
thanks to all you guys in this forum for doing so much... wouldve been too much without you guys.

(this took me a whole lot of time - hours... so i highly recommend you save/copy your disk image between every update).
 

shal

macrumors newbie
Dec 20, 2020
5
0
ACVM or QEMU can run virtual nic at brideg mode?
i want in windows 10 vm ssh main host

and i don't know way my win10 is say no intetnet but i can use edge go to google and github
now i can't in windows login my microsoft ac
 
Last edited:
Register on MacRumors! This sidebar will go away, and you'll see fewer ads.