you can try Kvic-z SsdPmEnabler macOS Big Sur recently updated bug fixes for 2015 15" MBP.No luck for me either on Big Sur but I didn’t try that hard since it wasn’t doing anything for me when I was on Catalina anyway (ADATA SX8200Pro).
Got a tip for us?
Let us know
Become a MacRumors Supporter for $50/year with no ads, ability to filter front page stories, and private forums.
Upgrading 2013-2015 Macbook Pro SSD to M.2 NVMe
- Thread starter maxthackray
- WikiPost WikiPost
- Start date
- Sort by reaction score
You are using an out of date browser. It may not display this or other websites correctly.
You should upgrade or use an alternative browser.
You should upgrade or use an alternative browser.
- Status
- The first post of this thread is a WikiPost and can be edited by anyone with the appropiate permissions. Your edits will be public.

When upgrading MacOS, is there any risk of getting "locked in" with a custom SSD? By which I mean: not being able to update MacOS any further, because the custom SSD is not recognised? From what I understand, the workaround in the past has been: reinstall the original/old SSD > update the OS/bootrom > reinstall the custom SSD > import data from backup. Big Sur is here and is working well with custom SSD's, so I guess that bodes well for the near future. Once I use the large custom SSD I can't go back to the old Apple drive, it will be way too small to contain all the data.
The new boot rom should support power management. So why would you want to install NvmeFix?Hello everybody, merry christmas!
I've just got an early christmas present, Sabrent Rocket 1TB with phison e12s controller.
My current setup was Sabrent Rocket 512 GB with Phison E12 and macOS Catalina + NVMeFix installed - everything worked as charm and battery was awesome.
So I decided to make an upgrade and also install new macOS Big Sur 11.1.
After clean install of macOS Big Sur (Apple SSD), my bootroom got upgraded to 425.0.0.0.0 (Macbook Pro 15 Mid 2015). Then I've tried to install Lilu with NVMeFix kexts via Hackintool (SIP disabled), but have no luck. My system got stuck on restart loop and only solution was do PRAM reset (enable SIP) and then system boots normal.
So my question is:
Is there anybody that have successfully installed Lilu and NVMeFix on macOS Big Sur 11.1?
Thank you!
How do you know that?The new boot rom should support power management. So why would you want to install NvmeFix?
Very good question. I don’t know it for certain. But it’s likely:How do you know that?
660p SSD with Catalina, iStat menus showed 0.17A / 0.17 for battery / adapter. With nvmefix 0.00 / 0.17.
Removed nvmefix and lilu, upgraded to big sur.
With big sur and bootrom 186 (old): 0.17 / 0.17. With big sur and new bootrom (425): 0.00 / 0.17 .
Why not certain? I don’t now whether iStat menus is reliable. The Intel 660p datasheet specifies 0.012A (0.04W) for idle, so I would expect that iStat reports 0.01. I would be more confident if iStat reported a low value (not 0.00).
Last edited:
This may not be true. Bootroom update resolves 2013-2014 macbooks hibernate problems not power management and apst troubles.The new boot rom should support power management. So why would you want to install NvmeFix?
For Sabrent istat shows 0.12 A at idle vs 0.20 A without nvmefix (0.0 is probably wrong).
So it has definitely worked at Catalina. But as far as I know Big Sur brings changes to the system extension and kext installation procedure so I guess there is a problem. There is need to know how to install kexts and system extensions under Big Sur because both kexts has been updated and should work under Big Sur.
Last edited:
Thanks for going through this. Do you ever see gradations of power reported by istats, between 0.00 and 0.17 (on 11.1) or is it just one or the other? Does it jump up to .17 from 0, or is it more like (0.0, 0.03, 0.10, 0.17, 0.40)?Very good question. I don’t know it for certain. But it’s likely:
660p SSD with Catalina, iStat menus showed 0.17A / 0.17 for battery / adapter. With nvmefix 0.00 / 0.17.
With big sur and bootrom 186 (old): 0.17 / 0.17. With big sur and new bootrom (425): 0.00 / 0.17 .
Why not certain? I don’t now whether iStat menus is reliable. The Intel 660p datasheet specifies 0.012A (0.04W) for idle, so I would expect that iStat reports 0.01.
When I have a moment, I'll update to the new bootrom and see whats going on.
@vince22 has your Sabrent Rocket 1TB. He got it idle at 0.02A (0.03A before..and 0.05A before that)!This is not true. Bootroom update resolves 2013-2014 macbooks hibernate problems not power management and apst troubles.
For Sabrent istat shows 0.12 A at idle vs 0.20 A without nvmefix (0.0 is probably wrong).
So it has definitely worked at Catalina. But as far as I know Big Sur brings changes to the system extension and kext installation procedure so I guess there is a problem. There is need to know how to install kexts and system extensions under Big Sur because both kexts has been updated and should work under Big Sur.
Here are some screenshots of mine with kvic's SsdPmEnabler installed. Been running it for 2 days and haven't seen any side affects other than lower power consumption.These are my results (since Catalina). Now I am running Big Sur 11.1 with BootRom 429.0.0.0 on a Macbook Pro 15" mid-2014 + Silicon Power A80 (Phison E12) 1Tb. The minimum is at 0.16A. I don't use any kext.


There must be.. I got it to read SOMETHING when I disconnected power just once.. Every other time almost the whole bottom section of data drops to 0..I highly suspect there is. On Macbook pro 11'5 I never see 0A readings on the ssd , and yet others here are posting accounts of that on their MBA's. Its possible the sensor systems are different between models. Also the specifications that the manufacturer give for various ssd power draws don't necessarily mean that thats what Istats will report even if your drive is working correctly.
Hello everyone, I hope you had a good Christmas Day 😬
I had a special gift with a new Sn550 for my MBP mid 2014 with Big Sur. Unfortunately, after changing my SSD (and after saving with time machine) my Mac failed to recover my data’s.
I don’t know why but after changing my ssd my Mac turn on with catalina, and when I try to recover with time machine, I have a message with unrecoverable error and security agent.
do you have a solution pleeeeaese ?
Last edited:
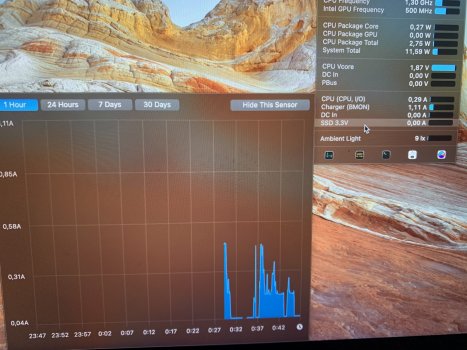
Yes, did a small experiment. Started Windows 10 via VMWare Fusion. Stopped Windows. Disconnected power connector. It then takes long before the current drops to 0.00A. That might make sense, because the image needs to be written to disk?Thanks for going through this. Do you ever see gradations of power reported by istats, between 0.00 and 0.17 (on 11.1) or is it just one or the other? Does it jump up to .17 from 0, or is it more like (0.0, 0.03, 0.10, 0.17, 0.40)?
When I have a moment, I'll update to the new bootrom and see whats going on.
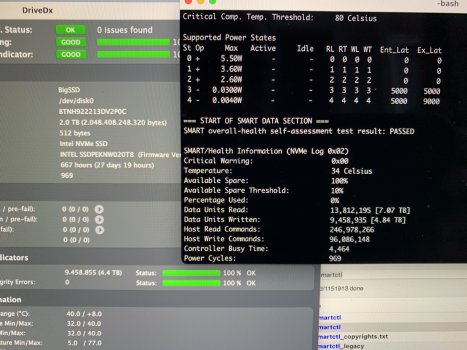
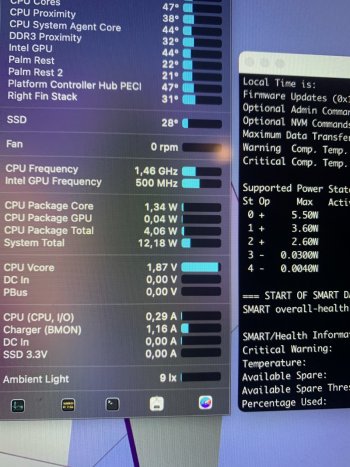
The SSD reports several power states (see photo). Power state 4 is hibernate/sleep. Power state 3 is idle (0.030W). That resembles 0.009A max.). I assume that iStats doesn’t round, and therefor displays 0.00A.
Attachments
Last edited:
I removed nvmefix and lilu before the upgrade to big sur (afraid for instability). The reading of 0.00 is likely right. Because in the idle state the power should be max. 0.030 Watt. (3.3V, so 0.009A). We can assume that iStat doesn’t round to the least significant digit, therefore max. 0.009 will be displayed as 0.00A.This is not true. Bootroom update resolves 2013-2014 macbooks hibernate problems not power management and apst troubles.
For Sabrent istat shows 0.12 A at idle vs 0.20 A without nvmefix (0.0 is probably wrong).
So it has definitely worked at Catalina. But as far as I know Big Sur brings changes to the system extension and kext installation procedure so I guess there is a problem. There is need to know how to install kexts and system extensions under Big Sur because both kexts has been updated and should work under Big Sur.
Attachments
Last edited:
No value between 0.00 and 0.17. Did see values in the range from 0.17 to 0.23 and in the area around 0.45 .Thanks for going through this. Do you ever see gradations of power reported by istats, between 0.00 and 0.17 (on 11.1) or is it just one or the other? Does it jump up to .17 from 0, or is it more like (0.0, 0.03, 0.10, 0.17, 0.40)?
When I have a moment, I'll update to the new bootrom and see whats going on.
Photo: started windows client (vmware fusion), some small actions in Windows, stopped windows client.
Attachments
Last edited:
Curious, what is your system total at idle?No value between 0.00 and 0.17. Did see values in the range from 0.17 to 0.23 and in the area around 0.45 .
Photo: started windows client, some small actions in Windows, stopped windows client.

Yes, this is what interests me. On my model (15in 11’5) there are gradations from the base score all the way up to full power. Without any modification the 660p has a base idle of .17A then moves to .20, .25, .42 and back as it needs.No value between 0.00 and 0.17. Did see values in the range from 0.17 to 0.23 and in the area around 0.45 .
Photo: started windows client, some small actions in Windows, stopped windows client.
With @kvic ‘s ssdpmenabler kext, the 660p has been brought down to .06A as a base with gradations to .09, ect.
.06A is equivalent to what intel advertises as a normal operating mode for the 660p. So far I‘ve never seen Intel’s idle mode of 40mW, which as you say should be .01A or less.
So it seems that there is a discrepancy between the MBP’s 13 and 15, regarding Istats measurements.
I highly suspect that 0.00 A in your case does not mean the 660p has acheived idle... unless I’m way off here and the new bootrom in Big Sur is indeed enabling it.
Much higher. About 10 to 12 watts with brightness 100%. Only connected a Nifty disk (micro SD card). MBP 13” 12,1 (2015) 2.9 GHz.Curious, what is your system total at idle?
View attachment 1701159
Thanks a lot ! I’ve tried your ssdpmEnabler and it just works. I’ve got even lower power consumption in comparison with nvmefix kext used on Catalina.@vince22 has your Sabrent Rocket 1TB. He got it idle at 0.02A (0.03A before..and 0.05A before that)!
So there is no need anymore to have lilu and nvmefix installed ?
What’s the difference between ssdpmEnabler and nvmefix ?
btw: first post in this thread really needs to be updated.
What kind of MacBook do you have ? Because your istat show “SSD 3.3V”. Maine (mbp 15 mid 2015) shows only “SSD”. After you’ve upgraded to Big Sur, how did you get lilu and nvmefix working again ?I removed nvmefix and lilu before the upgrade to big sur (afraid for instability). The reading of 0.00 is likely right. Because in the idle state the power should be max. 0.030 Watt. (3.3V, so 0.009A). We can assume that iStat doesn’t round to the least significant digit, therefore max. 0.009 will be displayed as 0.00A.
Oh I see, the screenshot was with brightness at 25%. I turned it up to 100% just now and it fluctuates from 10 to 15 watts. Don't know what my point was for asking in the first place, LOL.Much higher. About 10 to 12 watts with brightness 100%. Only connected a Nifty disk (micro SD card). MBP 13” 12,1 (2015) 2.9 GHz.
Guess my MBP was still busy doing maintenance after the upgrade to big sur 11.1 . With brightness 50% the overall power usage is 7.xx Watts. MBP 2015 13”, CPU: I5 2.9 GHz.Much higher. About 10 to 12 watts with brightness 100%. Only connected a Nifty disk (micro SD card). MBP 13” 12,1 (2015) 2.9 GHz.
Attachments

Mbp 2015 13” i5 2.9 GHz. Not any special .kext anymore. SIP is fully enabled (csrutil). Big sur 11.1What kind of MacBook do you have ? Because your istat show “SSD 3.3V”. Maine (mbp 15 mid 2015) shows only “SSD”. After you’ve upgraded to Big Sur, how did you get lilu and nvmefix working again ?
All nvme SSD’s operate at 3.3V . Don’t know why iStat shows the voltage...
Might be that a SATA M2 drive operates at 5V (speculation) ?
Time to contribute to this thread. Just upgraded my Late 2013 15" MBP 500GB SSD to the SanDisk Ultra 1TB SSD. Also upgraded to Big Sur at the same time. Relatively straightforward install and great upgrade for only a $100. Before and after:


Link to SanDisk SSD:
Link to SanDisk SSD:
SanDisk Ultra 1TB Internal SSD PCIe Gen 3 x4 NVMe SDSSDH3N-1T00-G25 - Best Buy
Shop SanDisk Ultra 1TB Internal SSD PCIe Gen 3 x4 NVMe products at Best Buy. Find low everyday prices and buy online for delivery or in-store pick-up. Price Match Guarantee.
www.bestbuy.com
Upgrading Boot ROM Version without upgrading to Big Sur
(These steps are based on or an elaboration of the work done by @Cmd+Q et al.)The steps below were successfully performed on a MacBook Pro (Retina, 15-inch, Mid 2014) running macOS High Sierra 10.13.6 (17G14042) with the OEM Apple SSD (SM0512F) to upgrade to 429.0.0.0.0.
#1. Download Big Sur
First download Big Sur. In High Sierra, this is done via the App Store.app. After the download is finished, the disk image should mount automatically.#2. Extract the firmware
In Terminal.app, first verify your EFI version using the following command:
Bash:
/usr/libexec/firmwarecheckers/eficheck/eficheck --integrity-check | grep "EFI Version"An example output would be:
Bash:
EFI Version: MBP112.88Z.F000.B00.2012022043Note the first part of the EFI version (i.e. MBP112), as you'll use it below to identify the firmware file.
Next, locate the ZIP file that contains amongst other things the firmware file.
Bash:
# Store ZIP file path to variable (handle unpredictable file name)
ZIP_FILE=`ls /Volumes/Shared\ Support/com_apple_MobileAsset_MacSoftwareUpdate/*.zip`

# List firmware files in ZIP file
unzip -l-qq "$ZIP_FILE" AssetData/boot/EFI/EFIPayloads/*
An example output would be:
Bash:
  Length      Date    Time    Name
---------  ---------- -----   ----
        0  12-08-2020 02:17   AssetData/boot/EFI/EFIPayloads/
  8388608  12-08-2020 02:17   AssetData/boot/EFI/EFIPayloads/MBA71.fd
  8388608  12-08-2020 02:17   AssetData/boot/EFI/EFIPayloads/MB81.fd
  8520304  12-08-2020 02:17   AssetData/boot/EFI/EFIPayloads/MBA61.scap
  8520304  12-08-2020 02:17   AssetData/boot/EFI/EFIPayloads/MBP111.scap
  8388608  12-08-2020 02:17   AssetData/boot/EFI/EFIPayloads/MB91.fd
  8388608  12-08-2020 02:17   AssetData/boot/EFI/EFIPayloads/MBP131.fd
  8520304  12-08-2020 02:17   AssetData/boot/EFI/EFIPayloads/IM151.scap
  8388608  12-08-2020 02:17   AssetData/boot/EFI/EFIPayloads/MBP121.fd
  8388608  12-08-2020 02:17   AssetData/boot/EFI/EFIPayloads/IM183.fd
  8388608  12-08-2020 02:17   AssetData/boot/EFI/EFIPayloads/IM161.fd
  8520304  12-08-2020 02:17   AssetData/boot/EFI/EFIPayloads/MM71.scap
  8388608  12-08-2020 02:17   AssetData/boot/EFI/EFIPayloads/IM171.fd
  8388608  12-08-2020 02:17   AssetData/boot/EFI/EFIPayloads/MBP141.fd
  8388608  12-08-2020 02:17   AssetData/boot/EFI/EFIPayloads/MBP114.fd
  8388608  12-08-2020 02:17   AssetData/boot/EFI/EFIPayloads/IM162.fd
16777216  12-08-2020 02:17   AssetData/boot/EFI/EFIPayloads/IM191.fd
  8388608  12-08-2020 02:17   AssetData/boot/EFI/EFIPayloads/IM181.fd
  8388608  12-08-2020 02:17   AssetData/boot/EFI/EFIPayloads/MBP142.fd
  8388608  12-08-2020 02:17   AssetData/boot/EFI/EFIPayloads/MBP133.fd
  8388608  12-08-2020 02:17   AssetData/boot/EFI/EFIPayloads/MB101.fd
  8388608  12-08-2020 02:17   AssetData/boot/EFI/EFIPayloads/MBP132.fd
  8520304  12-08-2020 02:17   AssetData/boot/EFI/EFIPayloads/IM144.scap
  8388608  12-08-2020 02:17   AssetData/boot/EFI/EFIPayloads/MBP143.fd
  8520304  12-08-2020 02:17   AssetData/boot/EFI/EFIPayloads/MP61.scap
  8520304  12-08-2020 02:17   AssetData/boot/EFI/EFIPayloads/MBP112.scap
---------                     -------
219025680                     26 files
Now, locate the firmware file that matches the prefix of the EFI version from above and store the exact file path into the variable FIRMWARE_FILE below.
Bash:
FIRMWARE_FILE=<firmware file path here>An example command would be:
Bash:
FIRMWARE_FILE=AssetData/boot/EFI/EFIPayloads/MBP112.scapNext, we're finally ready to extract the firmware file with the command below.
Bash:
unzip -j "$ZIP_FILE" $FIRMWARE_FILE -d ~/Desktop/You should now see the firmware file on your desktop.
#3. Set firmware file for upgrade
Now it's time to set your MacBook to upgrade the firmware on the next bootup. Fill in the file name of your specific firmware file.
Bash:
sudo /usr/sbin/bless -firmware ~/Desktop/<firmware file name here> --verbose --recoveryAn example command would be:
Bash:
sudo /usr/sbin/bless -firmware ~/Desktop/MBP112.scap --verbose --recovery

Password: *****

EFI found at IODeviceTree:/efi
Will need to copy 8523776 bytes to EFI system partition
No auxiliary booter partition required
System partition found
Preferred system partition found: disk0s1
Returning booter information dictionary:
<CFBasicHash 0x7fd05f600550 [0x7fff83dc3c30]>{type = mutable dict, count = 4,
entries =>
    0 : <CFString 0x10aba83c0 [0x7fff83dc3c30]>{contents = "Data Partitions"} = (
    disk1s1
)
    1 : <CFString 0x10aba79a0 [0x7fff83dc3c30]>{contents = "Preboot Volumes"} = (
    disk1s2
)
    2 : <CFString 0x10aba83e0 [0x7fff83dc3c30]>{contents = "Auxiliary Partitions"} = (
)
    3 : <CFString 0x10aba7be0 [0x7fff83dc3c30]>{contents = "System Partitions"} = (
    disk0s1
)
}

Mounting at /Volumes/bless.5nQf
Executing "/sbin/mount"
Returned 0
Creating /Volumes/bless.5nQf/EFI/APPLE/FIRMWARE if needed
Deleting previous contents of /Volumes/bless.5nQf/EFI/APPLE/FIRMWARE
Deleting /Volumes/bless.5nQf/EFI/APPLE/FIRMWARE/MBP112.scap (8520304 bytes)
Opened dest at /Volumes/bless.5nQf/EFI/APPLE/FIRMWARE/MBP112.scap for writing
preallocation not supported on this filesystem for /Volumes/bless.5nQf/EFI/APPLE/FIRMWARE/MBP112.scap

/Volumes/bless.5nQf/EFI/APPLE/FIRMWARE/MBP112.scap created successfully
Relative path of /Volumes/bless.5nQf/EFI/APPLE/FIRMWARE/MBP112.scap is \EFI\APPLE\FIRMWARE\MBP112.scap
IOMedia disk0s1 has UUID E0D1A18E-BE5A-4756-A31A-EA2CA48410AF
Executing "/sbin/umount"
Returned 0
Write to RTC: 0
Setting EFI NVRAM:
<CFBasicHash 0x7fd05f600dc0 [0x7fff83dc3c30]>{type = mutable dict, count = 1,
entries =>
    2 : <CFString 0x10aba7c20 [0x7fff83dc3c30]>{contents = "efi-apple-recovery"} = <CFString 0x7fd05f502d60 [0x7fff83dc3c30]>{contents = "<array><dict><key>IOMatch</key><dict><key>IOProviderClass</key><string>IOMedia</string><key>IOPropertyMatch</key><dict><key>UUID</key><string>E0D1A18E-BE5A-4756-A31A-EA2CA48410AF</string></dict></dict><key>BLLastBSDName</key><string>disk0s1</string></dict><dict><key>IOEFIDevicePathType</key><string>MediaFilePath</string><key>Path</key><string>\EFI\APPLE\FIRMWARE\MBP112.scap</string></dict></array>"}
}
#4. Trigger firmware upgrade
Shut down your computer. (Do not choose the restart option!) After the MacBook is powered off, power it back on by pressing the power button. Next be patient, and if everything goes well your firmware will be updated.
---
@maxthackray - Thanks for all the work you've done. Would you kindly link to this post from the post number one to make it easier to find.
Last edited:
lvic, yes Sabrent rocket 1TB, just tested today in real world scenario by watching non-stop youtube videos, with your kext loaded i got 7hrs (50% brightness) total which is pretty good despite 5yrs old battery 597cycles. Thanks.@vince22 has your Sabrent Rocket 1TB. He got it idle at 0.02A (0.03A before..and 0.05A before that)!

Register on MacRumors! This sidebar will go away, and you'll see fewer ads.