So the adapter arrived earlier than I thought, and couldn't wait so I sat down yesterday for a few hours.
Setup:
Macbook Air (MBA) (2014?) 6.2 4GB
Sintech NGFF M.2 NVME "long" Adapter (Bought on Amazon shipped by Sintech in CN)
Samsung 970 EVO Plus 2TB M.2 NVME
"JOREST Precision Screwdriver Kit Tool Kit" (any kit with the right Torx (T5) and Pentalobe (P5) will do)
USB drive with 16GB min (I believe that should be enough, I used a 64GB drive)
High level process:
- Fresh OS install with updates on exisiting SSD (Steps 1-6 below)
- Build OpenCore Bootable USB (Steps 7-8 below)
- Install new SSD hardware (Step 10 below)
- Install OS (OpenCore "patched") on new SSD (Steps 11-20 below)
- Post Install OpenCore config (Steps 21-24 below)
- Enjoy your new SSD
Detailed process:
- Built a "standard" Bootable USB drive as per Apple instructions. Big Sur for me.
You can use a USB flash drive or other secondary volume as a startup disk from which to install the Mac operating system. These steps are primarily for system administrators and other experienced users.

support.apple.com
- Booted from USB (Hold Alt / Option), with the ORIGINAL SSD still in the MBA.
Disk Utility, formatted the drive.
- Fresh install of Big Sur.
- Booted from the internal drive.
- Setup Big Sur.
- Applied all available updates.
- Installed Open Core Legacy Patcher (OCLP) from https://dortania.github.io/OpenCore-Legacy-Patcher/
- Followed instructions by Mr. Macintosh's great youtube video () - Official Instructions are also great (https://dortania.github.io/OpenCore-Legacy-Patcher/INSTALLER.html)
- Note: the above video is a month old, and OCLP has had a UI refresh so will look slightly different. But the process is straight forward.
- Select "Create MacOS Installer" -> "Download MacOS Installer" -> Pick desired OS (BigSur for me) -> "Flash Installer" -> Select OS you just downloaded -> Select the correct USB drive -> Wait. You now have a Bootable USB created, like step 1. Not sure if it is really needed, but better to go through it all via OCLP IMO.
- Now you can build and install OpenCore on the bootable USB
- Note: I did not change / fiddle with any settings in OCLP. I made sure the correct model was selected (does so by default) and left everything as is. Based on your model it will add / not add things like "NVME Fix" / TRIM enable etc.
- Back in OCLP main menu select "Build and Install Open Core" -> You will see a window with a bunch of text scrolling as it builds the correct version of OpenCore (top of the window shows your Mac model, confirm that is correct) -> "Install OpenCore" -> "Install to Disk" -> "Select the correct USB drive you just build as bootable" -> "Select "EFI" on that drive" -> Wait, and Success
- Created a time machine backup to a different USB, just in case and never ended up using it.
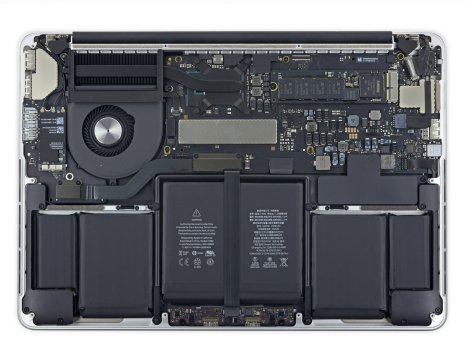
- Opened up the bottom of the case, disconnected the battery, took out the original SSD, placed the Samsung SSD into the adapter, inserted adapter / SSD combo into the logic board /motherboard, reconnect battery, and close up.
- Insert USB (created in steps 7-8) and power adapter.
- Hold Alt/Option, and power on MBA.
- Select "EFI Boot" option.
- Select "Install "YOUR OS JUST BUILT"" So mine said "Install macOS BigSur"
- "Recovery Mode" screen should appear
- Disk Utility find my new SSD, and select "Erase" -> "Name" -> Format "APFS" -> Scheme "GUID Partition Map" -> Wait
- Exit Disk Utility
- Select "Install/Reinstall macOS BigSur" or whatever OS you downloaded -> Make sure to select your new SSD
- Wait patiently. It will go through the regular install process which can take a while (30-60 mins atleast). It will likely reboot a number of times. You may need to select the OS on the boot load screen if that shows up, but the process usually handles itself.
- Once your new OS has loaded, setup as usual.
- OCLP should already be install and will "pop up".
- If you want to turn off the "Boot Picker" everytime the machine turns on go to Settings in OCLP -> Under Build -> Untick "Show OpenCore Boot Picker"
- Back in OCLP main menu -> "Build OpeCore" like step 8 BUT when selecting "Install to Disk" make sure to select your new internal SSD.
- Reboot.
Done, you now have a SSD up and running!
I have yet to test power draw (old battery wayyyy past useable, so waiting on a replacement). So will hold off on ssdpmEnabler KEXT.
Will test putting the laptop to sleep for and extended time (so it hibernates) and see if it will wake up properly / have kernal panics etc.
Thanks to all those in this thread for the great info, and a special thanks for Mr. Macintosh for the OCLP instructions / update videos, and the folks contributing to OCLP (what an awesome user friendly tool!!).


