Become a MacRumors Supporter for $50/year with no ads, ability to filter front page stories, and private forums.
Hello,
I've created an usb key with Pikify 3.1 v11 and El Capitan 10.11.6, but unfortunately my Mac Pro rev 1,1 has only 7 Gb of RAM. The installer says that 12 Gb RAM is required because of a memory leak. Is there a chance that this memory leak will be fixed, or should I turn back to my Yosemite howto which seems to work fine to make my El Capitan install usb key ? It's the last El Capitan update, I guess, so I shouldn't need to worry about a further update. I'm making a clean install, because my computer crashes each time I launch Parallels desktop, and some times with other programs like Safari too :)

Thank you
 
Hi Laurent, I would just buy some more RAM - it is really quite inexpensive and will help run lots of apps and generally improve things. The "memory leak" if that is what it is, is easily fixed by investing in some RAM - a small price to pay to keep your Mac up to date. Yosemite is still Ok for lots of things though, so your call.

If you have another Mac you can install without the 12gb of RAM - look for info on Target Disk in this thread, for full details.

EDIT: Just read your post again, do you have El Capitan installed already? If so how did you get it on there? Target Disk? Have you got any 512mb memory modules in your Mac? 7gb means you perhaps have 2. These are known to cause issues so remove them and see if things run better. This will probably be the cause of your problems if you are currently running El Capitan. Also check the position of RAM modules - diagram is on the inside of side panel - they need to be in pairs of the same size.
 
Last edited:
that's Apple's Gatekeeper protecting you.

There are various ways of working with Gatekeeper:
  • You can open the System Preferences, click Security & Privacy, click the General tab, click the lock icon, enter your password, change the value of "Allow apps downloaded from:" to Anywhere. Now run the installer. Remember to go back and put the "Allow apps downloaded from:" back to a sensible value.
  • OR
  • Try to launch the installer (and get the warning), then go to System Preferences > Security & Privacy > General, there is usually a button saying "open anyway". Click that.
  • OR
  • Right click on the installer and choose Open. You'll be prompted to allow the installer to run anyway
Great.
I instaled Boot64 and then updated to 10.11.6 NO PROBLEMS so far.
Thank you for everything!
 
So, I'm a but confused. For my last Yosemite install I upgraded the boot.efi 32 to the 2,1 64 efi. Is there any reason to have to upgrade or mess with the boot efi again when I install El Capitan? Also, is there a downloadable version of 10.11 with the final upgrade? Or do I have to download 10.11 and upgrade later? I'm trying to make sense of all of this but the information is all over the place. I wish there was one install with one set of directions and possibly a good video.
 
Hi, most people seem to have done a clean install rather than upgrading Yosemite as it keeps a working system on the Mac should anything go wrong. There are at least 4 drive bays so shouldn't be difficult to add another HD. I have not seen a pre patched installer like the Yosemite one, but the instructions by rthpjm are excellent - just don't try to mix and match installation methods as they can conflict. You build the installer onto a USB and should be able to do this with the latest version of El Cap from the Mac App Store and not need to update further unless Apple release another update. There is a video on the post 1390 and 1391 is essential reading to help with this.
 
Hi, most people seem to have done a clean install rather than upgrading Yosemite as it keeps a working system on the Mac should anything go wrong. There are at least 4 drive bays so shouldn't be difficult to add another HD. I have not seen a pre patched installer like the Yosemite one, but the instructions by rthpjm are excellent - just don't try to mix and match installation methods as they can conflict. You build the installer onto a USB and should be able to do this with the latest version of El Cap from the Mac App Store and not need to update further unless Apple release another update. There is a video on the post 1390 and 1391 is essential reading to help with this.

I still have Lion on another HD as my backup. I would hate to have to buy another SSD to install El Capitan on it.

I found a good video with download links here:


But it doesn't mention what version of El Capitan it is. I'd prefer to download the GM and not have to install updates later.

Also, the video doesn't mention partitioning the USB drive.
 
I think someone else on here had problems with that version as it was an installer created for an unknown Mac - maybe even a hackintosh. It won't be the latest version and if it works will need updating afterwards I am sure, as it has been around a while.

Creating the installer from a downloaded MAS copy isn't too difficult if you follow the steps - this was my first foray into this kind on thing and went quite smoothly. You could clone the Yosemite SSD to keep that OS available if needed and then install El Cap onto the SSD.

You could try updating Yosemite to El Capitan but you will have to change the boot.efi files manually after you have disabled SIP as they will get overwritten by the installer and you have to rely on your Lion install. Are your sure Lion is working OK? Some upgrades to GPUs may not work with Lion, so worth checking first. Personally I wouldn't risk this installer - the method in Post 1391 is a well trodden path and is known to work.
 
Last edited:
I still have Lion on another HD as my backup. I would hate to have to buy another SSD to install El Capitan on it.

I found a good video with download links here:


But it doesn't mention what version of El Capitan it is. I'd prefer to download the GM and not have to install updates later.

Also, the video doesn't mention partitioning the USB drive.

That's the one that I did. I installed on a fresh H/D from my 10.7.5 H/d using Disk Utility. No need to burn a disc or use an USB thumb drive. It was painless.. Then I installed the bootloader in 2 places as per directions. I think it was 10.11.1.

You could after installing d/l the 10.11.5 combo updater..then update to 10.11.6.. All running well here.

Also you don't need 12 gigs of ram to do this..
 
Last edited:
Good to hear this installer worked OK for you but doesn't the updater overwrite the boot.efi files going from 11.1 to 11.6?
 
I had recently upgraded my 10.7.5 Mac Pro 2.1 (upgraded 1.1, 2 x 3GHz Xeon) to Yosemite. That was running nicely, but as a compulsive tinkerer I just had to try and put El Capitan onto it.
As I only have 8Gb ram in it, I went for the "external drive on supported machine" option. In this case, a 17" MBP.
I watched a youtube video by dosdude1 and followed his instructions. They are the same as what is on here, so I won't repeat them.
I then attached it to my running Yosemite system, replaced the 2 boot.efi files. Then I replaced the boot drive in the Mac Pro with the new install and crossed my fingers. It worked!
I needed to tweak SIP for Totalfinder to work and to do this I needed to boot into Recovery OS.
No can do, until I found a blog where a guy explained how to replace the boot.efi on the recovery partition to allow it to work on older, unsupported machines. That enabled my to run the csrutil commands required.
I have installed the Boot64 patch and am currently running 10.11.6 (this is what I downloaded from App store).
Thanks for all the inspiration to keep playing with this wonderful piece of hardware, running an SSD has made it sooo fast.
Chris
 
  • Like
Reactions: Ant3000
I appreciate pikers efforts but I just don't get why there isn't a downloadable patched gold master OS that I can just copy over to a usb stick. Why put everybody through all of this confusion and mumbo jumbo?
 
I appreciate pikers efforts but I just don't get why there isn't a downloadable patched gold master OS that I can just copy over to a usb stick. Why put everybody through all of this confusion and mumbo jumbo?
Hello Apple Master,

Because.....
  1. Apple provides the downloadable gold master, but only for supported machines. Sadly Apple stopped supporting the original Mac Pro's (1,1 and 1,2) some time ago, and will stop supporting the 3,1 with Sierra.
  2. As an Apple Master, a little bit of learning is good for the soul ;)
  3. Personally, I prefer to start with Apple's distribution (and inherently trust the security of that distribution). If you pick up "somebody else's" pre-modified copy of the OS, you would have to perform a forensic analysis of all the the executable components of the OS to ensure it hasn't be affected by malware (if like me you were at all security conscious)
  4. The community is usually really helpful.
  5. There are many methods available. The most popular methods are discussed in post 1 of this thread. In summary:
    • Connect your MacPro to a supported Mac, using Target Disk mode. It will show up as one or more available disk drives to your supported Mac. Perform the install from your supported Mac using an unmodified Install OS X El Capitan app onto your MacPro disk of choice. Manually replace 2 files (yes there is a sequence of commands to follow, well documented).
    • Physically remove a disk drive from your MacPro, use a caddy/converter/external drive case to connect it to a supported Mac, proceed as above
    • Follow step-by-step instructions to extract the Install OS X El Capitan app disk images onto install media such as a USB memory stick, external drive, internal drive, or small partition. Follow the step by step instructions to patch it so that it will boot into the Installer. Install from there.
    • Use the pikify method, which is basically a script that I wrote which automates the steps from the point above.
    • Do your own thing o_O If you really want to, you can find tools to help you extract all of the individual Packages directly onto your hard disk, in effect you become the installer, but you might miss a few steps doing it this way, so it's never recommended.
  6. Code signing. The installer checks the validity of the installer packages and will not proceed if they have been altered. This is a good thing, it keeps the vast majority of Apple's customers from accidentally installing compromised software. If someone distributes a modified copy of Apple's Install OS X El Capitan app, it will need to be signed with a valid developer certificate, which in turn is likely to be revoked by Apple for breaking the terms and conditions.
  7. Personal liability. If someone distributes a modified copy of Apple's Install OS X El Capitan app, that person is much more likely to incur the wrath of Apple at some point. Whereas if you as an individual decide by your own choice to perform those modifications, then the liability probably rests with you the individual. (Disclaimer, I am not a legal expert :rolleyes:)
There's probably other reasons I haven't thought of....

Take a look at post #1390 on page 56 if you are interested in the pikify method. Read the caveats (there's always caveats), especially the RAM requirement (which only applies whilst you are installing, once you've finished installing you just have lots of RAM).
 
Last edited:
Hello Apple Master,

Because.....
  1. Apple provides the downloadable gold master, but only for supported machines. Sadly Apple stopped supporting the original Mac Pro's (1,1 and 1,2) some time ago, and will stop supporting the 3,1 with Sierra.
  2. As an Apple Master, a little bit of learning is good for the soul ;)
  3. Personally, I prefer to start with Apple's distribution (and inherently trust the security of that distribution). If you pick up "somebody else's" pre-modified copy of the OS, you would have to perform a forensic analysis of all the the executable components of the OS to ensure it hasn't be affected by malware (if like me you were at all security conscious)
  4. The community is usually really helpful.
  5. There are many methods available. The most popular methods are discussed in post 1 of this thread. In summary:
    • Connect your MacPro to a supported Mac, using Target Disk mode. It will show up as one or more available disk drives to your supported Mac. Perform the install from your supported Mac using an unmodified Install OS X El Capitan app onto your MacPro disk of choice. Manually replace 2 files (yes there are a sequence of commands to follow, well documented).
    • Physically remove a disk drive from your MacPro, use a caddy/converter/external drive case to connect it to a supported Mac, proceed as above
    • Follow step-by-step instructions to extract the Install OS X El Capitan app disk images onto install media such as a USB memory stick, external drive, internal drive, or small partition. Follow the step by step instructions to patch it so that it will boot into the Installer. Install from there.
    • Use the pikify method, which is basically a script that I wrote which automates the steps from the point above.
    • Do your own thing o_O If you really want to, you can find tools to help you extract all of the individual Packages directly onto your hard disk, in effect you become the installer, but you might miss a few steps doing it this way, so it's never recommended.
  6. Code signing. The installer checks the validity of the installer packages and will not proceed if they have been altered. This is a good thing, it keeps the vast majority of Apple's customers from accidentally installing compromised software. If someone distributes a modified copy of Apple's Install OS X El Capitan app, it will need to be signed with a valid developer certificate, which in turn is likely to be revoked by Apple for breaking the terms and conditions.
  7. Personal liability. If someone distributes a modified copy of Apple's Install OS X El Capitan app, that person is much more likely to incur the wrath of Apple at some point. Whereas if you as an individual decide by your own choice to perform those modifications, then the liability probably rests with you the individual. (Disclaimer, I am not a legal expert :rolleyes:)
There's probably other reasons I haven't thought of....

Take a look at post #1390 on page 56 if you are interested in the pikify method. Read the caveats (there's always caveats), especially the RAM requirement (which only applies whilst you are installing, once you've finished installing you just have lots of RAM).

Problem is, I don't have an extra supported mac.
 
Good to hear this installer worked OK for you but doesn't the updater overwrite the boot.efi files going from 11.1 to 11.6?


Yes it does. I simply boot into my 10.7.5 HD and replace the 10.11 efi with pikes.efi again (Takes about 2 minutes). All good to go..
 
Last edited:
OK, so I finally bit the bullet and pulled my boot SSD out of my 1,1 (refurb ROM, so it can't be updated to 2,1 ROM) and hooked it up to my 2009 MBP. I installed El Capitan on the SSD from the installer on the MBP's internal SSD. Slow as heck through USB 2.0 (LOL!). While still connected to the MBP, I replaced the two boot.efi files with the black background Pike versions (I rebooted using the El Capitan install on the internal SSD in the MBP). I then put the SSD back into the Mac Pro 1,1 and it booted just fine into 10.11.6. I am assuming that the update from 10.11 to 10.11.6 happened during the final phases of the install, before I copied the Piker boot.efi files over the ones installed by Apple's installer.

On a side note, prior to this I was having odd issues with the free version of Avast Mac Security (it wouldn't connect to their servers and therefore would refuse to do anything). Once the new OS was installed, my connection issues went away and I can now use the anti-malware software.
 
So I finally got it, but I'm still perplexed as why it worked on my SSD and not my USB Flash drive.

I installed it from OS X Lion on one of my spindle drives to the SSD. Weird indeed.
 
I upgraded the boot.efi 32 to the 2,1 64 efi.

Hi,

I'm not really sure what you mean by that but it got me intrigued. The fact that an EFI is 32 or 64 bit is a soldered hardware chip issue, if I'm correct.... so how do you update from 32 bit EFI to 64 bit EFI on a 2,1 ?
I'm really interested!!

Cheers,

Gabriel
 
refurb ROM, so it can't be updated to 2,1 ROM
It can. There is a patcher available. I have done it.
I'm not at my machine now, but I'll post details on this later today.
Hope this helps.
[doublepost=1470056385][/doublepost]
@Andreaux , He probably meant that he upgraded Firmware from 1,1 to 2,1, or that he just simply used Pike's boot.efi. :)
I'm pretty sure he did but you never know :)
 
  • Like
Reactions: owbp
Hi everyone,

Well, nothing seems to work for me.
Brief history:

  • I bought a Mac Pro 1,1 from a friend, with the following specs:
    • Dual-Quad Xeon 3.0GHz
    • 32GB RAM
    • Flashed ATI 5770
    • ROM flashed to Mac Pro 2,1
  • My friend created an USB installer for 10.11.2 at the time of purchase
  • I installed 10.11.2 using his USB successfully, but was afraid later to update
Now I found this thread (thanks guys, you are AWESOME), but I can't somehow install a newer version (tried 10.11.5, 10.11.6).

This is what I tried so far, and how those methods failed:


create USB installer of 10.11.5 using pikify script from rthpjm:
won't boot, can't reach installer screen

create USB installer of 10.11.6 using pikify script from rthpjm:
seems to reach installer screen, but no window appears, only grey screen (will attach photo soon if needed)

install 10.11.5 onto ssd using MacBook8,1, replace boot.efi files manually:
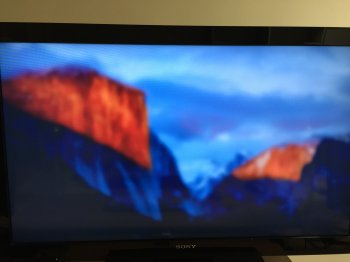
boots to login screen, but nothing shows, only blurred background (photo attached, also a system.log (renamed txt) from the ssd)

install 10.11.6 onto ssd using iMac11,3, then ran pikify.pkg on it:
same as above

create installer of 10.11.6 onto 9gb partition:
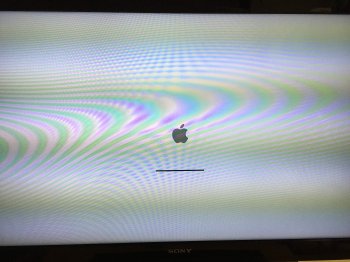
boot screen appears, bar goes through until 100%, and remains there (photo taken after 6hours being frozen that way)

Any suggestion guys?

Thank you, keep up the good work @rthpjm ! ;)
 

Attachments

  • system.txt
    258.7 KB · Views: 1,851
  • IMG_5451.JPG
    IMG_5451.JPG
    1.6 MB · Views: 139
  • IMG_5450.jpg
    IMG_5450.jpg
    536.3 KB · Views: 145
Last edited:
Did you try running the update from the Mac App Store? Ideally, run Boot64 before doing so to protect the boot.efi files.
 
Did you try running the update from the Mac App Store? Ideally, run Boot64 before doing so to protect the boot.efi files.
Thank you Ant3000, that's what I was thinking of to try, but I'd really like to use a clean install. 10.11.2 has been upgraded to server, but I don't need that past anymore, as I bought an Xserve for those purposes...
Anyway, I'll try and report back, thank you ;)
 
The blurry screen appears before you log in. Does it not prompt for a login name and password? I can't view pic properly on my phone but that looks normal but not sure why you don't get further.
 
The blurry screen appears before you log in. Does it not prompt for a login name and password? I can't view pic properly on my phone but that looks normal but not sure why you don't get further.
Yeah, it won't prompt for login name & password :(
 
Register on MacRumors! This sidebar will go away, and you'll see fewer ads.