Become a MacRumors Supporter for $50/year with no ads, ability to filter front page stories, and private forums.
Status
The first post of this thread is a WikiPost and can be edited by anyone with the appropiate permissions. Your edits will be public.
Please try this beta 5

I will test beta 5 later today, although I anticipate having good results as @Gustav Holdoff. Nevertheless, will report my outcome asap.

Martin, I paste below one interesting detail that the RadeonSensor developer points out, this would be very useful to get the GPU temp reading within iStat and similar apps so that cMP users could create custom fan settings based on the GPU temp.

"The SMCRadeonGPU.kext additionally can export the temperature to VirtualSMC for tools like iStats and HWMonitor" (original thread from InsanelyMac forum can be found here)

It seems two more kext are needed for this to happen: SMCRadeonGPU and VirtualSMC. Not sure if you find this useful to be included in your package, I can imagine most users of your package use fan control apps to monitor/tweak fan settings. Would be great to be able to use the GPU temp too! :)

Thanks!
 
Hi and great work on EFI 0.7.6! I’ve managed to install Monterey 12.1 on my Mac Pro 5,1 but Bluetooth doesn’t work although it did under Big Sur 11.6.2 - where I had previously upgraded the Wi-Fi / Bluetooth card in my Mac Pro to support Catalina!!

Any thoughts anybody?

For me, Bluetooth was crossed off when I first booted into 12.1 on my 5,1, but upon a restart it was back. Also having used OCLP I had to make sure it booted without the USB and injected code onto the main NVMe.
 
You can search ChannelA-DIMM0

Then you should able to locate the DIMM spoofing details, and edit them accordingly.

e.g. You can make it 6x32.

Anyway, mixing DIMM may not work, and you better avoid it. You can try to boot with just 2x32GB DIMM. If that works, then it's not the mis-config's issue, but your 16GB DIMM and 32GB DIMM simply can't be mixed together.
Interesting…what EXACTLY would I replace ChannelA-DIMM0 with, assuming I am totally new at this and know nothing? (Let’s say also I am using the same type of RAM six times).

Also this has to be done with the Custom Memory = true?
 
I will test beta 5 later today, although I anticipate having good results as @Gustav Holdoff. Nevertheless, will report my outcome asap.

Martin, I paste below one interesting detail that the RadeonSensor developer points out, this would be very useful to get the GPU temp reading within iStat and similar apps so that cMP users could create custom fan settings based on the GPU temp.

"The SMCRadeonGPU.kext additionally can export the temperature to VirtualSMC for tools like iStats and HWMonitor" (original thread from InsanelyMac forum can be found here)

It seems two more kext are needed for this to happen: SMCRadeonGPU and VirtualSMC. Not sure if you find this useful to be included in your package, I can imagine most users of your package use fan control apps to monitor/tweak fan settings. Would be great to be able to use the GPU temp too! :)

Thanks!
I haven’t test VirtualSMC on cMP for a while, not quite sure if it can handle the native sensors correctly. You want to try that?

In worst case, iState won’t show any CPU / fan’s reading as all. But that should be a cosmetic issue, the SMC itself should be still working, and the fans will still spin up when CPU gets warm.

Of course, when that happen, you shouldn’t run any CPU stress test, and should just remove the VirtualSMC kext then reboot (or revert to a known good OC package).

Also, if I understand correctly, even the SMCRadeonGPU kext can pass the temperature reading to the SMC (or VirtualSMC), there still no way to control the fan via any apps (including iStat).

iStat change the fan speed (in real time) by altering some SMC keys, but I don’t think there is any SMC key exist which can change the graphic card’s onboard fan speed. When the GPU warm up, the SMC was programmed to increase the PCIe fan speed, not the card’s fan speed. And the card’s fan speed isn’t controlled by the SMC, but just follow its own firmware’s fan profile.

If we want to alter the graphic card’s fan speed, we can inject the PowerPlay table via a kext or via OC, which completely replace the firmware’s fan profile. However, this fan profile will be read to the RAM during boot, and can’t be changed once booted to desktop. Therefore, we can’t manage it in real time.
 
Interesting…what EXACTLY would I replace ChannelA-DIMM0 with, assuming I am totally new at this and know nothing? (Let’s say also I am using the same type of RAM six times).

Also this has to be done with the Custom Memory = true?
You may just turn on the Custom Memory, and let it spoof the RAM to 192GB. This of course will force MacOS to display 192GB RAM which you may not installed. However, it should allow you to boot even only one 32GB DIMM installed.

This can be a starting point to try if your 32GB DIMM works (do not mix use DIMM when performing this tests. Otherwise, when something goes wrong, you have no way to know if it’s hardware compatibility issue, or software configuration issue).

If you want more discussion in this area, please join the 32GB DIMM thread.
 
  • Like
Reactions: hirshnoc
despite the admin account […]
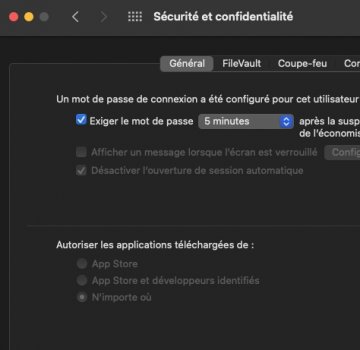
In system preferences - security - general : is the gatekeeper enabled to « all developers » ?
If not, open Terminal and type :
Code:
sudo spctl --master-disable
 

Attachments

  • Capture d’écran 2022-01-22 à 12.16.20.jpg
    Capture d’écran 2022-01-22 à 12.16.20.jpg
    57.1 KB · Views: 102
In system preferences - security - general : is the gatekeeper enabled to « all developers » ?
If not, open Terminal and type :
Code:
sudo spctl --master-disable
not work in my case- all developers allowed- not worked and with terminal command - not worked- may be this application nor work with my hardware- may be due to my RadeonPro W5700 this app not work
 
Hi! I have a Mac Pro 2010 with unflashed Sapphire Pulse RX 580 (single bios) on Mojave. I tried OCLP but it didn't work.

I would like to update to Big Sur 11.6.2

Are there any changed to the method or settings compared to your video from March 2020?

Thanks for any help! :)
 
Hi! I have a Mac Pro 2010 with unflashed Sapphire Pulse RX 580 (single bios) on Mojave. I tried OCLP but it didn't work.

I would like to update to Big Sur 11.6.2

Are there any changed to the method or settings compared to your video from March 2020?

Thanks for any help! :)
I keep updating my package, but the installation method always the same.
 
I keep updating my package, but the installation method always the same.
Thank you so much for your reply. In your notes you say you are not sure about spoofing method. Does this mean I should use an older version, like 0.7.6?
 
I haven’t test VirtualSMC on cMP for a while, not quite sure if it can handle the native sensors correctly. You want to try that?

In worst case, iState won’t show any CPU / fan’s reading as all. But that should be a cosmetic issue, the SMC itself should be still working, and the fans will still spin up when CPU gets warm.

Of course, when that happen, you shouldn’t run any CPU stress test, and should just remove the VirtualSMC kext then reboot (or revert to a known good OC package).

Also, if I understand correctly, even the SMCRadeonGPU kext can pass the temperature reading to the SMC (or VirtualSMC), there still no way to control the fan via any apps (including iStat).

iStat change the fan speed (in real time) by altering some SMC keys, but I don’t think there is any SMC key exist which can change the graphic card’s onboard fan speed. When the GPU warm up, the SMC was programmed to increase the PCIe fan speed, not the card’s fan speed. And the card’s fan speed isn’t controlled by the SMC, but just follow its own firmware’s fan profile.

If we want to alter the graphic card’s fan speed, we can inject the PowerPlay table via a kext or via OC, which completely replace the firmware’s fan profile. However, this fan profile will be read to the RAM during boot, and can’t be changed once booted to desktop. Therefore, we can’t manage it in real time.

Took me more time than anticipated to test the 0.7.7 beta 5, and in the meantime I noticed you posted the final release of your 0.7.7 package. So I went ahead and tested the final instead. 0.7.7 it's working well. It only hung once during the first boot of the package, I am not sure why, so I went ahead and did a 4 chime NVRAM reset at the second boot and that worked fine. On that second boot the OC picker did not show up for some reason, must have been a GPU issue with inputs. Third boot worked perfectly and boot picker showed up. Will test multiple reboots today and monitor overall performance. Will wait few days before installing (the just released) macOS 12.2 in order to make sure all is working fine on macOS12.1.

Thanks for the detailed explanation and response to my queries about GPU temps, RadeonSensor kext and control fan apps. I understand we won't be able to control the GPU fans via iStat, nonetheless having iStat receiving GPU temp sensor data would provide an option to customize the cMP PCI fan based on the GPU temp (instead of or in addition to NMVe temps on PCI cards for instance). I will look into VirtualSMC and try to determine whether it's worth the effort and any its potential risks. Will report back with updates and/or questions if/when I can free up the cMP from daily work!

Thanks again for all Martin!

EDIT: Forgot to specifically confirm that the companion RadeonSensor app launched fine and reports GPU temperature data properly!

EDIT 2: Did about 4 additional reboots since I wrote the above post, everything working properly.
 
Last edited:
Hey @h9826790

Sorry if it's been covered before, but I just read the Readme.txt included in the 0.7.7 packges and the section about moving OC to my UEFI installed Windows 10 drive (SATA SSD) sounds interesting – I currently have OC on a SATA HDD.

I am a bit unsure what's meant with ”replace the Boot folder”, though.
Shall I remove the ”Boot” folder and put the OC folder there instead?

And after removing OC from my old location I run ”Bless OpenCore.app” again so OC understands it should use OC on the new location?
For Windows, there is a BOOT folder in the EFI folder which contain some files for booting Windows.

In general, if you damage that folder, Windows won’t boot. But in this case, we intentionally replace that folder completely by the BOOT folder from OpenCore. And OpenCore itself as a boot loader can bridge boot Windows without the original BOOT folder.

So, if for whatever reason OpenCore is disabled, Windows simply can’t boot. This create an extra protection to the cMP’s BootROM.

You can install multiple OpenCore copies on a single cMP. E.g. you can copy your existing OC folder to the Windows drive’s EFI partition, but not delete the old one.

Then you unmount all other EFI partition but only leave the Windows drive EFI partition still mounted, and run the bless tool. In this case, the bless tool will bless the OC that stores on the Windows drive, and disable the original copy (unless you remove the Windows drive, then the cMP should able to boot from the old copy).

The idea is simple, you can install many many copies of OC. But when you only mount one EFI partition and run bless tool, that OC copy will become the master.
You rock.
 
greetings dear mac fans & technicans n lovers

with some attention over several weeks now, i've read the part about activating the hardware acceleration with a compatible gpu in our transformed / hack :apple: computers.
maybe some of you could help me out to archive the same with mine? :cool:
everything is working smooth and fine except this part I want to use....

the parts ive already done, is to look the IORegistryExplorer part, look at the naming for the gpu and use whatevergreen.
maybe its only a small thing and or i oversee something.
as for now I would provide some more infos and data on demand.

thanks und greetings
 
For Windows, there is a BOOT folder in the EFI folder which contain some files for booting Windows.

In general, if you damage that folder, Windows won’t boot. But in this case, we intentionally replace that folder completely by the BOOT folder from OpenCore. And OpenCore itself as a boot loader can bridge boot Windows without the original BOOT folder.

So, if for whatever reason OpenCore is disabled, Windows simply can’t boot. This create an extra protection to the cMP’s BootROM.

You can install multiple OpenCore copies on a single cMP. E.g. you can copy your existing OC folder to the Windows drive’s EFI partition, but not delete the old one.

Then you unmount all other EFI partition but only leave the Windows drive EFI partition still mounted, and run the bless tool. In this case, the bless tool will bless the OC that stores on the Windows drive, and disable the original copy (unless you remove the Windows drive, then the cMP should able to boot from the old copy).

The idea is simple, you can install many many copies of OC. But when you only mount one EFI partition and run bless tool, that OC copy will become the master.
Thanks so much for this – I had missed there was a ”Boot” folder in the OC package. ?

But one thing – I now have a ”No Name” partition that shows up in the OC boot picker that wasn't there before. I know it says in the Readme.txt that I shoud rename that partition to "EFI”, but I can't seem to find any partition named that – they're all named EFI for me when I look in Clover Configurator -> Mount EFI

Where would I find that ”No Name” partition I see in the OC boot picker?

Sorry for my ignorance here.


I managed to hide the ”No Name” partition from the boot picker by setting ”HideAuxiliary” to ”True”, so I'm good now.
 
Last edited:
FYI I updated my cMP 5,1 from 11.6.2 to 11.6.3. It went fine other than on first reboot, it still had 11.6.2 and Software Update was still offering 11.6.3 even though it "appeared" to install it the first time. Running the update a second time, all went as expected. Odd, all other updates from .0 to .1 to .2 did not do that.
 
@h9826790

Using your (absolute vanilla) OC 077 I cannot update to 12.2.

After running a modified version my Mac failed to update (via system prefs).

Then I reinstalled your original config and made zero modifications. Macintosh HD remains an option in the bootpicker, but will not complete a boot. Tried video instructions for Catalina (VMM and updateSMBIOS-false), but I still cannot update - unless I intervene in bootpicker to try "Macintosh HD" (which fails) it will simply switch to the 12.1 version and boot that.

Is it not possible to OTA update with this basic OC package?
 
Last edited:
  • Sad
Reactions: star-affinity
Using the OC 0.7.7 package I decide to move on from Big Sur 11.5.2 to Monterey 12.2 (after backing up the entire drive).

Changed the "Cpuid1Mask" and set "UpdateSMBIOS" to "false" in the congfig.plist and restarted. Then started the Monterey installation on my Big Sur drive.

After the installer did its initial thing and then made the computer restart I now have a "Macintosh HD" partition that wasn't there before. Booting into that shows the Apple logo and progress bar for some time, then the computer restarts. I've tried booting into that partition several times. Booting back into my usual Big Sur partition takes me back into Big Sur 11.5.2.

Any ideas what's going on here? What shall I try next?

Thanks in advance!

Edit:

How it looks in Disk Utility currently:
Disk Utility.png

I've worked as an IT technician for almost two decades and I don't understand much of what's going on here. ?

Where does that ”Macintosh HD” partition I see in the OC boot picker come from?
Seems to me I should get into that ”com.apple.os.update...” partition somehow. ?

Edit 2:

Ok, I learnt that that ”com.apple.update…” partition should be there.
Can say that I also had trouble updating to Big Sur 11.5.3 when I tried that – same thing when trying to boot on the ”Macintosh HD” partition from the OC boot picker. It was first when I reverted back the ”Cpuid1Mask” and ”UpdateSMBIOS” settings that I could update to 11.5.3. Maybe I can now also update to Monterey.

So it seems one should not touch ”Cpuid1Mask” and ”UpdateSMBIOS” when going from Big Sur to Monterey as it says in the Readme.txt? @h9826790

Edit 3:

I can't seem to get Monterey to install. It tries and boot into ”Macintosh HD” that the Monterey installer creates, but it either gets stuck during progress bar and Apple logo or it just restarts and gets back into Big Sur. I'll see if I can do a ”verbose” boot to see what's going on.

Sorry for taking up so much attention with this, but maybe it helps someone else.
 
Last edited:
Please try this link to get beta 4

It's possible that the extra unknown hardware causing the extra kernel task demand indeed.

But I can't quite sort it out with you at this moment. I simply don't have the time to do so. Let's see if others can help.

W5700 should be supported by RadeonSensor. Please let me known if that works as expected.
Thank You, Martin.
Your 0.7.7 release works with disabled all not unneeded kext.
I have updated to monterey 12.2. and now radeon sensor WORKS for Radeon pro w5700.
Also this week I replace USB3 pcie card to thunderbolt Alpine Ridge.
I tried to install it with your original config, turned on the SSDT,
of course the chipset was shown as Intel DSL7540, but Alpine Ridge should have 6540.
Nevertheless, i plugged in Belkin thunderbolt dock with connected thunderbolt RAID HDD,
did a warm restart - HDD doesn't show - in system info thunderbolt pci shown,
but in thunderbolt section disappeared.
Then i changed settings in config and replaced SSDT-TBOLT3.aml
with SSDT-TBOLT3-AR.aml (Alpine Ridge SSDT provided by the card seller)- it works now.
I still need to test the work for a long time,
but I am not yet satisfied with replacing USB3 card with a thunerbolt card,
since after sleeping and waking up all devices disappear,
I need to turn off the CMP, boot the system, and then do another warm reboot.
Since I have a backup disk connected via thunderbolt to the Belkin dock,
and now it’s obvious that I won’t be able to make a recovery from time machines.
if I need to restore the system, I will have to put the backup disk inside the cMP.
Or did I something wrong with set up the thunderbolt card?
and your cMP works differently?
ADDED
after a whole day of testing: I found that if I don’t use Belkin thunderbolt dock,
but connect HDD devices directly, then the work becomes more convenient -
I have one thunderbolt connected to WD MY Book Thunderbolt Duo
- in SysInfo it is shown as a thunderbolt device,
and the second to WD My Book Duo
- it is shown as USB 3.1 .
When turning on or rebooting the cMP, external hdd are now shown.
And I can even make a recovery from an external time machine.
BUT IMPORTANT!
the disk that shows up as connected to usb 3.1 I can eject (using mac os eject command)
and reconnect again,
then if I try to disconnect the disk that shows up as a thunderbolt,
the system immediately crashes,
the cMP tries to reboot,
the GPU crashes - the display shows a damaged picture.
Neither reseting smс nor reseting nvram helps, and the system boot freezes.
I found, that for some reason, EFI opencore is damaged.
Only a complete overwrite of the entire EFI returns the cMP to work (even without resetting SMC and nvram).
STILL IMPORTANT!
after sleep and wakeup, HDD is not visible again,
if I try to replug HDD, the system immediately crashes
and the result is the same as described earlier.
In order not to crash after the sleep and wakeup,
I have to turn off and boot the cMP with the devices DISCONNECTED from the thunderbolt,
and reconnecting again after the system boots and after a warm restart,
then the hdd is visible again.
cMP works as usual, it can be turned off and after turning on the HDD are visible and working.
For me it is impossible to make any manipulations with connecting and disconnecting devices while cMP is ON,
except for the procedure described above.
My question is, how does it happen that the EFI is damaged?
how to avoid it?
MacPro 4.1/5.1, dual 5680, Radeon Pro W5700, 96Gb samsung RAM, 1Tb nvme 970EvoPlus,
2TB Crusial P2, Alpine Ridge thunderbolt, OC 0.7.7, MacOS Monterey
 
Last edited:
Register on MacRumors! This sidebar will go away, and you'll see fewer ads.