This second option warning occurred for two reasons:
1) if you boot your USB external macOS apple assigns to it the main EFI volume disk0s1 (because it's the root disk), while instead an external disk can't be physically on disk0 but disk(0+x), in the script I disallow that any disk0* should be erased even for mistake and also disallow it for the current macOS in use (example APFS container)
2) if you boot after power-on with an USB device plugged to your internal macOS apple assigns the main label EFI, so the next label I could use for an external USB is "EFI 1", for the same reason I disallow to erase for mistake an internal volume so it throws an error
You could use the second option (to use an empty usb drive with erase) in these cases:
- booting your external USB macOS and change the label to your external USB empty drive
- booting your internal macOS but without any plugged usb devices, just plug them after you login the desktop
- erase first your external USB drive as macOS Extended Journaled with GUID scheme (because MBR is not supported for EFI Boot)
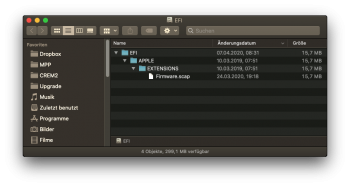
But the purpose of this USBOpenCoreAPFSloader2 is that it is stored on the hidden USB external EFI volume diskXs1, and to make this I can't use a different name from EFI, because this is the standard apple name for an EFI Boot either internal or external.
You could use even both the versions together in this way:
- From an empty USB drive make first a: USBOpenCoreAPFSloader (blue icon, version 1)
- Then using USBOpenCoreAPFSloader2 select the same USB drive and choose the "
Near to an usb device" option
At the power-on chime holding alt-option you'll notice two OpenCoreAPFSloader, the green icon is the newest with telemetrap.kext that should allow to complete an OTA update without kp or bootloop.
edit:
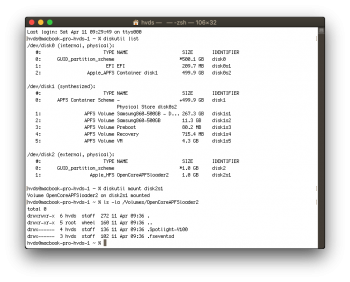
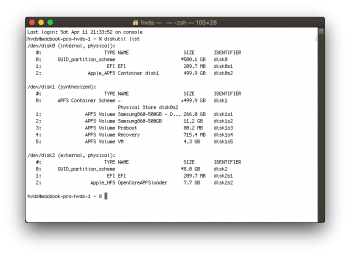
@hvds from your picture your external USB drive hasn't a proper GUID scheme, this is the correct apple GUID scheme (example using my 32 gb usb drive):
Code:
/dev/disk2 (external, physical):
   #:                       TYPE NAME                    SIZE       IDENTIFIER
   0:      GUID_partition_scheme                        *31.1 GB    disk2
   1:                        EFI EFI                     209.7 MB   disk2s1
   2:                  Apple_HFS USBopencore             30.8 GB    disk2s2