Become a MacRumors Supporter for $50/year with no ads, ability to filter front page stories, and private forums.
Status
The first post of this thread is a WikiPost and can be edited by anyone with the appropiate permissions. Your edits will be public.
Hello,

I guess I’m just too dumb to figure this out…here’s my problem. I boot into the “recovery mode” using the dosdude1 Catalina usb flash drive I made, open the terminal, type “csrutil disable”, the terminal “claims that the system integrity has been disabled”, restart the laptop without the usb stick inserted and boot up Catalina, open the “usr/lib” directory, ATTEMPT to drag the “libmecabra.dylib” into the “usr/lib” folder and I get the stupid circle with a slash and the system won’t let me do it….

I verified the system integrity is disabled also with “csrutil status”

What am I doing wrong?

Thanks for any help!
Like @K two already mentioned you have to disable SIP (which is done by the Catalina patcher anyway) and you have to make the root system volume writable using the mount command. Additionally you might need to fix the permissions of all files copied to / like this as an example for the TextInput.framework

Code:
sudo chmod -R 755 /System/Library/PrivateFrameworks/TextInput.framework
sudo chown -R 0:0 /System/Library/PrivateFrameworks/TextInput.framework

As long as you do not add an extension you are fine now.
 
  • Like
Reactions: 0134168 and K two
Re: How to restore a TM Backup with Catalina on-board tools..

thanks for the info. So there is no way to do it other than with the BigSur workaround I found myself. Dammit.
You could roll the dice w/APFS ROM patcher, you have an early MCP79 Mac which can be opened to read the actual P/N from the EEPROM before attempting. If an error is made the Macbook can be bricked. 🤪
 
  • Like
Reactions: roysterdoyster
You could roll the dice w/APFS ROM patcher, you have an early MCP79 Mac which can be opened to read the actual P/N from the EEPROM before attempting. If an error is made the Macbook can be bricked. 🤪
Thanks for pointing me to this.
I don't take the risk.

How do you restore a TM Backup on your unsupported Macs?
 
Last edited:
  • Like
Reactions: K two
Thanks for pointing me to this.
I don't take the risk.

How do you restore a TM Backup on your unsupported Macs?
I have used time machine with a MacBook Pro 8,1 (2011), running the dosdude1 Catalina patcher.

Just like an unpatched install, I had a TM back up of my patched Catalina install. With this computer,Something on a different partition went wrong, and I had to end up wiping the entire disk, repartitioning, and reinstalling all the OSs.

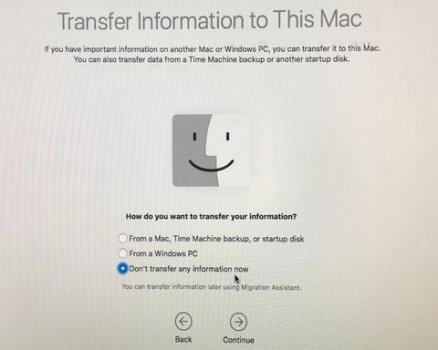
On a blank SSD, I reinstalled the patched Catalina from the dosdude1 USB stick. When you go through the install and you get to the window in the attachment (or it might say migration assistant), choose “from Time Machine“…… then plug in your TM back up and go through like normal.

The TM back up that I used was from a patched Catalina install. However, as long as you start the install process with a DOSdude1 Catalina USB stick and do a clean install of the OS from the USB stick, I think that any TM back up should work, when you are given the option later on To set up the Mac with the TM back up. Am I incorrect?


hope this was helpful. Cheers.
 

Attachments

  • 3A5636D0-934E-43DA-A9C0-18F168E27EBD.jpeg
    3A5636D0-934E-43DA-A9C0-18F168E27EBD.jpeg
    23.4 KB · Views: 73
Last edited:
I have used time machine with a MacBook Pro 8,1 (2011), running the dosdude1 Catalina patcher.

Just like an unpatched install, I had a TM back up of my patched Catalina install. With this computer,Something on a different partition went wrong, and I had to end up wiping the entire disk, repartitioning, and reinstalling all the OSs.

On a blank SSD, I reinstalled the patched Catalina from the dosdude1 USB stick. When you go through the install and you get to the window in the attachment (or it might say migration assistant), choose “from Time Machine“…… then plug in your TM back up and go through like normal.

The TM back up that I used was from a patched Catalina install. However, as long as you start the install process with a DOSdude1 Catalina USB stick and do a clean install of the OS from the USB stick, I think that any TM back up should work, when you are given the option later on To set up the Mac with the TM back up. Am I incorrect?


hope this was helpful. Cheers.
This solved my problem. Thanks a lot, @TimmuJapan! Now I can sleep again without having this on my mind all the time. I didn't think of this solution via Migration assistant after a clean wipe and fresh install of Catalina. You helped me out. Great comment.
 
  • Like
Reactions: TimmuJapan
An advice. Make full cloned backups. You just have to boot form it and restore again.
Thanks for the tip. I will set it up. Do I have to format the external drive APFS or MacOS Extended (Journaled)? Which program delivers error-free clones, CCC or SuperDuper! or do you use an alternative app? Please inform.
 
Hello
Like @K two already mentioned you have to disable SIP (which is done by the Catalina patcher anyway) and you have to make the root system volume writable using the mount command. Additionally you might need to fix the permissions of all files copied to / like this as an example for the TextInput.framework

Code:
sudo chmod -R 755 /System/Library/PrivateFrameworks/TextInput.framework
sudo chown -R 0:0 /System/Library/PrivateFrameworks/TextInput.framework

As long as you do not add an extension you are fine now.
Hello,

Thanks for the reply, I’m going to give this a shot as soon as I’m back from a trip this Thursday! Thanks again!!!

:)
 
Migration Assistant will use the TM BU. In the Security&Privacy CP, give Migration Assistant permission for Accessibility and Full Disk Access. 🧐
Thank you, K two. Granted permissions as you said, a dry run keeps Migration Assistant stuck in "Configuration". Does it only work after a clean install of Catalina?
 
  • Like
Reactions: K two
Why, why, why... won't my daughter's iMac 8,1 upgrade to macOS 10.15.7?! I tried more and more times to upgrade it with USB stick created with macOS Catalina Patcher. I downloaded macOS it self more times... Now I'm sure it's the last available, installer version 15.7.02. I tried to update booting from USB stick and launching installer while iMac was booted from internal SSD. All seems to went well, but after reboot I'm still on macOS 10.15.6.
Schermata 2021-06-22 alle 23.10.45.png
 
  • Like
Reactions: K two
Why, why, why... won't my daughter's iMac 8,1 upgrade to macOS 10.15.7?! I tried more and more times to upgrade it with USB stick created with macOS Catalina Patcher. I downloaded macOS it self more times... Now I'm sure it's the last available, installer version 15.7.02. I tried to update booting from USB stick and launching installer while iMac was booted from internal SSD. All seems to went well, but after reboot I'm still on macOS 10.15.6.
View attachment 1796582

19H15 is the current full installer. Available via gibMacOS-master. Make certain SIP is disabled before starting.
 

Attachments

  • gibMacOS-master.zip
    505.4 KB · Views: 70
  • Like
Reactions: Dilli
Dosdude1's patcher disables SIP in any case. Like @K two said latest version is 19H15 that you need to ensure you download. Goodluck
 
I didn't control if SIP was disabled (I guess it was) before my post above, but after your answer, I disabled it and tried again to install macOS 10.15.7, in both ways: booting from USB stick and launching the installer from normal booted iMac. This is the screenshot I took the second try:
Schermata 2021-06-23 alle 00.54.16.png

And I can confirm that even after this, iMac is still with macOS 10.15.6.

Now I'm downloading 19H15 installer, I'll try with it too... but I suspect it won't change results. Just a question: after downloaded with gibMacOS.command, do I need some other of the scripts, or can I use directly Dosdude1's patcher to make a new USB stick?
 
Last edited:
  • Like
Reactions: K two and Dilli
You dont need any scripts. You can use Dosdude1's patcher to make a new usb stick if you want.
 
I didn't control if SIP was disabled (I guess it was) before my post above, but after your answer, I disabled it and tried again to install macOS 10.15.7, in both ways: booting from USB stick and launching the installer from normal booted iMac. This is the screenshot I took the second try:
View attachment 1796714
And I can confirm that even after this, iMac is still with macOS 10.15.6.

Now I'm downloading 19H15 installer, I'll try with it too... but I suspect it won't change results. Just a question: after downloaded with gibMacOS.command, do I need some other of the scripts, or can I use directly Dosdude1's patcher to make a new USB stick?

Yes, to build the Catalina installer, drop the output folder w/product id# into the BuildmacOSInstallApp.command shell and the full installer will be made. To check SIP status anytime, enter csrutil status
 
Last edited:
I understood the mystery! After the first part of install process, iMac rebooted from USB stick, but shouldn't. In some way, this interrupted install process, that didn't complete even after manually rebooted with internal drive. The trick was to holding pressed option key, and selecting internal drive after the first reboot. Without this trick, iMac won't update even using 19H15 installer.
 
  • Like
Reactions: Dilli and K two
I understood the mystery! After the first part of install process, iMac rebooted from USB stick, but shouldn't. In some way, this interrupted install process, that didn't complete even after manually rebooted with internal drive. The trick was to holding pressed option key, and selecting internal drive after the first reboot. Without this trick, iMac won't update even using 19H15 installer.
The option/alt "trick" finds the 2nd half of the installer. What Build# is the iMac at? Has NVRAM been reset? 🧐
 
Last edited:
What Build# is the iMac at? Has NVRAM been reset?
What do you mean with "What Build#". It is a iMac8,1, previous macOS was 10.15.6, installed through Dosdude1's patcher, with no issues. Now I can't remember exact macOS build. And for NVRAM reset... I didn't any in the last times. In any case, now the iMac is upgraded to macOS 10.15.7 (19H15), and I guess it will go on until death with it ;-)
 
  • Like
Reactions: K two
sudo mount -uw /

Hello,

I opened terminal and and typed "sudo mount -uw /" and the terminal asked for a password which I put in. I then tried to drag the "libmecabra.dylib" into the "/lib" folder and got the same circle with a slash through it...this doesn't work. I still cannot replace files in this folder?????

:-(
 
DouglasCarroll said:
Hello,

I guess I’m just too dumb to figure this out…here’s my problem. I boot into the “recovery mode” using the dosdude1 Catalina usb flash drive I made, open the terminal, type “csrutil disable”, the terminal “claims that the system integrity has been disabled”, restart the laptop without the usb stick inserted and boot up Catalina, open the “usr/lib” directory, ATTEMPT to drag the “libmecabra.dylib” into the “usr/lib” folder and I get the stupid circle with a slash and the system won’t let me do it….

I verified the system integrity is disabled also with “csrutil status”

What am I doing wrong?

Thanks for any help!
sudo mount -uw /


Hello,

I opened terminal and and typed "sudo mount -uw /" and the terminal asked for a password which I put in. I then tried to drag the "libmecabra.dylib" into the "/lib" folder and got the same circle with a slash through it...this doesn't work. I still cannot replace files in this folder?????

:-(

After remounting Finder needs to be restarted.

Type “killall Finder” and try again
 
sudo mount -uw /


Hello,

I opened terminal and and typed "sudo mount -uw /" and the terminal asked for a password which I put in. I then tried to drag the "libmecabra.dylib" into the "/lib" folder and got the same circle with a slash through it...this doesn't work. I still cannot replace files in this folder?????

:-(
Okay, this was only the half of the truth. I never use the Finder to replace files when I have opened a terminal anyway. You need to enter killall Finder right after the mount command. This restarts the Finder an make it aware of the fact that your root (file system ) became writable.
 
Last edited:
  • Like
Reactions: K two
What do you mean with "What Build#". It is a iMac8,1, previous macOS was 10.15.6, installed through Dosdude1's patcher, with no issues. Now I can't remember exact macOS build. And for NVRAM reset... I didn't any in the last times. In any case, now the iMac is upgraded to macOS 10.15.7 (19H15), and I guess it will go on until death with it ;-)
Congrats. Now learning to update the macOS is next. 🤪
 
Register on MacRumors! This sidebar will go away, and you'll see fewer ads.