Become a MacRumors Supporter for $50/year with no ads, ability to filter front page stories, and private forums.
Status
The first post of this thread is a WikiPost and can be edited by anyone with the appropiate permissions. Your edits will be public.

Toledospod

macrumors newbie
Sep 5, 2020
26
24
Toledo, OH
Device: MacBook Pro 9,2 running macOS Catalina 10.5.6

Hey guys, I'm new in all of this and I'm getting an error. These were my steps in creating the bootable installer through terminal:

1. Open macOS Big Sur Beta 6 package contents, drag the createinstallmedia file into Terminal then add the --volume line and dragged the flash drive to Terminal

2. After the bootable drive was created I dragged the micropatcher.sh file, followed by the bootable installer to Terminal so that it could be patched.

3. I went into Settings > Startup Disk > and selected Install macOS Big Sur Beta to restart (because it is not showing when restarting and holding the Option key to choose where to boot from.

I'll attach the error message on this post. Can anyone guide me through what I'm doing wrong and how to fix it?

View attachment 957739

Sounds like your bootable installer isn't bootable....it should show when you you hold Option at boot, if it doesn't show there, then that means the Mac can't see it as being bootable IMO. I would suggest erasing and creating it again through Terminal

Also, as an observation with your steps after creating the USB installer and patching it, you'll need to go into regular recovery and do the whole 'nv-ram boot-args' command first before you boot from the USB installer, at least thats what I had to do. Feel free to read my post on how I did it - https://forums.macrumors.com/thread...unsupported-macs-thread.2242172/post-28856413
 
  • Like
Reactions: TimothyR734

maví ??

macrumors newbie
Sep 22, 2020
2
2
Naguabo
Sounds like your bootable installer isn't bootable....it should show when you you hold Option at boot, if it doesn't show there, then that means the Mac can't see it as being bootable IMO. I would suggest erasing and creating it again through Terminal

Also, as an observation with your steps after creating the USB installer and patching it, you'll need to go into regular recovery and do the whole 'nv-ram boot-args' command first before you boot from the USB installer, at least thats what I had to do. Feel free to read my post on how I did it - https://forums.macrumors.com/thread...unsupported-macs-thread.2242172/post-28856413


Okay, thank you! I'll try using these steps now.
 
  • Like
Reactions: TimothyR734

Barry K. Nathan

macrumors 6502
Jul 6, 2018
387
1,145
Irvine, CA, USA
Hey guys, I'm new in all of this and I'm getting an error. These were my steps in creating the bootable installer through terminal:
I'm releasing a new version of the patcher (v0.2.0) very soon (in half an hour or less). I'll post again when it's released. It has updated directions. Try following those directions when it comes out, especially the part about using Disk Utility to erase the USB stick and format it with a GUID Partition Map before running createinstallmedia (no, that's not in the current directions).

By the way, you can't choose a macOS 11.0 beta 3 or later volume (including the installer USB) in the Startup Disk preference panel of a pre-Big Sur macOS because of a limitation in the bless command in Catalina and earlier.

Edit: I'm going to need another 15-20 minutes or so probably. What's on the GitHub page now looks like a final v0.2.0 release, and there are no more code changes coming so feel free to download it I guess, but I need to make one more edit to the README before I finally tag and release it as v0.2.0.
 
Last edited:

Barry K. Nathan

macrumors 6502
Jul 6, 2018
387
1,145
Irvine, CA, USA
Big Sur Micropatcher v0.2.0 is finally out. Here are the release notes. (I might update the release notes on GitHub later if I forgot anything.)
This release has a few major changes:

set-vars.sh had some reliability problems from the very beginning, especially on systems where a macOS installation (any macOS installation!) was encrypted with FileVault. However, Big Sur beta 5 added new restrictions on the nvram command that took those reliability problems to a new level (issue #24 in the project's issue tracker on GitHub). After considerable testing and experimentation, I concluded that the best way around this was to modify the nvram variables through direct calls to the EFI firmware API. So, this version of the patcher now adds another program to the EFI partition of a GUID Partition Map-formatted USB stick, "setvars", which runs directly on the EFI firmware without an operating system. You boot into setvars, let it do its thing and power the Mac down (this can take several seconds, but it usually takes less than 1 second), then turn the Mac back on and boot from the patched installer USB as normal. (setvars can also be installed onto a separate USB stick, but this is less elegant so is not described in the README at this time.) Thanks to Travis Parker for suggesting the idea of using the EFI partition on a GPT-formatted USB stick, thereby avoiding the need for a more difficult partitioning setup or a second USB stick.

Now that set-vars.sh has a reliable replacement. I was finally able to integrate the "trampoline" from the ParrotGeek patcher. (Thanks, ParrotGeek!) Now there is no need to run a Terminal command after booting the installer USB but before actually running the installer -- you just start the Installer and go on your way, just like on a supported Mac.

There are also new scripts in the misc-scripts directory for enabling and disabling animations. The script for disabling animations, in particular, makes Big Sur run much faster on Macs without Metal GPUs. Thanks to johncaling40 for these scripts!

Finally, the README has been thoroughly revised. Note that the steps have different numbers now. In particular, the famous "step 9" for installing the kext patches is now step 15.
So let me know if you find any typos or mistakes in the README, and let me know how things go.

As I've mentioned before, I know about the AirDrop problems and about WiFi patch problems more generally. I'll try to improve that situation in a future release. Maybe not v0.2.1, but hopefully not too long after.


moosethegoose2213

macrumors newbie
Jun 12, 2019
18
36
Big Sur Micropatcher v0.2.0 is finally out. Here are the release notes. (I might update the release notes on GitHub later if I forgot anything.)
So let me know if you find any typos or mistakes in the README, and let me know how things go.

As I've mentioned before, I know about the AirDrop problems and about WiFi patch problems more generally. I'll try to improve that situation in a future release. Maybe not v0.2.1, but hopefully not too long after.

On step 19, you misspelled performance. On Modifying the system volume yourself part, and you forgot a space after remount-sysvol.sh. That looked to be about it, but autocorrect may have missed something. I am excited to try out the updated patcher. I'll probably update when someone manages to get delta stuff sorted out
 

Arnoldso

macrumors newbie
Jul 23, 2020
8
20
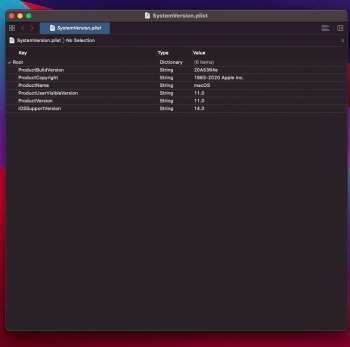
I try to install Delta Beta 8 on a supported mac (Hackintosh) but I got an error and start to download full Installer, at the end I got a 12.2 Gb "Install macOS Big Sur Beta.app" in Aplications, how can I check if it is a full Beta 8 Installer app ??
 

Attachments

  • Captura de Pantalla 2020-09-22 a la(s) 8.10.57 p.m..png
    Captura de Pantalla 2020-09-22 a la(s) 8.10.57 p.m..png
    85.6 KB · Views: 179
  • Like
Reactions: TimothyR734

chris1111

macrumors 6502
Jul 8, 2015
432
1,037
Montréal Canada
I try to install Delta Beta 8 on a supported mac (Hackintosh) but I got an error and start to download full Installer, at the end I got a 12.2 Gb "Install macOS Big Sur Beta.app" in Aplications, how can I check if it is a full Beta 8 Installer app ??
There is no full installer for beta 8
Securebootmodel needs to be disable for update beta 8
⬇︎
247354205_ScreenShot2020-09-22at5_23_15PM.png.8fd37b1573e3072787593f26b9aaf450.png
 

Barry K. Nathan

macrumors 6502
Jul 6, 2018
387
1,145
Irvine, CA, USA
I try to install Delta Beta 8 on a supported mac (Hackintosh) but I got an error and start to download full Installer, at the end I got a 12.2 Gb "Install macOS Big Sur Beta.app" in Aplications, how can I check if it is a full Beta 8 Installer app ??
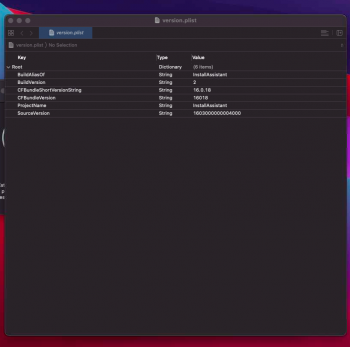
The easiest way to know for sure (in my opinion) is to use createinstallmedia to create a USB, then check System/Library/Preferences/SystemVersion.plist on the USB for the build number.

Having said that, I notice that the version number in your screenshot matches the version number of the beta 6 installer.
 

n0rt0nthecat

macrumors member
Oct 15, 2019
46
57
Big Sur Micropatcher v0.2.0 is finally out. Here are the release notes. (I might update the release notes on GitHub later if I forgot anything.)
So let me know if you find any typos or mistakes in the README, and let me know how things go.

As I've mentioned before, I know about the AirDrop problems and about WiFi patch problems more generally. I'll try to improve that situation in a future release. Maybe not v0.2.1, but hopefully not too long after.


Still some errors in the readme for steps ie: "
  • Late 2013 iMac: Everything should work (and, after step 8, you're finished -- no need for step 9 and later). Note that there have been some reports of very poor performance with Fusion Drives on this model when running Big Sur, which may be why Apple does not support Big Sur on this model.
Think this needs to be update to steps 15 and 16??

Great work also on the patcher. Working ok on my Late 2013 (Booted on external SSD). Just waiting to see what the update process will be going forward once GM is released to see if update my Catalina install on the internal SSD
 

Th3odor3

macrumors regular
Jun 19, 2018
143
35
Santa Clarita, CA, US
I'm releasing a new version of the patcher (v0.2.0) very soon (in half an hour or less). I'll post again when it's released. It has updated directions. Try following those directions when it comes out, especially the part about using Disk Utility to erase the USB stick and format it with a GUID Partition Map before running createinstallmedia (no, that's not in the current directions).

By the way, you can't choose a macOS 11.0 beta 3 or later volume (including the installer USB) in the Startup Disk preference panel of a pre-Big Sur macOS because of a limitation in the bless command in Catalina and earlier.

will the v0.2.0 work with developer beta 8? and if so how?
 
  • Like
Reactions: TimothyR734

Arnoldso

macrumors newbie
Jul 23, 2020
8
20
The easiest way to know for sure (in my opinion) is to use createinstallmedia to create a USB, then check System/Library/Preferences/SystemVersion.plist on the USB for the build number.

Having said that, I notice that the version number in your screenshot matches the version number of the beta 6 installer.

I took a screenshoot of the SystemVersion.plist file and that's right, is B6 ??? .....
 

Attachments

  • Captura de Pantalla 2020-09-22 a la(s) 8.47.01 p.m..png
    Captura de Pantalla 2020-09-22 a la(s) 8.47.01 p.m..png
    88.1 KB · Views: 156

Barry K. Nathan

macrumors 6502
Jul 6, 2018
387
1,145
Irvine, CA, USA
will the v0.2.0 work with developer beta 8? and if so how?
In theory you could use v0.2.0 to get beta 6 on your system, then use some other method to get beta 8 on your system, then v0.2.0's patch-kexts.sh should be able to install the kext patches on top of beta 8. However, this means staying away from patch-kexts.sh during the time period where you have installed beta 6 but not yet updated to beta 8 -- if you run patch-kexts.sh on beta 6, you'll have to reinstall beta 6 to have any chance of being able to update to beta 7 or 8. (It may be theoretically possible for me to fix this, so that unpatch-kexts.sh would be enough instead of having to reinstall beta 6, but I haven't had a chance to try the necessary patch-kexts.sh changes to test the theory yet.)

Does that answer the question?
 

buckrock

macrumors 6502
Jul 24, 2020
297
424
Fresno, California
Big Sur Micropatcher v0.2.0 is finally out. Here are the release notes. (I might update the release notes on GitHub later if I forgot anything.)
So let me know if you find any typos or mistakes in the README, and let me know how things go.

As I've mentioned before, I know about the AirDrop problems and about WiFi patch problems more generally. I'll try to improve that situation in a future release. Maybe not v0.2.1, but hopefully not too long after.

Barry -- Thank you! The Read Me has just one part that confused me. Step 4:

4. (Optional if you are reusing a USB stick which was already patched using micropatcher v0.2.0 or later) Use Disk Utility to erase the USB stick using "Mac OS Extended (Journaled)" format and "GUID Partition Map" scheme. In order for this patcher to run optimally, the USB stick must use GUID Partition Map and not Master Boot Record. (This is a new requirement as of micropatcher v0.2.0.) Note that the volume name does not particularly matter, since it will be renamed by `createinstallmedia` in the next step.

I am not sure what you mean by optional here. It seems like we'd need to erase the stick anyway, since in all cases the user would be creating a new installer to patch. So it doesn't seem optional. ...or am I just stupid?
 

Barry K. Nathan

macrumors 6502
Jul 6, 2018
387
1,145
Irvine, CA, USA
Barry -- Thank you! The Read Me has just one part that confused me. Step 4:

4. (Optional if you are reusing a USB stick which was already patched using micropatcher v0.2.0 or later) Use Disk Utility to erase the USB stick using "Mac OS Extended (Journaled)" format and "GUID Partition Map" scheme. In order for this patcher to run optimally, the USB stick must use GUID Partition Map and not Master Boot Record. (This is a new requirement as of micropatcher v0.2.0.) Note that the volume name does not particularly matter, since it will be renamed by `createinstallmedia` in the next step.

I am not sure what you mean by optional here. It seems like we'd need to erase the stick anyway, since in all cases the user would be creating a new installer to patch. So it doesn't seem optional. ...or am I just stupid?
If I rephrase it like this:
Use Disk Utility to erase the USB stick using "Mac OS Extended (Journaled)" format and "GUID Partition Map" scheme. In order for this patcher to run optimally, the USB stick must use GUID Partition Map and not Master Boot Record. (This is a new requirement as of micropatcher v0.2.0.) Note that the volume name does not particularly matter, since it will be renamed by `createinstallmedia` in the next step. (If this USB stick already contains a patched Big Sur installer created using micropatcher v0.2.0 or later, and you are re-creating it with a newer version of the micropatcher or a newer version of Big Sur, you may skip this step.)
Is that more clear? The idea is that, if you already went through these steps to create a patched bootable USB using micropatcher 0.2.0 or later, and you're redoing it with a newer version of the micropatcher or a newer version of Big Sur (or even just redoing it with the same versions for that matter), then you don't need to do the Disk Utility thing again because createinstallmedia and install-setvars.sh will erase everything that needs to be erased (taking into consideration that Disk Utility was used in the past to apply the proper partition layout the first time).

Edit to add: For what it's worth, if you created the bootable USB pre-micropatcher 0.2.0, without using Disk Utility, and it has the wrong partition layout, and you skip the Disk Utility step, then install-setvars.sh will give you an error message asking you to erase the USB stick with Disk Utility and start over.

Edit 2: Maybe this is an unnecessary shortcut and I simply shouldn't bother mentioning it in the README? Let me know what you think.
 
Last edited:

buckrock

macrumors 6502
Jul 24, 2020
297
424
Fresno, California
If I rephrase it like this:

Use Disk Utility to erase the USB stick using "Mac OS Extended (Journaled)" format and "GUID Partition Map" scheme. In order for this patcher to run optimally, the USB stick must use GUID Partition Map and not Master Boot Record. (This is a new requirement as of micropatcher v0.2.0.) Note that the volume name does not particularly matter, since it will be renamed by `createinstallmedia` in the next step. (If this USB stick already contains a patched Big Sur installer created using micropatcher v0.2.0 or later, and you are re-creating it with a newer version of the micropatcher or a newer version of Big Sur, you may skip this step.)

Is that more clear? The idea is that, if you already went through these steps to create a patched bootable USB using micropatcher 0.2.0 or later, and you're redoing it with a newer version of the micropatcher or a newer version of Big Sur (or even just redoing it with the same versions for that matter), then you don't need to do the Disk Utility thing again because createinstallmedia and install-setvars.sh will erase everything that needs to be erased (taking into consideration that Disk Utility was used in the past to apply the proper partition layout the first time).

Edit to add: For what it's worth, if you created the bootable USB pre-micropatcher 0.2.0, without using Disk Utility, and it has the wrong partition layout, and you skip the Disk Utility step, then install-setvars.sh will give you an error message asking you to erase the USB stick with Disk Utility and start over.

Edit 2: Maybe this is an unnecessary shortcut and I simply shouldn't bother mentioning it in the README? Let me know what you think.

That is more clear to me. In fact, I've always wondered why erase with Disk Utility and then run createinstallmedia which erases again unless it was going to use a different partition protocol. So thanks for clearing that up.

Also, that step 9 efi boot was so quick and quiet (no chime) I didn’t think it worked!
 
Last edited:

Barry K. Nathan

macrumors 6502
Jul 6, 2018
387
1,145
Irvine, CA, USA
That is more clear to me. In fact, I've always wondered why erase with Disk Utility and then run createinstallmedia which erases again unless it was going to use a different partition protocol. So thanks for clearing that up.

Also, that step 9 efi boot was so quick and quiet (no chime) I didn’t think it worked!
I've updated the phrasing of step 4 in the readme on the GitHub page now. Thank you!

I could make step 9 drop into an EFI shell that automatically executes a script (kind of like the APFS booter that dosdude's patch uses on old Macs without APFS ROMs), so it could display messages on the screen, but that would make it much slower, and I also figured it was more important to just make it as reliable as possible. (Also, I couldn't figure out a way to do everything I needed using EFI shell commands alone, which meant I would need to write EFI shell commands of my own in C, at which point it became easier to just do everything as a single C program.)
 

Barry K. Nathan

macrumors 6502
Jul 6, 2018
387
1,145
Irvine, CA, USA
Still some errors in the readme for steps ie: "
  • Late 2013 iMac: Everything should work (and, after step 8, you're finished -- no need for step 9 and later). Note that there have been some reports of very poor performance with Fusion Drives on this model when running Big Sur, which may be why Apple does not support Big Sur on this model.
Think this needs to be update to steps 15 and 16??

Great work also on the patcher. Working ok on my Late 2013 (Booted on external SSD). Just waiting to see what the update process will be going forward once GM is released to see if update my Catalina install on the internal SSD
Oops, I missed this post earlier tonight somehow. The references to steps 8 and 9 should have been corrected to 14 and 15, and I've done that now. Thank you!
 
  • Like
Reactions: TimothyR734

Alex-Microsmeta

macrumors 6502
Jul 14, 2018
376
630
Rome
Still some errors in the readme for steps ie: "
  • Late 2013 iMac: Everything should work (and, after step 8, you're finished -- no need for step 9 and later). Note that there have been some reports of very poor performance with Fusion Drives on this model when running Big Sur, which may be why Apple does not support Big Sur on this model.
Think this needs to be update to steps 15 and 16??

Great work also on the patcher. Working ok on my Late 2013 (Booted on external SSD). Just waiting to see what the update process will be going forward once GM is released to see if update my Catalina install on the internal SSD
Very good! iMac late 2013 is my main mac, I'll use 0.20.0 on SSD
 

borp99

macrumors regular
Jun 25, 2020
139
151
Sort of on point regarding beta 7 and 8, I’d reinstalled beta 6 using the Hax3 method from Catalina (not with USB stick) and had it running fine as an unsealed system. I usually always delete snapshots as well but the OTAswufix requires that the OS is booted from a snapshot, so I left the initial ‘update’ one in place.

After booting with OpenCore 0.61, the delta beta 7 (3.61GB) showed up, downloaded and failed to install (as reported by many) but then initiated a full download (11.52GB - also reported). While all of this was happening in real time, I searched where these files were being placed. The S/Volumes/Update had a folder ‘softwareupdate.xxx(x).xxxxxx’ (3 or 4 + 6 characters) generated but the files were not where the delta files were installed. A ‘source’ alias inside this folder pointed to the ‘AssetData’ folder inside the S/L/AssetsV2/com_apple_MobileAsset_MacSoftwareUpdate_MacUpdateBrain/xxx...xxx.asset/ folder. (xxx...xxx = 40 characters)

Now, interestingly, as the full installer was being prepared by the system after its download, the files reduced from 11.52GB down to 2.94GB without any interaction by me (presumably deleting all unnecessary files which already existed and didn’t need overwriting). The auto reboot to install the reduced update happened and proceeded somewhat but at some point (not witnessed), my MP5,1 switched off completely. Restarting and selecting EFI (OpenCore) or the temp macOSInstall volume was a bit hit and miss, with experimenting I stopped documenting out of frustration, but eventually I ended up with Beta 7 installed just fine. Sadly, though, I could only boot into this with OpenCore and not from the Mac’s own Option key screen or using rEFInd (my preferred bootloader). The circle/cross symbol barred these other methods from booting - and my previously Sealed/‘No’ beta 6 status became ‘Broken’ with the completion of beta 7. I haven’t tried beta 8 but expect the same result. Note: the temp 3.61GB or 11.52->2.94GB delta update files are purged after each failed or successful update.

Could these delta updates simply be extracted to the correct AssetsV2 folder mention above and then trigger the availability of an update in the PrefPane? I doubt it, as there are self-generated placeholder files added to the Updates (and PreBoot?...think I noticed something change) volume(s) and ‘com_apple_MobileAsset_MacSoftwareUpdate’ folder (not the ‘Brain’ one) as well, and these don’t seem to come with the SummerUpdate zip file. No one seems to have asked...if Apple is providing developers with these delta updates to test out the steadily advancing bug crushing of BS and/or their own software to run on it, how are these developers installing these updates? No one on this forum seems privy to this secret information and we’re running around blindly guessing and largely shrugging off the wasted hours waiting for a proper full installer to turn up on Apple’s servers.
 
Last edited:

jackluke

macrumors 68040
Jun 15, 2018
3,321
8,068
As I've mentioned before, I know about the AirDrop problems and about WiFi patch problems more generally. I'll try to improve that situation in a future release. Maybe not v0.2.1, but hopefully not too long after.


To fix AirDrop for Ivy Bridge Mac with a Broadcom 802.11n "Wifi 4" card simply use the stock Mojave IO80211Family.kext that contains mainly the required AirPortBrcm4360.kext (plugin) , moreover it also contains the driver for legacy Broadcom Wifi cards.

Instead for Broadcom 802.11ac (also some Ivy Bridge have the "Wifi 5") you should use the stock BigSur IO80211Family.kext .
 

Arnoldso

macrumors newbie
Jul 23, 2020
8
20
In theory you could use v0.2.0 to get beta 6 on your system, then use some other method to get beta 8 on your system, then v0.2.0's patch-kexts.sh should be able to install the kext patches on top of beta 8. However, this means staying away from patch-kexts.sh during the time period where you have installed beta 6 but not yet updated to beta 8 -- if you run patch-kexts.sh on beta 6, you'll have to reinstall beta 6 to have any chance of being able to update to beta 7 or 8. (It may be theoretically possible for me to fix this, so that unpatch-kexts.sh would be enough instead of having to reinstall beta 6, but I haven't had a chance to try the necessary patch-kexts.sh changes to test the theory yet.)

Does that answer the question?

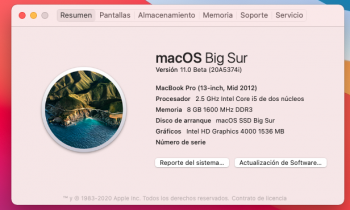
Using @jackluke opencore 4.2, I upgraded my MBP 9.2 mid 2012 to B8, the only trouble I encountered was adding to NVRAM the boot-args="-no_compat_check" parameter 'cause opencore delete it, to solve, I hit CMD+r to get into Internet Recovery and from its terminal add NVRAM parameter that was missing to boot without the opencore USB, after that I used a USB with B6 patched with @Barry K. Nathan v0.2.0 patch to get the WiFi working again.
 

Attachments

  • Captura de Pantalla 2020-09-23 a la(s) 1.11.11.png
    Captura de Pantalla 2020-09-23 a la(s) 1.11.11.png
    144.8 KB · Views: 349
Register on MacRumors! This sidebar will go away, and you'll see fewer ads.