Become a MacRumors Supporter for $50/year with no ads, ability to filter front page stories, and private forums.
Status
The first post of this thread is a WikiPost and can be edited by anyone with the appropiate permissions. Your edits will be public.

MacPeet

macrumors member
Jul 26, 2018
57
115
germany
@jackluke

I need DoNotSeal for the MacPro3,1.
No problem up to DP6 with full installer.

Now direct update to DP8. After downloading and restarting ...
System / Volumes / Updates / mnt1 is empty
System / Library / AssertsV2 lots of files
... not an option for DoNotSeal.

I've done the installation twice now, but BigSur is sealed each time.

Do you have any idea?
 

jackluke

macrumors 68040
Jun 15, 2018
3,321
8,068
@jackluke

I need DoNotSeal for the MacPro3,1.
No problem up to DP6 with full installer.

Now direct update to DP8. After downloading and restarting ...
System / Volumes / Updates / mnt1 is empty
System / Library / AssertsV2 lots of files
... not an option for DoNotSeal.

I've done the installation twice now, but BigSur is sealed each time.

Do you have any idea?

You should after downloading the beta 8 OTA packages let to complete the "Preparing macOS Big Sur beta 8" phase that can take up to one hour and it occurs directly on BigSur desktop (the UI becomes very slow responsive during this phase that is a kind of updating a non snapshot system mounted volume), after that phase completes a popup shows upper-right and tells that within a minute system auto restart to continue update, you should instead select from that window to postpone and update later.

Then you can access this folder (the stage2 installer): /System/Volumes/BigSurLabel/macOS Install Data/

and here you should find (or copy directly the one I linked UpdateOptions.plist.zip) a UpdateOptions.plist file where you can edit the DoNotSeal dictionary key.

Anyway it's not a big deal having a sealed system because you can anyway disable snapshot booting to use "sudo mount -uw /" and also you can mount and write a BigSur sealed System from other BigSur installation (other than from its recovery), for example from a BigSur beta 4 desktop (I have this version for non-APFS Mac) I can mount and write a sealed BigSur beta 8 System .
 
Last edited:

baronsekeber

macrumors newbie
Jul 13, 2020
5
7
You should after downloading the beta 8 OTA packages let to complete the "Preparing macOS Big Sur beta 8" phase that can take up to one hour and it occurs directly on BigSur desktop (the UI becomes very slow responsive during this phase that is a kind of updating a non snapshot system mounted volume), after that phase completes a popup shows upper-right and tells that within a minute system auto restart to continue update, you should instead select from that window to postpone and update later.

Then you can access this folder (the stage2 installer): /System/Volumes/BigSurLabel/macOS Install Data/

and here you should find (or copy directly the one I linked UpdateOptions.plist.zip) a UpdateOptions.plist file where you can edit the DoNotSeal dictionary key.

Anyway it's not a big deal having a sealed system because you can anyway disable snapshot booting to use "sudo mount -uw /" and also you can mount and write a BigSur sealed System from other BigSur installation (other than from its recovery), for example from a BigSur beta 4 desktop (I have this version for non-APFS Mac) I can mount and write a sealed BigSur beta 8 System .

Dear @jackluke

i am interesting on you can mount and write a sealed BigSure beta8, with BigSur beta 4.
my question is, did your BigSur beta4 is Sealed or not sealed to do that?

thanks.
 

jackluke

macrumors 68040
Jun 15, 2018
3,321
8,068
Dear @jackluke

i am interesting on you can mount and write a sealed BigSure beta8, with BigSur beta 4.
my question is, did your BigSur beta4 is Sealed or not sealed to do that?

thanks.

Beta 4 not sealed , but I guess it should work also from another sealed BigSur.

Consider that from a snapshot booting sealed you can mount and write the system volume with: sudo diskutil mount diskXs5

the label is "YourBigSurLabel"\ 1 (can notice this easily from DiskUtility)
 
Last edited:

Husseinabd40

macrumors newbie
Jun 26, 2020
5
5
Iraq
I have installed Big Sur Beta 5 on an external SSD on MBP 15 early 2013, from Catalina using Hax hacking. It works fine without Wifi support, I use Apple Thunderbolt Ethernet adaptor for networking (for now).
Now, I am trying to use @jackluke USBOpenCoreAPFSloader4s. When I boot using Opencore, I got Preboot and Big Sur recorvery options, having selected Preboot it shows a stop sign and after few seconds it reverts back to former options.

With CMD+V I got results as in the picture.

IMG_0368.png


Is there something that I am missing? How can I boot successfully with USBOpenCoreAPFSloader4s?
 

jackluke

macrumors 68040
Jun 15, 2018
3,321
8,068
I have installed Big Sur Beta 5 on an external SSD on MBP 15 early 2013, from Catalina using Hax hacking. It works fine without Wifi support, I use Apple Thunderbolt Ethernet adaptor for networking (for now).
Now, I am trying to use @jackluke USBOpenCoreAPFSloader4s. When I boot using Opencore, I got Preboot and Big Sur recorvery options, having selected Preboot it shows a stop sign and after few seconds it reverts back to former options.

With CMD+V I got results as in the picture.

View attachment 960194

Is there something that I am missing? How can I boot successfully with USBOpenCoreAPFSloader4s?

Try this:
https://forums.macrumors.com/thread...unsupported-macs-thread.2242172/post-28948321
 

jackluke

macrumors 68040
Jun 15, 2018
3,321
8,068
I didn't need snapshots to upgrade to Delta Beta 8
I don't need any modifications to the Big Sur installation, except NVRAM.
replaces my Airport wifi card with a compatible one.

I just ran the OpenCore boot drive to recognize the OTA updates, after preparing the installation and restarting, I booted up the Mojave or Catalina installer and applied the NVRAM settings and restarted, he followed up with the Delta update for Beta 8.

View attachment 959946

Without snapshots I only got a full beta 6 installer from Software Update, I guess you already had a stock apple snapshot.

Could you check this:
Code:
diskutil info / | grep Sealed
diskutil apfs listSnapshots /
sudo mount -uw /
 

webg3

macrumors 6502a
Jul 19, 2018
507
774
Without snapshots I only got a full beta 6 installer from Software Update, I guess you already had a stock apple snapshot.

Could you check this:
Code:
diskutil info / | grep Sealed
diskutil apfs listSnapshots /
sudo mount -uw /

You're right, but you should have created this snapshot automatically, as I just installed the micropatcher (beta 6) and nvram.

Run bootdrive OpenCore for updating via OTA.

Captura de Tela 2020-09-27 às 12.52.46.png
 

jackluke

macrumors 68040
Jun 15, 2018
3,321
8,068
You're right, but you should have created this snapshot automatically, as I just installed the micropatcher (beta 6) and nvram.

Run bootdrive OpenCore for updating via OTA.

View attachment 960224

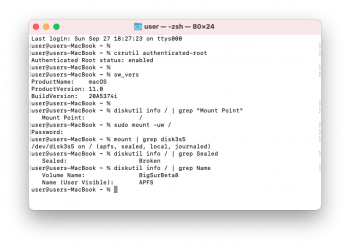
That snapshot is created automatically by apple during an installation or update, Sealed: Broken I get it also with a working sudo mount -uw / and sealed system, so I guess your system after the delta update is sealed now, you could check typing mount on the first output line diskXs5s1 should read also sealed.

But I repeat the only issue of a sealed system is that cannot mount or write System volume from previous APFS macOS, but patching kext and deleting snapshots is doable, also the Data Volume, Preboot and Recovery are writable from other macOS .
 

Attachments

  • beta 8 sealed mount.png
    beta 8 sealed mount.png
    106.6 KB · Views: 223

Bmju

macrumors 6502a
Dec 16, 2013
702
768
Hi - I've got Big Sur beta 6 working perfectly on a late 2012 13" Macbook Pro with an upgraded ac WiFi card. So, many thanks to the work of everybody here that makes that possible! I used `big-sur-micropatcher` 0.2.0 (which was current when I downloaded it a couple of days ago!). I did the extra sealing step #12, as I understood this means that OTA updates are more likely to work OOB (as long as I don't need to patch the wireless kext, which I don't). But I'm not being offered any OTA updates (at least, not in the normal About This Mac/Software Update...). I was on the public beta channel, I tried using `seedutil` to change to develop (which worked, according the the Software Update screen), but no change, I'm still not being offered any update. Can anyone help point me as to what I am doing wrong!

EDIT: `diskutil info / | grep Sealed` shows `Sealed: Broken`, so I guess for whatever reason step #12 didn't result in a 'sealed' install, which I think is enough to explain why I'm not getting offered OTA updates.

EDIT TO MY EDIT: The first output line of `mount` shows `/dev/disk2s5s1 on / (apfs, sealed, local, read-only, journaled)`, so now I don't know whether I have a sealed install or not!
 
Last edited:

mikentosh

macrumors newbie
Oct 19, 2002
27
19
Earth
I have new problem since updating to D8, actually the opposite of the user in post #4508. I have a late 2013 iMac. I ran a clean install of Beta 6. I used the instructions at Barry's Github page (from post #4465), and I stopped at step 15 like it said. I then created an OpenCore thumb drive (from post #4466 here). Rebooted, held down option, chose OpencoreAPFSloader4s1, then continued with my boot drive. I was able to run the Software Update just fine. Only took about 15-20 minutes to process the 3GB update. When it rebooted, I got the "stop sign", so I rebooted again with the thumb drive in and held down option, etc... It then continued to process the D8 update. When it rebooted during the update, I had to again use the thumb drive, but it continued to update just fine. I now have a successful install of D8, but now every time I reboot my machine I get the stop sign and I have to use the thumb drive. Also, my hard drive continues to say Preboot every time use OpencoreAPFSloader4s1 to boot. I suppose I need to patch something, but I'm at a loss as to what.
 

jackluke

macrumors 68040
Jun 15, 2018
3,321
8,068
Hi - I've got Big Sur beta 6 working perfectly on a late 2012 13" Macbook Pro with an upgraded ac WiFi card. So, many thanks to the work of everybody here that makes that possible! I used `big-sur-micropatcher` 0.2.0 (which was current when I downloaded it a couple of days ago!). I did the extra sealing step #12, as I understood this means that OTA updates are more likely to work OOB (as long as I don't need to patch the wireless kext, which I don't). But I'm not being offered any OTA updates (at least, not in the normal About This Mac/Software Update...). I was on the public beta channel, I tried using `seedutil` to change to develop (which worked, according the the Software Update screen), but no change, I'm still not being offered any update. Can anyone help point me as to what I am doing wrong!

EDIT: `diskutil info / | grep Sealed` shows `Sealed: Broken`, so I guess for whatever reason step #12 didn't result in a 'sealed' install, which I think is enough to explain why I'm not getting offered OTA updates.

EDIT TO MY EDIT: The first output line of `mount` shows `/dev/disk2s5s1 on / (apfs, sealed, local, read-only, journaled)`, so now I don't know whether I have a sealed install or not!

Regardless of sealed or not, the main requirement to get OTA update on unsupported Mac are a snapshot booting that you have and a board id spoofing that you don't have.

For spoofing a supported BigSur Mac try this: https://forums.macrumors.com/thread...unsupported-macs-thread.2242172/post-28952250
 

jackluke

macrumors 68040
Jun 15, 2018
3,321
8,068
I have new problem since updating to D8, actually the opposite of the user in post #4508. I have a late 2013 iMac. I ran a clean install of Beta 6. I used the instructions at Barry's Github page (from post #4465), and I stopped at step 15 like it said. I then created an OpenCore thumb drive (from post #4466 here). Rebooted, held down option, chose OpencoreAPFSloader4s1, then continued with my boot drive. I was able to run the Software Update just fine. Only took about 15-20 minutes to process the 3GB update. When it rebooted, I got the "stop sign", so I rebooted again with the thumb drive in and held down option, etc... It then continued to process the D8 update. When it rebooted during the update, I had to again use the thumb drive, but it continued to update just fine. I now have a successful install of D8, but now every time I reboot my machine I get the stop sign and I have to use the thumb drive. Also, my hard drive continues to say Preboot every time use OpencoreAPFSloader4s1 to boot. I suppose I need to patch something, but I'm at a loss as to what.

When exiting from opencore nvram and csrutil are cleared, so you should set from a macOS Recovery at least -no_compat_check anyway these steps should fix too:

From opencore select Preboot to load BigSur (normal booting), open terminal and copy paste (one line at once):
Code:
sudo rm /System/Volumes/Preboot/*/System/Library/CoreServices/PlatformSupport.plist

sudo bless --folder /System/Volumes/Preboot/*/System/Library/CoreServices --bootefi /System/Volumes/Preboot/*/System/Library/CoreServices/boot.efi --label BigSur

while instead to rename the Preboot label on opencore use this: https://forums.macrumors.com/threads/opencore-on-the-mac-pro.2207814/post-28710595
 

justperry

macrumors G5
Aug 10, 2007
12,629
9,934
I'm a rolling stone.
Related but a bit Off Topic, there was a comment above including this (diskutil apfs listSnapshots /) command which showed me the below output.

Can I somehow delete these snapshots, 4 out of 5 are purgeable.
I only found out how to delete local snapshots when I searched the web, not these.


diskutil apfs listSnapshots /
Snapshots for disk2s5s1 (5 found)

|+-- 07B8C575-1DE9-4026-86ED-9E1B24DC983E
| Name: com.apple.os.update-1CACCA8B9167E48660AF1212F25BE50BEA7E29C025BADFC0801A643798DFE322
| XID: 11908885
| Purgeable: No
| NOTE: This snapshot limits the minimum size of APFS Container disk2

|+-- 5B67866E-5E50-408E-9C09-1E3653FC299B
| Name: com.apple.bless.921C4255-753D-4FB9-A6BC-87F6FF71F078
| XID: 11909040
| Purgeable: Yes

|+-- 81EE4371-BC64-4669-8141-97F9977D732D
| Name: com.apple.bless.C3CDD891-333C-43B7-B9D5-55EFF83F1DD5
| XID: 12022513
| Purgeable: Yes

|+-- A31BFCE9-B96F-48F9-B551-3E4A5B57C105
| Name: com.apple.bless.46CDC36B-F999-43C0-9BE5-F1F1EDB86029
| XID: 12022523
| Purgeable: Yes

|+-- E916EC3E-24D2-4795-9453-E5B29683E9BB
|Name: com.apple.bless.B434869C-E21F-4900-973A-29D18A2F6345
|XID: 9223372036866807103
|Purgeable: Yes

I found this

Usage: diskutil apfs deleteSnapshot|deleteVolumeSnapshot <apfsVolumeDisk>
-uuid <snapshotUUID> | -xid <snapshotXIDNumber> | -name <snapshotName>
where <apfsVolumeDisk> = APFS Volume DiskIdentifier
<snapshotUUID> = an APFS Snapshot UUID string (preferred)
<snapshotXIDNumber> = an APFS Snapshot ID Number in decimal
<snapshotName> = an APFS Snapshot Name (not mountpoint)
Remove the specified APFS Snapshot from the specified APFS Volume. The ability to restore the state of the APFS Volume to that point in its evolution is lost.
The APFS Volume must be unlocked and mounted; the Snapshot must not be mounted.
Ownership of the affected disks is required.
Example:
diskutil apfs deleteSnapshot disk5s1 -uuid <UUID>
diskutil apfs deleteSnapshot disk5s1 -name MySnap1
 
Last edited:
  • Like
Reactions: TimothyR734

mikentosh

macrumors newbie
Oct 19, 2002
27
19
Earth
When exiting from opencore nvram and csrutil are cleared, so you should set from a macOS Recovery at least -no_compat_check anyway these steps should fix too:

I finally got it to boot on its own. I had to temporarily boot from a Catalina thumb drive and execute the commands from there since I couldn't even boot from the Recovery partition without using OpenCore.(I couldn't execute csrutil or nvram commands while booting using OpenCore.) Anyway, thanks a million.
 

jackluke

macrumors 68040
Jun 15, 2018
3,321
8,068
Related but a bit Off Topic, there was a comment above including this (diskutil apfs listSnapshots /) command which showed me the below output.

Can I somehow delete these snapshots, 4 out of 5 are purgeable.
I only found out how to delete local snapshots when I searched the web, not these.


diskutil apfs listSnapshots /
Snapshots for disk2s5s1 (5 found)

|+-- 07B8C575-1DE9-4026-86ED-9E1B24DC983E
| Name: com.apple.os.update-1CACCA8B9167E48660AF1212F25BE50BEA7E29C025BADFC0801A643798DFE322
| XID: 11908885
| Purgeable: No
| NOTE: This snapshot limits the minimum size of APFS Container disk2

|+-- 5B67866E-5E50-408E-9C09-1E3653FC299B
| Name: com.apple.bless.921C4255-753D-4FB9-A6BC-87F6FF71F078
| XID: 11909040
| Purgeable: Yes

|+-- 81EE4371-BC64-4669-8141-97F9977D732D
| Name: com.apple.bless.C3CDD891-333C-43B7-B9D5-55EFF83F1DD5
| XID: 12022513
| Purgeable: Yes

|+-- A31BFCE9-B96F-48F9-B551-3E4A5B57C105
| Name: com.apple.bless.46CDC36B-F999-43C0-9BE5-F1F1EDB86029
| XID: 12022523
| Purgeable: Yes

|+-- E916EC3E-24D2-4795-9453-E5B29683E9BB
|Name: com.apple.bless.B434869C-E21F-4900-973A-29D18A2F6345
|XID: 9223372036866807103
|Purgeable: Yes

I found this

Usage: diskutil apfs deleteSnapshot|deleteVolumeSnapshot <apfsVolumeDisk>
-uuid <snapshotUUID> | -xid <snapshotXIDNumber> | -name <snapshotName>
where <apfsVolumeDisk> = APFS Volume DiskIdentifier
<snapshotUUID> = an APFS Snapshot UUID string (preferred)
<snapshotXIDNumber> = an APFS Snapshot ID Number in decimal
<snapshotName> = an APFS Snapshot Name (not mountpoint)
Remove the specified APFS Snapshot from the specified APFS Volume. The ability to restore the state of the APFS Volume to that point in its evolution is lost.
The APFS Volume must be unlocked and mounted; the Snapshot must not be mounted.
Ownership of the affected disks is required.
Example:
diskutil apfs deleteSnapshot disk5s1 -uuid <UUID>
diskutil apfs deleteSnapshot disk5s1 -name MySnap1

Even if in some cases deleting snapshots worked also from desktop, you should do that from a BigSur Recovery environment.

diskutil list

(locate your BigSur system diskXs5)

mount -uw /Volumes/YourBigSurLabel

now you should delete the snapshots in this way:

diskutil apfs deleteSnapshot /Volumes/YourBigSurLabel (or diskXs5) -xid yoursnapshotnumber

if some snapshot fail to delete you should delete the penultimate example xid 12022523

but if you want just to allow "sudo mount -uw /" and disable snapshot booting, use this ASentientBot method:

cd /S*/L*/File*/apfs*/C*/R*/

./apfs_systemsnapshot -v /Volumes/YourBigSurLabel -r ""

if you get this output: "Attempting tagging of snapshot on volume: /Volumes/YourBigSurLabel/

At next reboot "sudo mount -uw /" should work and so you can make any system modification.
 

Barry K. Nathan

macrumors 6502
Jul 6, 2018
387
1,145
Irvine, CA, USA
Exactly that, I have never been able to boot Linux (Distros) on my 2012 MM and 2012 MBP, Windows boots though.

I haven't been able to:

Update my Samsung Pro SSD Firmware from a (Linux) boot CD
Run any Linux distribution, like Live CD's
Any Live CD's/USB sticks with for instance Security Live CD Distros

They just don't boot, and I've tried hard.
That's weird. I've had *no* problems with any of those on my mid-2012 non-Retinas. (For what it's worth, the Ubuntu 20.04.1 live/installer also boots fine off of a USB stick on even my 2011's.)
 
  • Like
Reactions: TimothyR734

Barry K. Nathan

macrumors 6502
Jul 6, 2018
387
1,145
Irvine, CA, USA
EDIT TO MY EDIT: The first output line of `mount` shows `/dev/disk2s5s1 on / (apfs, sealed, local, read-only, journaled)`, so now I don't know whether I have a sealed install or not!
mount will show "sealed" if the system volume has ever been sealed, even if the seal is broken. At least, that's my experience with it. (I don't have time to comment on the rest of your post right now, sorry.)
 

Barry K. Nathan

macrumors 6502
Jul 6, 2018
387
1,145
Irvine, CA, USA
When exiting from opencore nvram and csrutil are cleared, so you should set from a macOS Recovery at least -no_compat_check
Or boot the EFI Boot partition of a USB installer that's been patched with micropatcher v0.2.0 or later -- that will also set boot-args and csrutil stuff again, and it's quicker than booting into a macOS Recovery.
 

Bmju

macrumors 6502a
Dec 16, 2013
702
768
*** EDIT ***

This method is no longer safe. Multiple reports on the web suggest that it can completely brick your Mac so that hardware (specifically, the IO board) needs replacing - though in my own experience simply disconnecting the battery, then holding the power button for a few seconds (to clear what is presumably some unusable setting in NVRAM or PRAM) seems to always (multiple times now) fix it for me.

Anyway, be aware that although Apple have now fixed this problem for all supported Macs in Big Sur 11.1 and upwards, that it can STILL happen with this method - because your Mac is being faked to a much newer model, to which the incompatible update will still be applied.

There is a work-around:

Always update using Apple's create-install-media instructions (you can Google for these) from a full download of the OS. You will still need to use @jackluke's sideloader as below to allow various steps of that process to run (not be blocked by Apple) on an incompatible Mac, but so far, unlike incremental updates, it has always proven safe. This is a shame, because incremental updates download much faster (~3GB) and install much faster than full updates (~12GB).

---

After being pointed in the right direction by @jackluke, I've got an *unpatched* Big Sur beta 8 running on a Late 2012 Retina MBP. I did not use big-sur-micropatcher or in any way patch the downloads, it relies on @jackluke's id spoofing and on manually setting -no_compat_check when needed.

I think this could be applied to any Mac where the only incompatibility with Big Sur is that the Wi-Fi card needs to be upgraded (and I think that means late 2012 and early + mid 2013 retina MPBs only?).

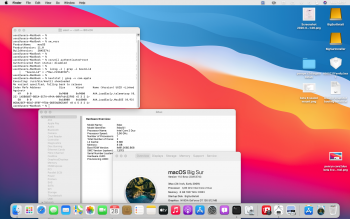
Here's a screenshot. :

Screenshot 2020-09-28 at 13.47.55.png


To install unpatched Big Sur beta 6:
  1. Upgrade the physical WiFi card on your Mac, to either of BCM94360CS or BCM94360CSAX (worth noting as a positive side effect of this, I found this gives much more reliable Bluetooth pairing than the original component)
  2. Make a USBopencore4s1 Mac id spoofing disk from @jackluke's zip file
  3. If you're happy to install in place over your existing OS then simply: enroll your Mac in the beta program; boot your existing OS via USBopencore, go to 'About This Mac/Software Update...' (and untick auto-update if ticked); you should be offered the beta upgrade and can upgrade in place, but you'll have to adapt the remainder of these steps yourself
  4. If you want to install onto a separate partition (recommended):
  5. Create a partition to install onto (min. 35Gb is recommended)
  6. Create an SSD partition to install from (13.5Gb is needed for macOS beta 6); this is normally done using a USB, not a partition, but I could not get OpenCoreAPFSLoader4s1 on a USB to successfully boot another USB (maybe I just didn't wait long enough?); though this means setting up more partitions, it at least has the advantage that creating the install media and installing from it is quicker than with a USB
  7. Get hold of the Big Sur beta 6 download package, and run createinstallmedia from it onto the 13.5Gb partition
  8. Boot holding down ⌘, select OpenCoreAPFSLoader4s1, then select your (unpatched) install partition in the next screen
  9. At a certain point this will try to reboot into a 'macOS Installer' partition, and you will get a 'no entry' sign
  10. Set -no_compat_check as follows (which you will also need to do again later, after receiving the OTA update): reboot holding down ⌘+R, wait for recovery mode, open a terminal, enter the command nvram boot-args="-no_compat_check"
  11. Reboot (without using OpenCoreAPFSLoader4s1), allow to complete, you should now have a running, unpatched macOS beta 6

If you decide to use Big Sur installed like this, you may find it helpful to set up this much quicker way of setting boot-args="-no_compat_check". (Which you are going to need to do again occasionally, e.g. after resetting your NVRAM, and after booting through OpenCore to get offered upgrades.)


To receive the OTA update to beta 8:
  1. Boot into Big Sur via OpenCoreAPFSLoader4s1
  2. Go to Software Update; now that your id is spoofed by booting via USBopencore, you should see the update available; get it
  3. For me it went through 'An Update is Available' and 'Preparing...' twice, but it only downloaded the update once (downloading ~3.6Gb). Preparing this update takes quite a long time.
  4. When it comes to restarting during the update, be *sure* to boot into the temporary 'macOS Installer' partition (which has been made for you by the beta 8 updater) using OpenCoreAPFSLoader4s1 (I rebooted into the main Big Sur partition, without using USBopencore, and ending up having to fetch the update all over again; I'm not sure whether that's because I went into the wrong partition, or because I didn't use USBopencore, or both)
  5. At a certain point this will reboot again and show a no entry sign: set -no_compat_check once again (as per step #10 above), reboot (without using OpenCoreAPFSLoader4s1) and allow to continue
  6. You should now have a completely unpatched macOS beta 8
 
Last edited:

nandor690

macrumors 6502
Jun 25, 2011
374
221
Just did an internal install on my Mac Pro 5,1 from a big-sur-micropatcher modified installer Big Sur beta 6. I can run it unpatched with my RX-580 and updated BLE/WiFi. Watch unlocking does not work without patching, not sure it is worth the trouble. I had issues with an external drive updated to beta 7, so I will skip that.

I had few spurious error messages during the initial installer dialogs, but then installing and migrating worked smoothly. Big Sur is sharing a container with a Mojave install and a Shared data volume on a 2TB SSD.

My main Catalina install on an M2 drive will stay untouched for now. It is working flawlessly.

Thanks barykn and other contributors.
What kind of patches did you use to get handoff and continuity working? And unlocking with Apple Watch?
 
  • Like
Reactions: TimothyR734

jackluke

macrumors 68040
Jun 15, 2018
3,321
8,068
About Penryn Core2Duo Legacy USB and non-APFS Mac, I patched a beta 8 BaseSystem.dmg and it still works with my BaseSystem Legacy USB fix (so this eventually could be used as BigSur Recovery for non-APFS Mac), but to continue the staged installer is required USBopencore and a replacement of patched BKE on these paths:

/APFS Data Volume/macOS Install Data/Locked Files/BootKernelExtensions.kc
/APFS Data Volume/boot/BootKernelExtensions.kc
/APFS Preboot/UUIDBigSur/boot/System/Library/KernelCollections/BootKernelExtensions.kc

Thanks to @ASentientBot method downgrading the beta 6 kernel and an updated version of usbopencore I was able to boot with CMD+S and exit on a non-APFS Mac (legacy USB) the beta 8 through an external USB SSD installation .

I uploaded the patched BKE that embeds beta 8 extensions and beta 6 kernel here: https://github.com/jacklukem/BigSurfixes/tree/master/penryn c2d bigsur beta6

because a beta 6 kernel is required to boot BigSur with Penryn Core2Duo.

Meanwhile I attach the updated usbopencore that is not for spoofing or OTA updates, but mainly to inject some legacy kext on the BootKernelExtensions.kc still experimental and legacy USB booting works only with CMD+S and exit (stock Recovery 11.0 beta 6 also works, I'd advise to keep a beta 6 BaseSystem.dmg copy).

To use the bootloader simply copy the EFI folder to any FAT32 formatted volume, then reboot with alt-option key and select EFI Boot.
 

Attachments

  • legacy USB Mac beta 8 BKE with beta 6 kernel usbopencore.png
    legacy USB Mac beta 8 BKE with beta 6 kernel usbopencore.png
    1.5 MB · Views: 291
  • OpenCoreAPFSloader4s1.zip
    6.2 MB · Views: 435

sinbad21

macrumors regular
Nov 5, 2017
182
186
France
[...]

To install unpatched Big Sur beta 6:
  1. Upgrade the physical WiFi card on your Mac, to either of BCM94360CS or BCM94360CSAX (worth noting as a positive side effect of this, I found this gives much more reliable Bluetooth pairing than the original component).

These cards are wifi n, not wifi ac. What is the difference with the original card of the MBP mid 2012 ?
 
  • Like
Reactions: macinfo
Register on MacRumors! This sidebar will go away, and you'll see fewer ads.