Become a MacRumors Supporter for $50/year with no ads, ability to filter front page stories, and private forums.
i hate electricity

Plug the 6-pin into the motherboard. Take either the 8-pin or 6-pin (honestly, it doesn't matter one bit) and then plug in one of the molex plugs into the second optical drive power plug-in. I wasn't able to do that without removing the optical drive itself and having it sit on a stack of books outside the machine :D but you could always grab an extension cable if you don't want to wait a week for ATI to ship you another 6-pin PCIe cable.

The discrepancy in how I had the card comes from this: at the time of the earlier post, that was how I had it. At the time of the pictures I'd posted, I'd received my new power cable from ATI and was using that. No, your card isn't the same as mine - you have the Turbo edition, mine is similar but has the standard clock.

Yes, I put a 6-pin PCIe cable into an 8-pin slot. No power issues at all, it runs exactly the same as it did when I was using the molex cable. Both the PCIe cables are attached to the motherboard - if you'd like more pictures I can take them.

It looks like from the picture you've posted that you have the cables plugged into the molex adapters properly, but I can't see the other end of them so who knows what's going on down there. :)

LOL
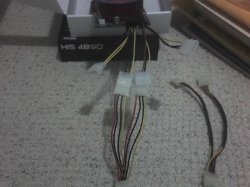
Thank you. "What's going on down there" is what is pictured on the left or first below - 2 molex plugs, one from each of the 6-and 8-pin cables, plugged into the first of the 2 molex splitter cables... both ports on that first splitter filled. The second splitter would be used only as an extension to get the one end (at bottom of image) up to the optical bay. It is as ghetto as it looks... and in retrospect sounds (and looks) like a bad idea.

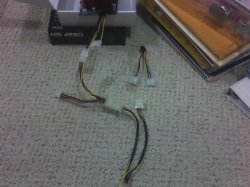
But that was my question; you're recommending I plug both the 6-pin cable into the mo-bo normally, and plug in the 8-pin cable, and then use only one molex split from the 8-pin cable to go up to the optical bay? That would be the second image below (8-pin filled with 8 pin -> 2 molex, and then the 6-pin to molex split not used at all laying off to the right, and 6 pin not filled because i didn't yank out the 6-pin mo-bo cable)... Does that look correct? I sense that the lifespan of this card is not so long in my hands. :eek:
 

Attachments

  • split.jpeg
    split.jpeg
    48.9 KB · Views: 109
  • mime-attachment.jpeg
    mime-attachment.jpeg
    58.8 KB · Views: 99
LOL
Thank you. "What's going on down there" is what is pictured on the left or first below - 2 molex plugs, one from each of the 6-and 8-pin cables, plugged into the first of the 2 molex splitter cables... both ports on that first splitter filled. The second splitter would be used only as an extension to get the one end (at bottom of image) up to the optical bay. It is as ghetto as it looks... and in retrospect sounds (and looks) like a bad idea.

But that was my question; you're recommending I plug both the 6-pin cable into the mo-bo normally, and plug in the 8-pin cable, and then use only one molex split from the 8-pin cable to go up to the optical bay? That would be the second image below (8-pin filled with 8 pin -> 2 molex, and then the 6-pin to molex split not used at all laying off to the right, and 6 pin not filled because i didn't yank out the 6-pin mo-bo cable)... Does that look correct? I sense that the lifespan of this card is not so long in my hands. :eek:

Ah, I see.

Here's what I'd do: take the 6-pin PCIe cable, plug it into the GPU, and plug the other end into the motherboard. Take the 8-pin PCIe to Molex cord, plug it in, then plug the adapter into the cord, and then plug the adapter into the power supply from the optical drive. Only plug one molex cord into the adapter, not two.

Here's a text diagram, as I have nothing better to work with at the moment. :)

GPU - PS1 - 6-pin PCIe - motherboard
PS2 - 8-pin molex - adapter - optical drive bay

If you want photos, I'll find the ones I had where I was using the optical bay for power and upload those. They won't be identical to what you have, but they should give you an idea of what i mean if I'm not explaining clearly.

Okay. Thanks again... no photos needed. I think that's what the 2nd image I posted shows, but I also have the 2nd 1-to-2 split molex cable on the end (at bottom) so it can reach up to the optical bay. That's why there's so many loose plugs: 1 from the 8-pin to 2 molex sticking out of the card, 1 from the first molex splitter connected to that, and then 1 from the second molex splitter at the very bottm. So I'll only use one molex socket now instead of both on the split molex cables.

Hey, if it helps anyone I had a friend put the Apple Mac Pro 1,1 service manual at:
http://public.me.com/djpenn
I'm not sure if it applies to other Mac Pro models (up to the most recent model, maybe) but I can't reach into get the cable unless I take out the front fan assembly. This PDF shows you how to take the entire machine apart. It's encrypted (that should stop the weenies from deleting it). The password is:
c1nd0r1-pe10che-mack11r0y
:D
 
Awesome, thanks for the manual! I tried finding it before but never could. You should plug everything in and then tell us how it goes. You should be good to go. :)
 
I just did this, so let me give you an breakdown :) (you can find my experiences a couple of pages back if you want to look)

1. (I didn't do the injector, as I kept my 8800GT installed, and just used power from the CD drive to run it.
2. with the 4890 unpacked, look under the heatsink to see the memory type. I did not have to take the fan off, I could clearly see the memory type in the gap between.
3. Have 4890 installed in slot 1, and 8800Gt in other slot. boot up with monitor cable on 8800GT
4. Run the ATI flashing tool (which I believe now has the ROMS needed) When I did this I used the 1.0 version of the tool which didn't have any roms. I grabbed them from Peloche's link in his signature.
5. Flash your card. For me I could see another application run, and then I got a beep on the screen. When I clicked on the ATI Flashing tool, the little window stating that the flashing finished popped up. I closed it, and then installed the QE_CI patch from the ATI Flashing Tool. From my understanding the newer version (1.2) of the tool has the correct/working patch.
6. Shutdown your system. Plug the DVI cable into the 4890 and boot the system back up into OSX. (you can leave the 8800 in for now).
7. The gray screen should show up, and there might be some black lines that pop up on the screen before the Apple logo appears. OSX should boot fine. NOTE: you will probably get an error when OSX comes up that you need to plug in the power cable. Don't worry about this, it is normal, just click OK and go on your marry way.

I personally had problems from the QE_CI patch, which caused me to have a bunch of strange graphics issues in OSX. These were all resolved when I installed the correct patch.

Good luck.

K

I just ordered a Sapphire 100269HDMI Radeon 4890 New Edition from Newegg (N82E16814102852). I will be upgrading a 2006 Mac Pro 1,1 from an Apple 8800GT which was an upgrade from the X1900. I already have 2 of the 6-pin cables (One came with the original X1900 and one came with the 8800GT).

As I understand from reading all the post here, what I can do is this:

1. Run the ATI Flashing Tool and install the injector (Natit).
2. Shut down and install the 4890 and remove the 8800GT. Put in the 4890 card and determine what type of memory (Hynix or Qimonda).
3. Attach 6-pin cable to motherboard and plug both cables into 4890 card.
4. Boot OS X and run ATI Flashing Tool.
5. Flash using the appropriate Sapphire 4890 new edition rom.
6. Remove Natit.
7. Install qe_ci package.
8. Reboot.

Am I understanding this correctly? Thanks.
 
Alone?

I was just wondering if anyone else had the same problem as me? Not being able to Flash the 4890 correctly? Again my config:
4890 Sapphire old edition- MacPro 1,1-OSx 10.6.2-
I did severall flashings of the card, and everytime i would get a problem... At boot the Apple logo would be plagued with numerous stripes, and I would not access the desktop, but a blank screen with strange pixels, the OS seems unresponsive.
DSC00063.jpg

I Just dont see why this card would not function when flashed...
 
I just ordered a Sapphire 100269HDMI Radeon 4890 New Edition from Newegg (N82E16814102852). I will be upgrading a 2006 Mac Pro 1,1 from an Apple 8800GT which was an upgrade from the X1900. I already have 2 of the 6-pin cables (One came with the original X1900 and one came with the 8800GT).

As I understand from reading all the post here, what I can do is this:

1. Run the ATI Flashing Tool and install the injector (Natit).
2. Shut down and install the 4890 and remove the 8800GT. Put in the 4890 card and determine what type of memory (Hynix or Qimonda).
3. Attach 6-pin cable to motherboard and plug both cables into 4890 card.
4. Boot OS X and run ATI Flashing Tool.
5. Flash using the appropriate Sapphire 4890 new edition rom.
6. Remove Natit.
7. Install qe_ci package.
8. Reboot.

Am I understanding this correctly? Thanks.

natit only applies to ppl with ati cards. re-read the original post of this thread.
 
As i remember you flashed your card with wrong rom (New Edition Hynix).
Try to flash again with appropriate rom (you can find it in Cindoris tool).

Thanks for the advice, i flashed 1st the Quimonda new edition, then the regular normal 4890 sapphire (macised), still not have tried the Hynix... But these are the only three Roms for my Brand of 4890 Sapphire, so apart from trying the Hynix, that's pretty much everything in store!
 
Hey, if it helps anyone I had a friend put the Apple Mac Pro 1,1 service manual at:
http://public.me.com/djpenn
I'm not sure if it applies to other Mac Pro models (up to the most recent model, maybe) but I can't reach into get the cable unless I take out the front fan assembly. This PDF shows you how to take the entire machine apart. It's encrypted (that should stop the weenies from deleting it). The password is:
c1nd0r1-pe10che-mack11r0y
:D
Thanks to you cryptoseven and to your friend for this very useful service manuel.
Peloche,
 
something not working quite right?

I really hope someone is around that I can pick their brain. :)

*crosses fingers for Cindori*

I have the XFX 4890, and I've done everything according to the how-to with the new flashing utility.

I get to the step where I install the injector, choosing the 4890:XFX option, and get a successful message. Then I shut down, remove my X1900xt, and put in the 4890. When I power back up, everything SOUNDS right, but I get nothing on the displays. (blank screens)

Am I supposed to do something and have missed it? Currently, I've put the X1900xt back in the machine and hope someone out there knows what I can do.

Thanks so much,

Josh

edit: link to a photo of the XFX 4890 card
http://i18.photobucket.com/albums/b147/jdhorner/xfx.jpg
 
that is a new model, as you can see from the card table it does not match anything from the Injector list.

dump your rom with GPU-Z in windows and upload
 
Thanks for the advice, i flashed 1st the Quimonda new edition, then the regular normal 4890 sapphire (macised), still not have tried the Hynix... But these are the only three Roms for my Brand of 4890 Sapphire, so apart from trying the Hynix, that's pretty much everything in store!

did your card have one 6pin and one 8pin power slot?
 
yes that is what I meant

OK. My apologies. I've never done something like this before, and just wanted to make sure that I didn't waste anyone's time. :D

That being said, I wasn't sure if Boot Camp would suffice, but now that I know it will, it will be the first thing I do when I get home tonight, which will be in about 9 hours.
 
Just a quick update.

Just a quick update on my Sapphire Vapor-X OC 4890.

After about several days of leaving my MacPro on (I usually just leave it on instead of turning it on and off when I leave for work and come back)
I have yet to experience any types of problems, I did pick up a DisplayPort to HDMI adapter for my LCD HDTV and it worked great. I thought I just let you all know. =)
 
Oh Noes Problems

I got in the Sapphire New Edition card today. It has Hynix Memory.
Mac Pro is 2006 1,1

Sapphire Radeon HD 4890
PN: 288-1E115-D20SA
SKU: 11150-11-20R

I turned on screen sharing and took out the 8800GT and put in the 4890. Power is through the 2 6-pin cables to the mother board. Connected from MBP and flashed using the Hynix rom. Rebooted and monitor stays in power save. Connected remotely again and tried booting into Windows 7. Was able to boot into Windows and works great.

Realized that I did not install the qe_ci patch, so rebooted back into OS X and remoted back into it. Installed qe_ci and rebooted and now computer does not boot :( Never seems to boot into OS X.

What are my options now?
 
I put the 8800 back in and was able to get back into OS X. Do I need to reinstall 10.6.2 Update?
 
Register on MacRumors! This sidebar will go away, and you'll see fewer ads.