Become a MacRumors Supporter for $50/year with no ads, ability to filter front page stories, and private forums.

-MB-

macrumors member
Oct 6, 2015
61
17
You haven't said much about what your El Capitan system is doing
Are there processes running in El Capitan that causes, or contributes to your high CPU temps?
Can you monitor your Activity Monitor, particularly the CPU tab?
Hi!

Nothing at all. CPUs are idle at 0,7% (more or less) on any of those OSes. Older MacOS (10.6 to 10.9) keep the CPUs under 50ºC while 10.11 put them over 90ºC, same Xeon 5300 8-core CPUs. Just logged-in on macOS, no CPU use at all, computer offline too, but temperatures keep rising

Back to Xeon 5100 4-core CPUs Temps over 80ºC, again no CPU use, just logged-in on macOS. If I can't lower the temps with these 'original' CPUs I just have two options, use another OS or trash the computer o_O
 

DeltaMac

macrumors G5
Jul 30, 2003
13,769
4,592
Delaware
I forgot to ask: In Activity Monitor, are you showing "All Processes", and not just "My Processes"?
That's a setting that you can change in the Activity Monitor menus.

If the only difference is the OS, the CPU temps have to be coming from somewhere, and All Processes should be showing something. Did you also check in the Memory tab?
 

-MB-

macrumors member
Oct 6, 2015
61
17
Hi!

Thanks. I always use the "All Processes" option. There is no process using over 1,0% of CPU, only "Activity Monitor" itself peaks sometimes at 4%

The Mac Pro CPUs temps are still 20ºC higher that those seem on Mavericks without CPU use at all.
 

-MB-

macrumors member
Oct 6, 2015
61
17
3,3GB RAM used under Mavericks and 3,1GB used under El Capitan (32GB installed)
 

-MB-

macrumors member
Oct 6, 2015
61
17
Hi!

It can't be Spotlight. It is doing nothing, sorry. I only allow to index Applications and Library folder. Other folders or disk are not available to him.

As after log-in 99% of CPU are idle and temps rise I went back to
install Mavericks (fast!), which doesn't show this problem
Solus linux (latest, faaast!)
and win10 (updated to latest) so much sloooower than the 2016 version,:oops: whataf**joke :rolleyes:

-edited spelling-
 

MJK2017

macrumors newbie
Mar 23, 2017
5
0
Hello all in this forum, Have mac 1,1 and followed how to install El Capitan, did it a few years ago
and it has been working fine, and never did the security updates as recommended . The boot drive
is running out of space and was wondering if it is ok to clone the start up boot drive that has been altered
to run El Cap on Mac 1,1 to a new Hard drive with more space ie SSD with 2 tb. / is there a special
procedure necessary or can I just clone the entire drive to a new drive. Thanks.
 

juanxer

macrumors newbie
Aug 7, 2017
10
1
Spain
I think I used to do that in my old MP 1.1 via Carbon Copy Cloner (the old, free version compatible with El Capitan might still be around), using default settings for such a thing, nothing special.

You could try testing it by doing a complete or partial clone to some other drive (SSD or mechanical, there should be no difference).

The only thing that might be advisable is to format the destination SSD in a more modern macOS (applying the journaled HFS+ format as usual) just in case there is some extra nuance to it (I seem to remember reading about SSDs' optimal "sector alignment" details that weren't taken into account in the Snow Leopard era, and I'm not sure they were catered to in El Capitan's Disk Utility app).
 
Last edited:

Larsvonhier

macrumors 68000
Aug 21, 2016
1,611
2,983
Germany, Black Forest
Hello all in this forum, Have mac 1,1 and followed how to install El Capitan, did it a few years ago
and it has been working fine, and never did the security updates as recommended . The boot drive
is running out of space and was wondering if it is ok to clone the start up boot drive that has been altered
to run El Cap on Mac 1,1 to a new Hard drive with more space ie SSD with 2 tb. / is there a special
procedure necessary or can I just clone the entire drive to a new drive. Thanks.
I did this a couple of times (not to get more space on a bigger drive but to have bootable backups).
Carbon Copy Cloner does a good job, but applies some "boot capability magic" after the actual cloning, i.e. it seems to copy some kernel replacements from heaven knows where and overwrites the patches needed for the cMP1,1/2.1
So after running the clone job with CCC, what usually helps is to let Disk Utility find/fix errors (there´s some phase where it updates the boot helper partition). You might also use Kext Wizard or some other tool to re-build the kernel caches.
As long as you still have the bootable source drive, you can redo everything until the clone also boots fine.
Once figured out the right steps and sequence, it´s not a big deal...
 

MJK2017

macrumors newbie
Mar 23, 2017
5
0
I did this a couple of times (not to get more space on a bigger drive but to have bootable backups).
Carbon Copy Cloner does a good job, but applies some "boot capability magic" after the actual cloning, i.e. it seems to copy some kernel replacements from heaven knows where and overwrites the patches needed for the cMP1,1/2.1
So after running the clone job with CCC, what usually helps is to let Disk Utility find/fix errors (there´s some phase where it updates the boot helper partition). You might also use Kext Wizard or some other tool to re-build the kernel caches.
As long as you still have the bootable source drive, you can redo everything until the clone also boots fine.
Once figured out the right steps and sequence, it´s not a big deal...
Thanks for response will try CCC what did you use version 5 or 4.1.24
 

joevt

macrumors 604
Jun 21, 2012
6,974
4,262
I use Disk Utility's Restore option. Select the destination partition, click Restore. Select the source partition and go.
 
Last edited:
  • Like
Reactions: VaZ

EugW

macrumors G5
Jun 18, 2017
14,984
12,950
Anyone having problems with browsers seeing bad certificates? See here?


Mystere65

macrumors member
Nov 2, 2015
79
49
Firenze (Italy)
Anyone having problems with browsers seeing bad certificates? See here?


It works!
 

Attachments

  • isrgrootx1.pem.zip
    2.2 KB · Views: 167

EugW

macrumors G5
Jun 18, 2017
14,984
12,950
It works!
Thanks. I posted in the other thread it was "solved" for me by forcing Keychain Access to always trust that certificate. (I already had it on my system BTW.) I'm not sure how unsafe that is though.
 

EugW

macrumors G5
Jun 18, 2017
14,984
12,950
I don't understand any of this. Could you explain what to do like I'm 5?
 

rthpjm

macrumors 6502a
Jan 31, 2011
720
309
U.K.
I don't understand any of this. Could you explain what to do like I'm 5?
I’ve got some time to kill, so here goes… ;) This is probably going to be a massive oversimplification…

Certificates are used for a bunch of different purposes, but fundamentally they are used to perform security-by-encryption.

Certificates effectively are made up of two parts. A private key, and a public key. The “owner” of a certificate receives both parts. The owner will use the private key to encrypt data before it is sent to the “consumer”. The consumer will receive the encrypted data and will need the public key to decrypt it.

The unwritten assumption here is that the consumer(s) all have a copy of that public key, or that any given certificate can be validated. This introduces the concept of a hierarchy of certificate signing.

Certificate signing can be visualised as a “pyramid of trust”. At the apex of the pyramid are a small number of Root Certificate Authorities (RCAs). These RCAs are “trusted” companies who own a ROOT CERTIFICATE. You may have heard of some of these companies (such as Verisign, DigiCert, and many others…). These RCAs will have a root certificate and typically a number of INTERMEDIATE certificates. The pyramid starts to build because the intermediate certificates are SIGNED by the root certificate. This signing establishes a CHAIN OF TRUST, it “proves” that the intermediate certificate is trusted by the root certificate.

Commercially, any company or end user can request their own certificate(s) by applying to one of the RCAs. The application process is typically called a CERTIFICATE SIGNING REQUEST (CSR). The RCA will typically validate your request. For example, if you are a company requesting a certificate for your web server, the RCA should run domain checks, and company registration checks, along with other checks in order to validate that your are who you claim to be. Once they are satisfied, then they will issue you a certificate signed by one of their intermediate certificates.

The chain of trust is now: your certificate … the RCA’s intermediate certificate … the RCA’s root certificate.

It all hinges on trust. You trust the RCA to be stable, and they implicitly trust your application (you are who you say you are, and that you will use your certificate for the purpose your requested).

For day-to-day usage, the most common use is for your company to encrypt your web site data using secure HTTP (HTTPS). You use your private key to encrypt, and part of the secure handshake exchanges the public key with your visitors. From the perspective of the web browser, the public key is received from the server, and then the web browser (MS Edge, Mozilla Firefox, Apple Safari, etc…) will VALIDATE the certificate it received by checking the chain of trust, something like:

The received cert is signed by well known RCA intermediate certificate.
Check that the intermediate certificate is still valid.
Assuming “valid”, the intermediate certificate is signed by the root certificate.
Check that the root certificate is valid.

So long as those checks are all okay, then the chain is trusted, and the browser will use the certificate to encrypt/decrypt the data between the web browser and the web server.

In order to perform these checks quickly and efficiently most operating systems ship with copies of the root certificates and their intermediate certificates. Having said that, all certificates have an expiry date. Therefore there must be a mechanism for updating those shipped certificates.

Apple uses the “Keychain” to hold those copies of trusted certificates. There is a Keychain Assistant app in Applications:Utilities.

When a shipped certificate is about to expire, a new version of the certificate will be “ready” to replace it. By convention, the operating system vendors will use their software update mechanisms to update the new/replacement certificates. However, when an operating system drops out of support, your machine will no longer be getting certificate updates. At some point one or more of the certificate copies on your machine will expire. That’s when you will notice the “unable to connect” errors when you’re browsing the WWW.

You can accept the loss, or upgrade your OS (if possible), or buy a newer computer that has a later supported OS, or you can manually try to sort it out by downloading the revised root/intermediate certificate and install it to the correct place.

For Mac OS, that means using the Keychain Assistant app. There are two steps:
  1. Install the certificate
  2. Trust the certificate
The other members have linked to articles where some of them link to how-to do these steps.

(I’ve deliberately ignored the whole revocation of certificates, this is where the certificate issuer can revoke a certificate if the certificate is compromised, or the business has gone out of business, etc…)

In layman’s terms, certificate validation is a simple chain of trust. For HTTPS connections, your web browser will check that the certificate it received from the web server is valid. Typically there two or three (or occasionally more) links in that chain. All the certificates in the chain must be valid before your web browser will fetch data from the web server.
 

pedro21

macrumors newbie
Oct 10, 2021
1
0
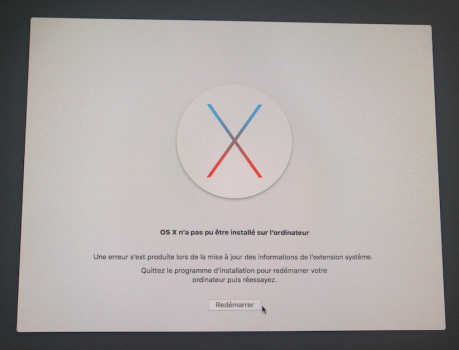
hello thank you for your article, I have a mac pro 2007 I tried to install it with pikiyfiy v 14, all works fine until the last steps to complete the installation remains 2 min in the progress bar. it displays an error message indicating: that an error occurred while updating the information of the system extension. on the other hand I initialized the PRAM and the date 01/01/2018, help me find a solution and thank you in advance
 

Attachments

  • Capture d’écran 2021-10-10 à 14.35.52.png
    Capture d’écran 2021-10-10 à 14.35.52.png
    1,006.6 KB · Views: 148

rthpjm

macrumors 6502a
Jan 31, 2011
720
309
U.K.
hello thank you for your article, I have a mac pro 2007 I tried to install it with pikiyfiy v 14, all works fine until the last steps to complete the installation remains 2 min in the progress bar. it displays an error message indicating: that an error occurred while updating the information of the system extension. on the other hand I initialized the PRAM and the date 01/01/2018, help me find a solution and thank you in advance
Hello pedro21,

Do you have a minimum of 12GB of RAM installed in your machine? Because the install process uses RAM-disks, if you have less than 11GB of RAM then there will not be enough RAM-disk space to unpack one of the large installation files.

Ensure that you have 12GB or more of RAM installed and properly detected by your current OS before you proceed.

if you do have a minimum of 12GB of RAM, then I have seen a similar issue on rare occasions. I have never figured out what the cause is. However, I have found that you can install if you reformat the destination drive before you try again.

Clearly, if the destination drive has data on it, then you must make a BACKUP first.
When you format the drive, ensure that you select HFS+ As the format, with GPT for the partition type.

Secondly, you can download an updated version of Apple’s installer (Install Mac OS X El Capitan) directly from Apple’s servers. There is a link to a knowledge base article at the top of post #1390. This article has a link to a page, from here you can download a fresh copy of the installer. Run the Pikify tools using this new version of the installer placed in your Applications folder. Finally try to install. With this fresh copy of the installer, there is no need to set the system date backward!

NOTE: this updated Apple installer is initially delivered as a package file. You will ”install” the package file. The result is a new copy of the “Install OS X El Capitan” app located in your Applications folder.

  1. Build a new version of the Pikified installer onto your USB a stick (using the updated copy of Apple’s installer as the source)
  2. Eject your USB stick, then unplug it.
  3. Re-attach your USB stick.
  4. Reboot.
  5. Clear the PRAM: hold CMD, ALT, P, and R immediately after you hear the first boot chime. Keep holding the keys until you hear a second chime then let go. Immediately hold the ALT key again to enter the boot picker.
  6. From the boot picker, choose the installer from the USB stick.
Good luck…


###########

Bonjour pedro21,

Avez-vous un minimum de 12 Go de RAM installé sur votre machine ? Comme le processus d'installation utilise des disques RAM, si vous avez moins de 11 Go de RAM, il n'y aura pas assez d'espace disque RAM pour décompresser l'un des gros fichiers d'installation.

Assurez-vous que 12 Go ou plus de RAM sont installés et correctement détectés par votre système d'exploitation actuel avant de continuer.

Si vous avez un minimum de 12 Go de RAM, j'ai vu un problème similaire en de rares occasions. Je n'ai jamais compris quelle en est la cause. Cependant, j'ai constaté que vous pouvez installer si vous reformatez le lecteur de destination avant de réessayer.

De toute évidence, si le lecteur de destination contient des données, vous devez d'abord effectuer une SAUVEGARDE.

Lorsque vous formatez le lecteur, assurez-vous de sélectionner HFS+ comme format, avec GPT pour le type de partition.

Deuxièmement, vous pouvez télécharger une version mise à jour du programme d'installation d'Apple (Install Mac OS X El Capitan) directement à partir des serveurs d'Apple. Il y a un lien vers un article de la base de connaissances en haut du post #1390. Cet article contient un lien vers une page, à partir de là, vous pouvez télécharger une nouvelle copie de l'installateur. Exécutez les outils Pikify à l'aide de cette nouvelle version du programme d'installation placée dans votre dossier Applications. Enfin, essayez d'installer. Avec cette nouvelle copie de l'installateur, il n'est pas nécessaire de régler la date du système à l'envers !

REMARQUE : ce programme d'installation Apple mis à jour est initialement livré sous forme de fichier d'emballage. Vous allez « installer » le fichier du paquet. Le résultat est une nouvelle copie de l'application "Installer OS X El Capitan" située dans votre dossier Applications.

  1. Créez une nouvelle version du programme d'installation Pikified sur votre clé USB (en utilisant la copie mise à jour du programme d'installation d'Apple comme source)
  2. Éjectez votre clé USB, puis débranchez-la.
  3. Rebranchez votre clé USB.
  4. Redémarrez.
  5. Effacez le PRAM : maintenez CMD, ALT, P et R immédiatement après avoir entendu le premier carillon de démarrage. Continuez à tenir les touches jusqu'à ce que vous entendiez un deuxième carillon, puis laissez-les aller. Maintenez immédiatement la touche ALT enfoncée à nouveau pour entrer dans le sélecteur de démarrage.
  6. Dans le sélecteur de démarrage, choisissez le programme d'installation dans la clé USB.

Bonne chance...
 
Last edited:
  • Like
Reactions: flygbuss and EugW

DannyTenor

macrumors newbie
Apr 8, 2021
3
0
Spain
Hello again, my Mac Pro 1.1 updated to 2.1 with new quad core Intel Xeon 3.0ghz processors and new graphics card gives me problems, it has been working very well for quite some time until recently, it seems to be that it is from the graphics, it is an ATI Radeon HD 5770, my problem is that yesterday while I was working with the computer it suddenly turned off and the fans were put on full blast, I turned off and when starting again the graphics fan goes to full power and does not start the screen, no beep sounds boot and the white light of power.
I have changed the graph and I have put the one that came from origin and everything seems to be going well but the screen still does not start.
I have changed the slot of the ATI Radeon HD 5770 graphics and the fan is still at full throttle and nothing to start the screen, I have checked the connectors and that the graphics is well placed in the slot, I have changed the battery of the motherboard for a new one and nothing, and I have also reset SMC from both the motherboard and the power loot and plug, and nothing at all, and I have even tried another fel power cord that goes to the wall.
Does anyone know what it could be? It could be the power supply that, since it has never been changed, does not give enough voltage to the graph? The power cable of the graph seems to be in good condition.
I hope you can help me, thank you very much, greetings.
 

Larsvonhier

macrumors 68000
Aug 21, 2016
1,611
2,983
Germany, Black Forest
Hello again, my Mac Pro 1.1 updated to 2.1 with new quad core Intel Xeon 3.0ghz processors and new graphics card gives me problems, it has been working very well for quite some time until recently, it seems to be that it is from the graphics, it is an ATI Radeon HD 5770, my problem is that yesterday while I was working with the computer it suddenly turned off and the fans were put on full blast, I turned off and when starting again the graphics fan goes to full power and does not start the screen, no beep sounds boot and the white light of power.
I have changed the graph and I have put the one that came from origin and everything seems to be going well but the screen still does not start.
I have changed the slot of the ATI Radeon HD 5770 graphics and the fan is still at full throttle and nothing to start the screen, I have checked the connectors and that the graphics is well placed in the slot, I have changed the battery of the motherboard for a new one and nothing, and I have also reset SMC from both the motherboard and the power loot and plug, and nothing at all, and I have even tried another fel power cord that goes to the wall.
Does anyone know what it could be? It could be the power supply that, since it has never been changed, does not give enough voltage to the graph? The power cable of the graph seems to be in good condition.
I hope you can help me, thank you very much, greetings.
Seems that the 5770 reached its end of life (thermal problem resulting in excessive current pull most likely). But make sure the one or two power supply cables from mainboard to GPU card are plugged in correctly. If card needs two, one will not suffice!
The "original" card presumably was a GT120 or even "worse", a 7300GT?
Here (again just most likely) it might be that Snow Leo or Lion would have the kexts necessary (32bit ?) for displaying stuff on them, but (patched) El Cap does not. My step by step solution I´d try would be to see if system boots ok with no card or (wrong old) card so far as system sounds on login are audible (volume up/down) and keyboard works (eject button should open optical drive bay).
From that check on, I´d add some suitable PC GPU card and see if after (dark) booting the login screen comes up!
If that´s the case, either live with bootscreen-less system or get a patched card or a mac-native one...
 

DCBassman

macrumors 6502a
Oct 28, 2021
774
597
West Devon, UK
Hello one and all, my very belated turn at El Capitan on a 2,1.
Using @rthpjm Pikify video, all is well until just after the screen colour selection. As it is messing with the InstallESD, it says:

"ERROR
A problem occurred when opening the InstallESD disk image file as read/write.
This is very odd and does not usually happen.
The "Install OS X El Capitan" application in your Application folder may be damaged.
You may need to download a fresh copy from Apple..."

The first thought was the date, so changed that to an appropriate date. Nope, Different date. Nope.
OK, download again.
Now, I'm wondering if the error is being caused by my needing to extract the "Install OS X El Capitan" app from the .pkg file that is produced on running the .dmg file from Apple. I'm using Pacifist for this.
If this is indeed the source of the error, how to work around? I can't seem to get the app extracted any way from within Lion.
Your input much appreciated!
 

DannyTenor

macrumors newbie
Apr 8, 2021
3
0
Spain
Seems that the 5770 reached its end of life (thermal problem resulting in excessive current pull most likely). But make sure the one or two power supply cables from mainboard to GPU card are plugged in correctly. If card needs two, one will not suffice!
The "original" card presumably was a GT120 or even "worse", a 7300GT?
Here (again just most likely) it might be that Snow Leo or Lion would have the kexts necessary (32bit ?) for displaying stuff on them, but (patched) El Cap does not. My step by step solution I´d try would be to see if system boots ok with no card or (wrong old) card so far as system sounds on login are audible (volume up/down) and keyboard works (eject button should open optical drive bay).
From that check on, I´d add some suitable PC GPU card and see if after (dark) booting the login screen comes up!
If that´s the case, either live with bootscreen-less system or get a patched card or a mac-native one...
Hello again, my Mac Pro 1.1 updated to 2.1 with new quad core Intel Xeon 3.0ghz processors and new graphics card gives me problems, it has been working very well for quite some time until recently, it seems to be that it is from the graphics, it is an ATI Radeon HD 5770, my problem is that yesterday while I was working with the computer it suddenly turned off and the fans were put on full blast, I turned off and when starting again the graphics fan goes to full power and does not start the screen, no beep sounds boot and the white light of power.
I have changed the graph and I have put the one that came from origin and everything seems to be going well but the screen still does not start.
I have changed the slot of the ATI Radeon HD 5770 graphics and the fan is still at full throttle and nothing to start the screen, I have checked the connectors and that the graphics is well placed in the slot, I have changed the battery of the motherboard for a new one and nothing, and I have also reset SMC from both the motherboard and the power loot and plug, and nothing at all, and I have even tried another fel power cord that goes to the wall.
Does anyone know what it could be? It could be the power supply that, since it has never been changed, does not give enough voltage to the graph? The power cable of the graph seems to be in good condition.
I hope you can help me, thank you very much, greetings.
Thanks for the reply, the problem are the memory ram, the module riser B is damage.
I have changed the riser tray for a reconditioned one and everything is perfect.
 
Register on MacRumors! This sidebar will go away, and you'll see fewer ads.